Personalizing messages using Attributes
Attributes are metadata used for audience segmentation and personalization. You can use Attributes in a message body to personalize content for each user.
For example, if you were sending a birthday message to your audience, you could target the audience using an AttributeMetadata used for audience segmentation and personalization. They extend the concept of Tags by adding comparison operators and values to determine whether or not to target a user, helping you better evaluate your audience. for a specific date and also use relevant Attributes within the body of the message to personalize based on an individual’s specific age, location, etc.
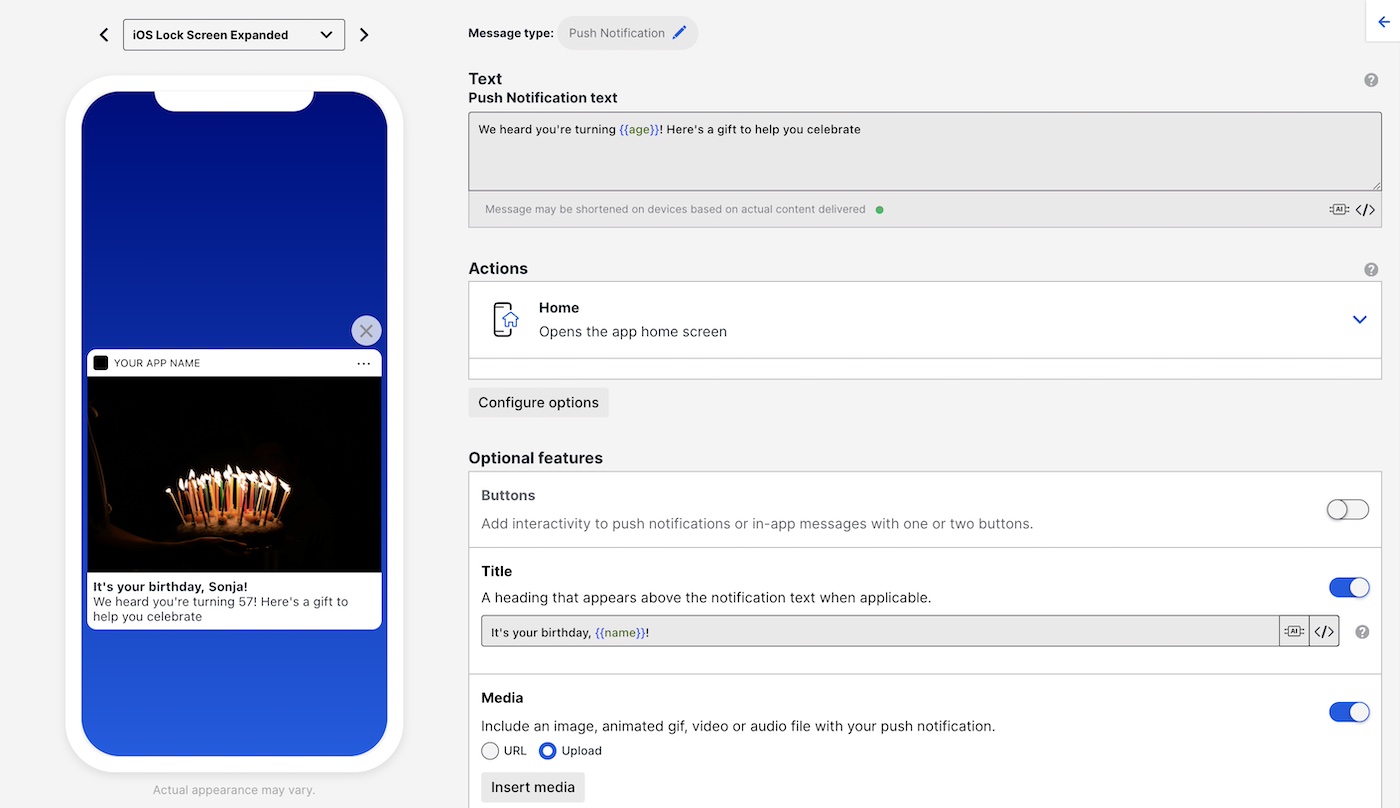
The image below shows a push notification with title It's your birthday, {{name}}! and text We heard you're turning {{age}}! Here's a gift to help you celebrate. Using preview data, you can populate the message preview to see how it will appear to your users.

Since Attributes can represent different kinds of values make sure you know the format of your Attributes before using them in a message or template. See Attribute types in About Attributes.
Personalizing content with JSON Attributes
JSON Attributes are provided as an object with keys corresponding to instance IDs each with a value of the associated instance. To use JSON Attributes in personalization, you can either reference a specific instance by ID or loop through the instances using the #each operator. See the Looping through objects and arrays guide.
Let’s look at an example. This is a JSON schema for an Attribute with ID players:
{
  name: string
  cool_factor: number
  is_cool: boolean
  inventory: [
    {
      name: string
      age: number
      enchanted: boolean
      custom_name: string
      magic_properties: [
        {
          id: string
          bonus: number
        }
      ]
    }
  ]
}
An example of a JSON Attribute using the above schema and having two saved instances might look like this:
{
    "player1": {
        "name":"Ganthur",
        "cool_factor":7,
        "is_cool":true,
        "inventory":[
            {
                "name":"Broadsword",
                "age":177,
                "enchanted":true,
                "custom_name":"Matilda",
                "magic_properties":[
                    {
                        "id":"flaming",
                        "bonus":20
                    }
                ]
            }
        ]
    },
    "player2": {
        "name":"Balfor",
        "cool_factor":1,
        "is_cool":false,
        "inventory":[
            {
                "name":"Mighty axe",
                "age":23,
                "enchanted":false,
                "custom_name":"Brunhild",
                "magic_properties":[
                    {
                        "id":"indestructable",
                        "bonus":4
                    }
                ]
            }
        ]
    }
}
You can use the this expression to refer to the current item in the loop and @index for the zero-index number of the item. In this example we will create a numbered list of player names and increment the @index operator by one using the add helper so the list starts with 1:
{{#each players}}
  {{add @index 1}} - {{this.name}}
{{/each}}
You can use the as |name| syntax to make your loop more readable. Let’s add each player’s list of inventory names to our example:
{{#each players as |player|}}
  {{add @index 1}} - {{player.name}}. Inventory:
  {{#each player.inventory as |item|}}
    {{item.name}}
  {{/each}}
{{/each}}
Add an if conditional statement to display a message only for players with a sword in their inventory that has the flaming magic property and display its custom name:
{{#each players as |player|}}
  {{#each player.inventory as |item|}}
    {{#if (eq item.name "sword")}}
      {{#each item.magic_properties as |property|}}
        {{#if (eq property.id "flaming")}}
          Congrats on your flaming sword "{{item.custom_name}}"
        {{/if}}
      {{/each}}
    {{/if}}
  {{/each}}
{{/each}}
You can also refer to a specific instance of the JSON Attribute using its instance ID. For example, {{players.player1}}.
Categories
