Message Center content
Create messages for your Message Center inbox.
About Message Center
Message Center is both a place in your app where you can display persistent rich messages, including HTML, video, etc., and a message type. Similar to email, Message Center represents both the medium (the in-app inbox) and the message type (the messages you send to the inbox). In reporting and other areas of Airship, a Message Center message may be referred to as a rich page.

Reach opted-out users — Message Center messages are not push notifications, but you can use push notifications to alert users that new rich content is available. Because Message Center messages do not require a user to opt in to push notifications, you can reach your opted-out audience with Message Center.
More opportunities to engage — When users interact with Message Center, e.g., read, delete, tap a button, Airship tracks the interactions and makes them available via our analytics offerings, Real-Time Data StreamingA service that delivers engagement events in real time via the Data Streaming API or an Airship partner integration. and Performance AnalyticsA customizable marketing intelligence tool that provides access to reports and graphs based on engagement data..
By providing engaging content and facilitating interactions via Message Center, you can also trigger other ActionsA configurable behavior that occurs when a user interacts with your message, e.g., opening a web page. such as adding a tag, or triggering a follow-up notification.
Theming — Change your Message Center colors, fonts, backgrounds, and icons to match your branding.
Airship hosting — Your message content is hosted by Airship.
More benefits:
- Persistent inbox
- Customized per user, according to how you target individual users
- Tracking of message state per user: Read, unread, deleted, etc.
- Customize UI, or use out-of-the-box
- Data/Reporting
- JavaScript Bridge
You can combine a Message Center message with a Push NotificationA message that can appear on any screen on a mobile device. Push notifications appear as banners. and/or In-App MessageA message that appears inside of your app. You can send in-app messages to your entire app audience, not just users who have opted-in to push notifications. The standard format, as opposed to In-App Automation, is a banner that slides downward or upward from the top or bottom of a device screen. message.
When combining a push notification and Message Center, Airship sends the Message Center message to both opted-in and opted-out devices.
Implement the Message Center via the Airship SDK.
Appearance and behavior

Message Center messages are fullscreen, with navigation back to the inbox at the top of the screen. The messages are accessed from the Message Center inbox in your app, and you can configure a push notification or in-app message to open a Message Center message.
- Inboxes are limited to 250 messages. Exceeding the limit deletes the oldest messages first.
- Messages remain in the inbox until expired or deleted.
- Messages expire after 1 year or per message expiration setting.
To create the message content, you can either upload your own HTML or design using our WYSIWYG editor. Airship supplies several default layouts, and you can save the layouts you create.
Inbox preview — The inbox supports a message preview of a thumbnail image and 1 or 2 lines of text
Expiration and you can specify an expiration date, when the message is removed from the inbox.
Custom templates — Airship can create and add custom message templates for you. Contact your Airship account manager if you are interested in adding custom templates to your project.
Theming your Message Center requires changes to the configuration file in your iOS or Android/Fire OS project. See: Styling the iOS Message Center and Styling the Android Message Center.
Android app reinstallation
Message Center inboxes are associated with channel IDs. On Android, reinstalling an app creates a new channel ID. Messages previously available in an Android user’s inbox will no longer be available after app reinstall.
Hosting and page size
Content is hosted in a CDN , ensuring responsive load times for your users globally. Hosted content — including embedded CSS, images and JavaScript — is limited to 1.5 MB, however the ideal page size is much smaller, given the potential for degraded download speeds on cellular networks. We recommend that you optimize your images and HTML to keep total page sizes under 100 KB.
If you have additional assets to load, you can host them in another location and link to them. Airship offers additional asset hosting options as a Professional Service. Contact Airship Sales for more information.
Choosing an editor
The first step in adding content to a landing page or Message Center message is choosing an editor.
Use the Interactive editor to do any of the following:
- Paste or upload your own HTML.
- Design using the WYSIWYG option. You can start from a blank layout or select an Airship default layout or a layout you saved. The WYSIWYG editor supports Merge FieldsA variable in your message or template that you want to populate with a personalized value for each member of the audience. Merge fields use Handlebars syntax —
{{merge_field}}., so you can personalize your message for your audience.
After selecting Interactive Editor, you also have the option to select a TemplateReusable message content. Templates support personalization using merge fields and other logic..
Use the Visual editor to do any of the following:
- Upload your own HTML.
- Select a legacy custom or default template. This editor has fewer default templates than the Interactive editor and with simple layouts.
- Design using our legacy editor, which has fewer design features than the Interactive editor.
Video
- You can enter a URL for video content in the Interactive and Visual editors, but the Interactive editor accepts YouTube URLs only.
HTML
- Uploaded HTML is single-use. It is not saved in your project for reuse on other messages.
- You cannot edit uploaded HTML. We recommend sending a test message before you send to your live audience.
- See: Custom HTML Templates for Rich Pages.
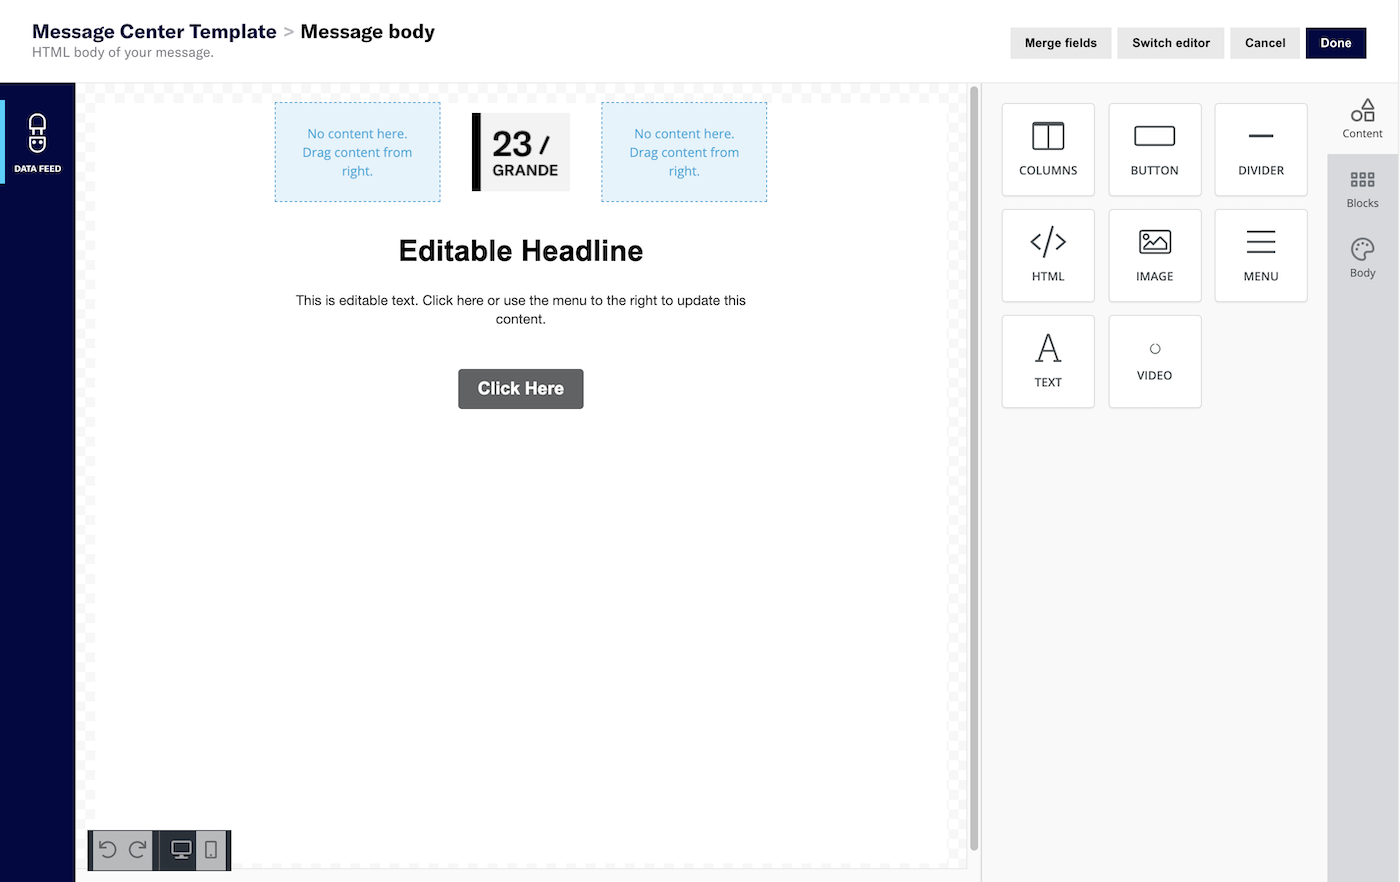
Creating content: Interactive editor
You configure the appearance of the message in the Content step of a composer; in the Delivery step you can configure content-related features that do not affect the appearance of the message.
In the Content step, click Message Center then Add content:
Then click Interactive editor » Add content » Edit. Now you can configure the message content:
If your message includes HandlebarsHandlebars is Airship’s templating language for personalization. Handlebars expressions use double curly braces wrapped around a content template, ranging from a simple variable, e.g., {{first_name}}, to complex evaluations of personalization data., you can enable Preview Data to test how they will appear. See: Previewing personalized content.
Add a Title.
- Click Add .
- Enter a title.
- Click Done.
Add the Message body.
- Click Add .
- For HTML, select the paste or upload option and add your HTML.
- For the WYSIWYG editor, first select a default or saved layout, or select Blank Layout to design your own. You can edit any layout after selecting. Then design your message. See: WYSIWYG editor.
- Click Done.
- Click Add .
Click Done to exit the editor.
Now you are ready to complete the remaining steps in the composer.
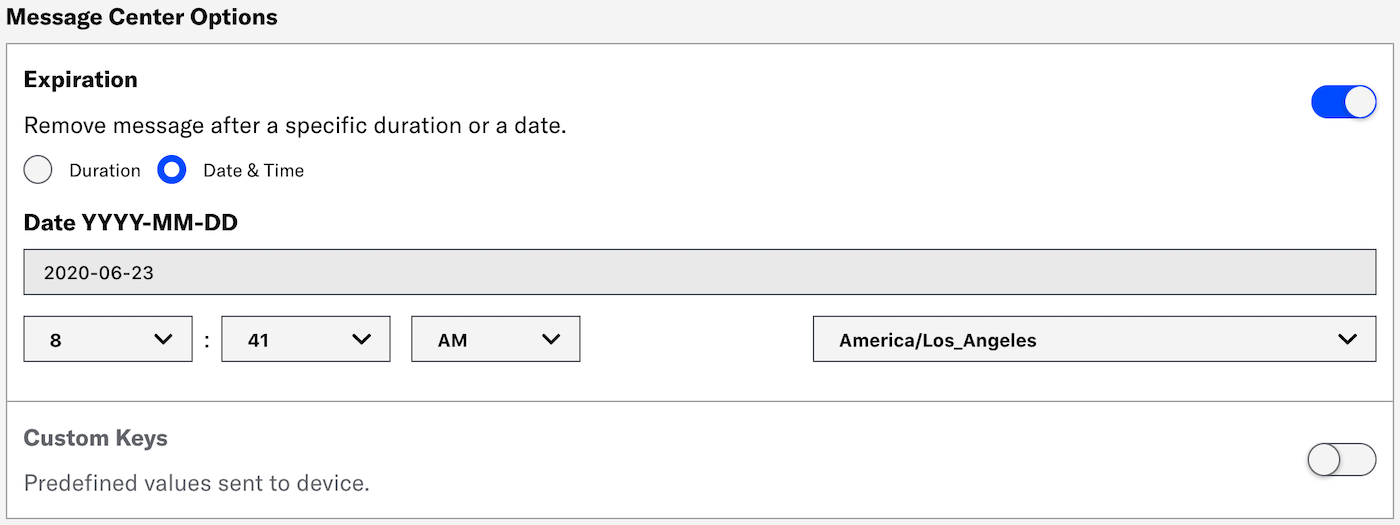
Set expiration
The Expiration for Message Center removes the message from users’ inboxes. This may be helpful if the message represents a coupon, sale, or specific event and needs to expire on a specific date and time, or after a period of time has elapsed (duration).
If you created your Message Center message using the Visual editor, you can specify a duration on the editor’s Options tab. Creating content: Visual editor.
For Message Center messages created with the Interactive editor (or created using a template that was created using the Interactive editor), set expiration in the Message Center Options section in a composer’s Delivery step. Select one of:
- Duration: Enter the number of minutes, hours, or days past your defined send time to remove the message.
- Date & Time: Select the date, time, and time zone when the message should be removed.
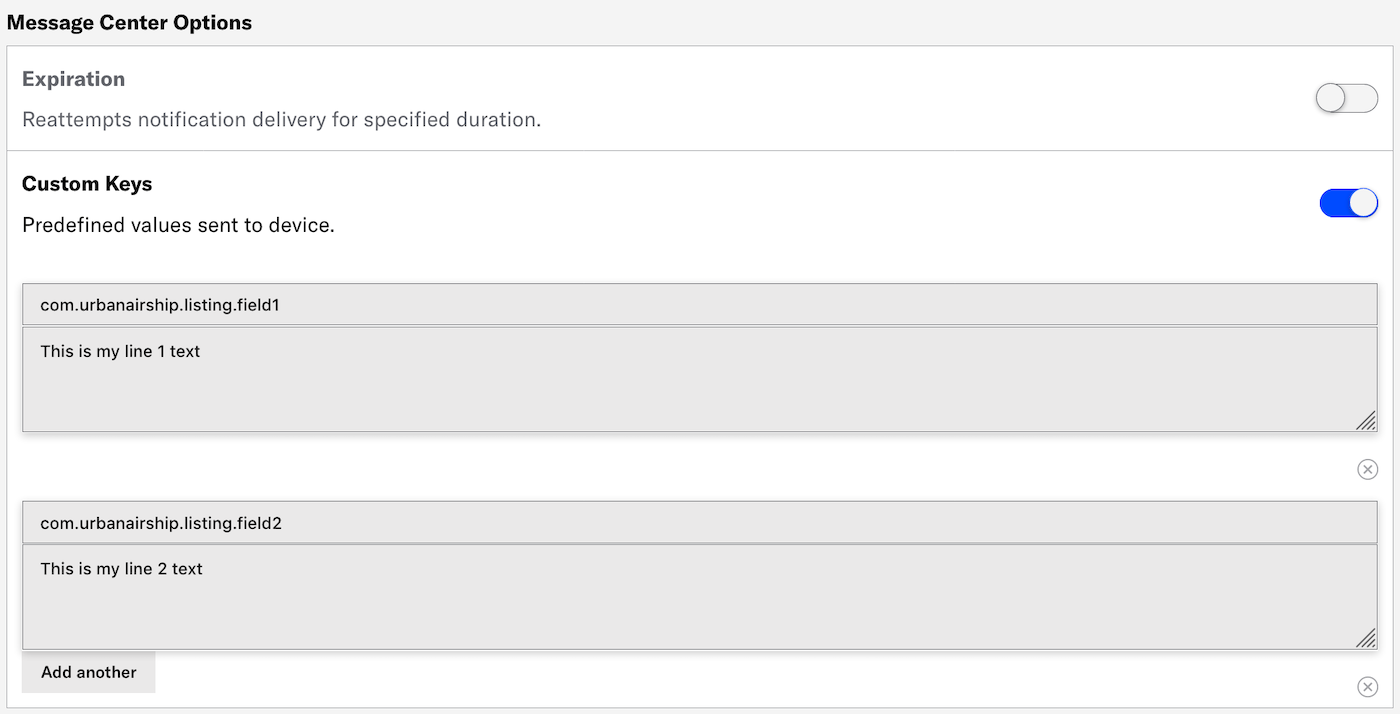
Add custom keys
You can set Custom KeysAdditional key-value pairs in your push notification payload for use by custom code in your app or website. You can use custom keys to pass additional campaign identifiers for analytics, pass user information to the device, control the look and feel of the app, provide image links, etc. that apply specifically to a Message Center message.
If you created your Message Center message using the Visual editor, you can add custom keys on the editor’s Options tab. See: Creating content: Visual editor.
For Message Center messages created with the Interactive editor (or created using a template that was created using the Interactive editor), set custom keys in the Message Center Options section in a composer’s Delivery step.
Add a key and value. Click Add Another for additional keys.
If your Message Center is set up with Named UserA customer-provided identifier used for mapping multiple devices and channels to a specific individual. filtering, include a custom key with named_user_id as the key and the user’s actual ID as the value.
See Filtering by Named User in Message Center Overview in our platform documentation.
Add preview lines
Message Center supports a message preview, which is how the message appears as listed in the inbox. In the Visual editor you enter preview Lines 1 and 2 on the Message Center tab. Creating content: Visual editor.
For Message Center messages created with the Interactive editor, you can add preview lines via Custom Keys in the Message Center Options in a composer’s Delivery step.
You must perform some development work before your app can display preview lines in the inbox.
Use com.urbanairship.listing.field1 and com.urbanairship.listing.field2 as keys representing preview lines 1 and 2. In the Value field for each key, enter the text that you want to show on each line of the preview.
You can personalize preview lines using HandlebarsHandlebars is Airship’s templating language for personalization. Handlebars expressions use double curly braces wrapped around a content template, ranging from a simple variable, e.g., {{first_name}}, to complex evaluations of personalization data. to reference AttributesMetadata used for audience segmentation and personalization. They extend the concept of Tags by adding comparison operators and values to determine whether or not to target a user, helping you better evaluate your audience. or Custom EventEvents that indicate that a user performed a predefined action, such as adding an item to a shopping cart, viewing a screen, or clicking an Unsubscribe button. Custom Events can trigger automation, including Sequences and Scenes. You can code them into your app or website, or send them to Airship from an external source using the Custom Event API. Custom Events contain properties that you can use to personalize messages. properties.
Add thumbnail image
Message Center supports a message preview, which is how the message appears as listed in the inbox. In the Visual editor you enter a thumbnail image for the preview on the Message Center tab. See: Creating content: Visual editor.
For Message Center messages created with the Interactive editor, add the image while in the WYSIWYG editor:
Click Settings in the left sidebar.
Enter the HTTPS URL of an image. See: Media guidelines.
If your Airship plan includes CDN support, you can also upload an image or select from previous uploads.
- Select Upload and click Upload File.
- (To use an existing file) Select a file row.
- (To upload media) Select Choose files and then and select one or more files to upload.
- (Optional) Select each uploaded file and add or edit keywords to help organize your media. Enter text in the search field below the preview, and then select from returned matches or select Add keyword: [entered text]. Select the X icon to remove a keyword. Changes are applied immediately.
- Select the file you want use in your message, then Insert selected media.
- Select Upload and click Upload File.
For additional information, see Media library.

Creating content: Visual editor
You configure the appearance of the message in the Content step of a composer; in the Delivery step you can configure content-related features that do not affect the appearance of the message.
In the Content step, click Message Center then Add content:
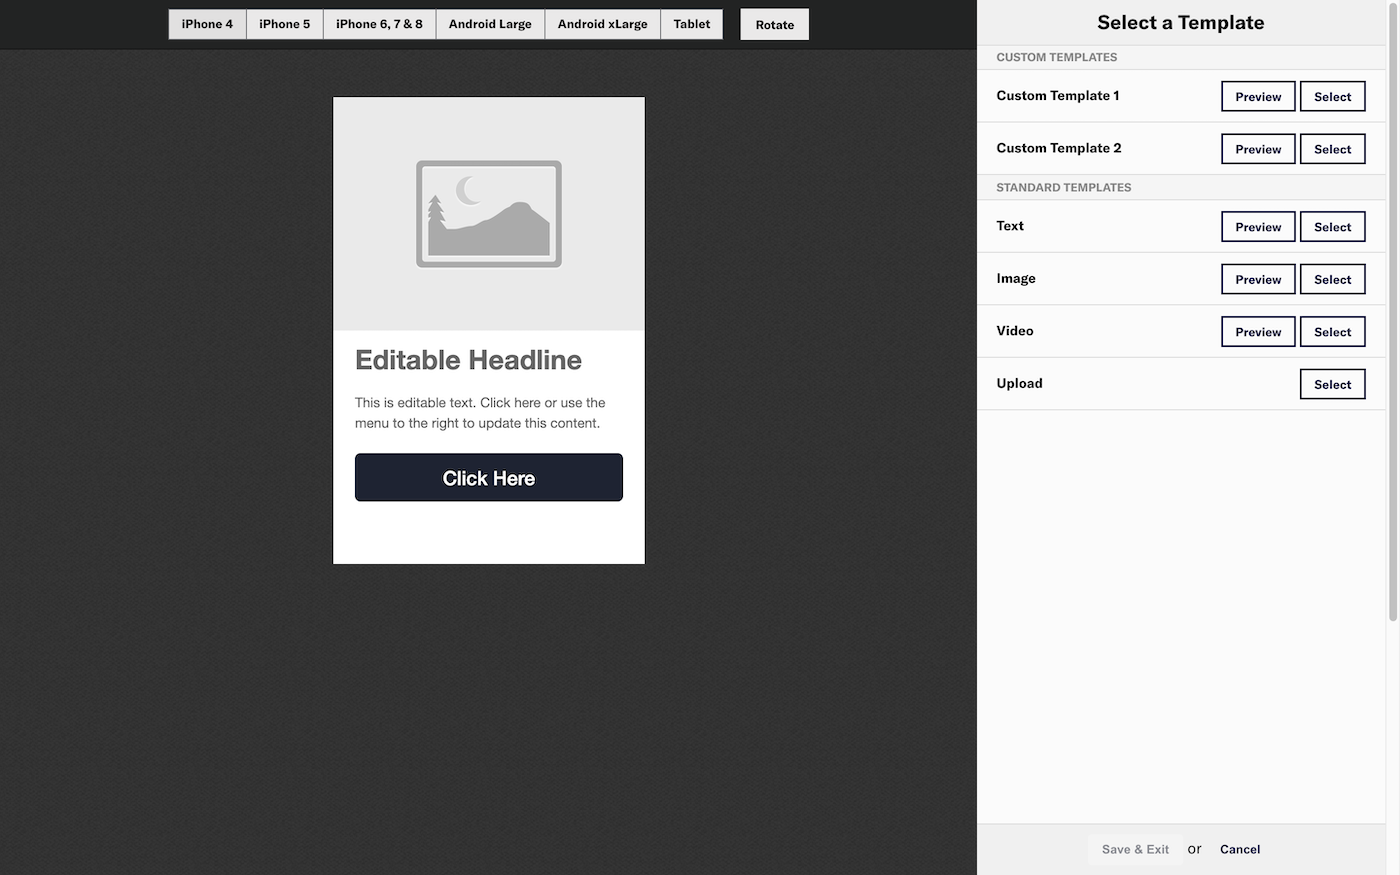
Then click Visual editor » Create. Now you can configure the message content:
Select a template or the upload option.
- For HTML, click Select for Upload under Standard Templates.
- For templates, click Preview for a template and select devices at the top of the screen to see how it will appear, then click Select for the template you want to use.
- Standard Templates are Text, Image, and Video. See: Standard templates.
- Templates added for you by Airship are listed under Custom Templates.

Configure the Message Center tab to determine the message preview that appears in the Message Center inbox.
- Message Center Title — Required. Enter text.
- Thumbnail — Upload an image. See: Media guidelines.
- Lines 1 and 2 — These lines appear below the title. Enter text.
Configure the Content tab to create the message body.
- For HTML, upload your HTML file.
- For templates, configure the fields for each page element. See: Field configuration. You can click to select fields in the preview or select directly from the side menu. Use the ON/OFF toggle in the upper right corner to enable/disable an element.

Configure the Options tab.
- Remove from Message Center — By default, messages are set to Never expire. To set expiration, select Specify and enter the number of minutes, hours, or days after send time when the page will expire. Expired messages are removed from users’ inboxes.
- Custom KeysAdditional key-value pairs in your push notification payload for use by custom code in your app or website. You can use custom keys to pass additional campaign identifiers for analytics, pass user information to the device, control the look and feel of the app, provide image links, etc. — Enter the key and value. Click for additional keys.
Click Save & Exit.
- You cannot save until your page meets minimum configuration requirements. Requirements are listed above Save & Exit.
- If your template includes a button or image, you must configure or disable its Action Link before you can save.
Now you are ready to complete the remaining steps in the composer.
Standard templates and fields
Airship provides three default (labeled “Standard”) templates: Text, Image, and Video.
- Each template contains various default elements.
- Each element requires configuring one or more field. See: Field configuration.
| Element | Fields | Text template | Image template | Video template |
|---|---|---|---|---|
| Page | Onload | ✓ | ✓ | ✓ |
| Headline | Text | ✓ | ✓1 | ✓ |
| Content | Text | ✓ | ✓ | ✓ |
| Button | Text, Link | ✓ | ✓ | |
| Image | Image, Link | ✓ | ||
| Video | Video | ✓ |
1. Labeled “Heading” in the Image template.
Field configuration
Elements in a template are controlled by various fields. Both custom and standard templates use the same field types, requirements, and configuration:
Text — Displayed in a headline, message body, button label, etc. Enter text.
Image — Displayed in the body of the message. Upload an image. See: Media guidelines.
Video — Displayed in the body of the message. Enter the URL for the video source. See: Media guidelines.
Onload — Add or remove tags when the content loads.
- Click Add Tags or Remove Tags.
- Click Select Tag.
- Enter the tag in the search field.
- Matches are listed below the Create Tag button. Click to select.
- If the tag is not found, click Create Tag to add it.
- Remove a selected tag by clicking at the end of its row.
- (Optional) Repeat for additional tag actions.
Link — The action that occurs when a user taps a button or image in the message. Select and configure an ActionA configurable behavior that occurs when a user interacts with your message, e.g., opening a web page.: Deep Link, URL, or Share.
You can also add or remove a tag when your audience taps the button or image. Follow the process as described for Onload above.
Important - Images have Action Link enabled by default. This makes the image perform as a button. If you don’t want the image to be clickable, disable Action Link for the image.
- While you can disable the Action Link for buttons, doing so does not remove the button itself. Because you must configure or disable the Action Link to save a template, you can disable it if you want to edit the message later.
Removal from a Message Center
You can remove messages from the Message Center inbox from the dashboard.
Removing a message from a Message Center is irreversible.
- Go to Messages » Messages Overview.
- Click for the message you want to remove.
- Click Remove from inbox and confirm.
After removal, Removed from inbox and the removal date, time, and time zone appears in these locations:
- Messages OverviewA view of all your project’s messages, with options for editing their settings, content, status, and more. — Message Details expanded view
- Message report — Header
Categories