Optional Features
You can enable optional features during the Content and Delivery steps when creating or editing a Message, Automation, A/B Test, or Sequence. Each feature’s purpose and settings are detailed here.
Feature availability is dependent on the message types and platforms you selected for your message.
Background Processing
The background processing option wakes the app and give it some running time to perform work, such as downloading content for future display. Data included in the push notification is available for background processing, e.g., to send URLs and then download that content. iOS only.Badge
Update the recipient device’s app badge. A badge is the numeric display on an app icon that typically indicates the number of unread messages. The badge count can be used as an engagement strategy, notifying users about new content and driving them to open your app. iOS only.
By default messages automatically increment the badge number, but you can specify an exact number, e.g., +3, +12, -3.
Select Increment by 1 or Specify. Specify requires a value in the text field.
Badge functionality requires the device to be opted in to push notifications.
Buttons (App)
You can add buttons to push notifications and in-app messages to direct users to take specific actions. One or two buttons are supported, e.g., a single Watch Now button, or a Yes/No pair, and you associate each button with an ActionA configurable behavior that occurs when a user interacts with your message, e.g., opening a web page.. You can also add or remove TagsMetadata that you can associate with channels or named users for audience segmentation. Generally, they are descriptive terms indicating user preferences or other categorizations, e.g., wine_enthusiast or weather_alerts_los_angeles. Tags are case-sensitive. or opt a user in to or out of a Subscription ListAn audience list of users who are opted in to messaging about a specific topic. Users can manage their opt-in status per list using a Preference Center. when they tap a button.
Airship records button clicks to help you track how your audience engages with your messages. Airship records them as Custom EventsEvents that indicate that a user performed a predefined action, such as adding an item to a shopping cart, viewing a screen, or clicking an Unsubscribe button. Custom events can trigger automation, including Sequences, Scenes, and Surveys. You can code them into your app or website, or send them to Airship from an external source using the custom event API. Custom events contain properties that you can use to personalize messages. with the name button--<BUTTON_ID>, where BUTTON_ID is either the button’s label or ID (when using the API). These events are included in Message Reports, Event Tracking, and Real-Time Data StreamingA service that delivers engagement events in real time via the Data Streaming API or an Airship partner integration..
Airship provides 30+ predefined buttons, which have preset labels and actions. Some buttons support changing their associated actions.
You can also create custom buttons, which must be configured in your project before you can add them to a message. Custom buttons can be associated with Airship actions, or they can be associated with custom actions.
See Interactive Notifications for more information about buttons. See Custom Notification Buttons to add buttons to your project.Click Select buttons, then search for and select the buttons you want to add.
- Search for predefined buttons by type. See reference: Built-In Interactive Notification Types.
- Search for custom buttons by name as configured for your project.
(Optional and if available) Change the action associated with each button.
(Optional) Set and/or remove TagsMetadata that you can associate with channels or named users for audience segmentation. Generally, they are descriptive terms indicating user preferences or other categorizations, e.g.,
wine_enthusiastorweather_alerts_los_angeles. Tags are case-sensitive. when the user taps a button.- Click Configure options.
- Select Add tag or Remove tag, then search for tags that exist in the system, or create a new tag.
Click Configure another option for additional tags.
(Optional) Opt a user in to or out of a Subscription ListAn audience list of users who are opted in to messaging about a specific topic. Users can manage their opt-in status per list using a Preference Center. when the user taps a button. AXP iOS SDK 16.9+Android SDK 16.7+
- Click Configure options.
- Select Opt in to or Opt out of, then search for a subscription list by name. When you first click the search field, you can select from your five most recently modified subscription lists.
Click Configure another option for additional subscription lists.
Buttons (Web)
You can add buttons to Web notifications to direct users to take specific actions. Web notifications support one or two buttons, e.g., a single Opt in button, or a Yes/No pair, and you associate each button with an ActionA configurable behavior that occurs when a user interacts with your message, e.g., opening a web page.. You can also add or remove TagsMetadata that you can associate with channels or named users for audience segmentation. Generally, they are descriptive terms indicating user preferences or other categorizations, e.g., wine_enthusiast or weather_alerts_los_angeles. Tags are case-sensitive. or opt a user in to or out of a Subscription ListAn audience list of users who are opted in to messaging about a specific topic. Users can manage their opt-in status per list using a Preference Center. when they tap a button.
Airship records button clicks to help you track how your audience engages with your messages. Airship records them as Custom EventsEvents that indicate that a user performed a predefined action, such as adding an item to a shopping cart, viewing a screen, or clicking an Unsubscribe button. Custom events can trigger automation, including Sequences, Scenes, and Surveys. You can code them into your app or website, or send them to Airship from an external source using the custom event API. Custom events contain properties that you can use to personalize messages. with the name button--<BUTTON_ID>, where BUTTON_ID is either the button’s label or ID (when using the API). These events are included in Message Reports, Event Tracking, and Real-Time Data StreamingA service that delivers engagement events in real time via the Data Streaming API or an Airship partner integration..
Airship provides 30+ predefined buttons, which have preset labels and actions. Some buttons support changing their associated actions.
You can also create custom buttons when you create a message, or within your project so you can reuse them for other messages. Custom buttons can be associated with Airship actions, or they can be associated with custom actions.
See Interactive Notifications for more information about buttons. See Custom Web Notification Buttons to add reusable buttons to your project.Click Select or add buttons.
Select your buttons, or click Create Buttons to make your own custom buttons for this message. To add:
- Click Add buttons.
- Enter a label for the Primary button (normally affirmative) and an optional Secondary button (appears to the right of the primary button).
- Click Add buttons.
Set an ActionA configurable behavior that occurs when a user interacts with your message, e.g., opening a web page. for each button.
- Home
- Dismiss Message
- Web Page
- Adaptive Link
Note You cannot use HandlebarsHandlebars is Airship’s templating language for personalization. Handlebars expressions use double curly braces wrapped around a content template, ranging from a simple variable, e.g.,
{{first_name}}, to complex evaluations of personalization data. to personalize actions for Web buttons.
(Optional) Set and/or remove TagsMetadata that you can associate with channels or named users for audience segmentation. Generally, they are descriptive terms indicating user preferences or other categorizations, e.g.,
wine_enthusiastorweather_alerts_los_angeles. Tags are case-sensitive. when the user taps a button.- Click Configure options.
- Select Add tag or Remove tag, then search for tags that exist in the system, or create a new tag.
Click Configure another option for additional tags.
(Optional) Opt a user in to or out of a Subscription ListAn audience list of users who are opted in to messaging about a specific topic. Users can manage their opt-in status per list using a Preference Center. when the user taps a button. AXP iOS SDK 16.9+Android SDK 16.7+
- Click Configure options.
- Select Opt in to or Opt out of, then search for a subscription list by name. When you first click the search field, you can select from your five most recently modified subscription lists.
Click Configure another option for additional subscription lists.
Bypass Ban List
Bypass your Ban ListAn externally maintained record of users that should not be included in Airship message audiences. Before sending a message, Airship validates the audience members with the Ban List. Any matching recipients are dropped from the audience before sending the message. when sending business-critical or otherwise required messages, such as privacy policy update notifications.
If you have a Ban List but do not see this option in the composer, enable it in your project settings. See Bypassing your Ban List in the Ban List documentation.
Campaign Categories
Campaign categories are labels that group messages of a similar type or messaging strategy for aggregate reporting. Campaigns help you track the efficacy of both your individual messages and a messaging campaign as a whole. You can add a maximum of ten categories.
Enter a campaign category name, then select Add. Category names have a 64-character maximum.
For categories defined in message limits, its limit displays after the category. To override the limit, select the check box for Ignore limit for this message.
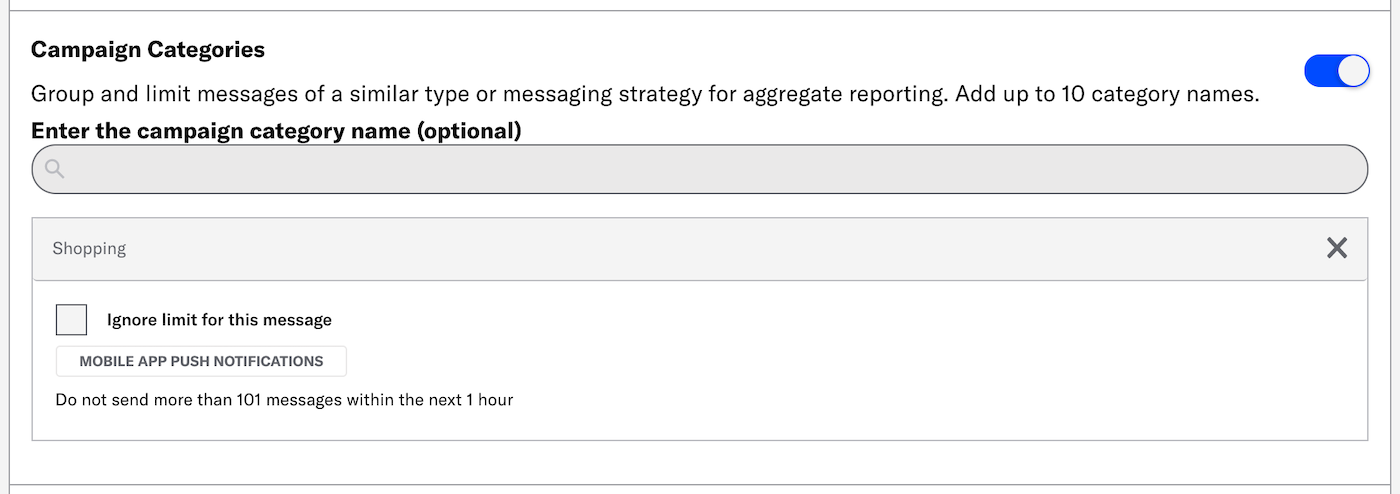
Campaign categories are listed in the Message Detail section of Message Reports.
Collapse Key
A collapse key is an optional delivery feature that acts as a grouping and replacement mechanism for messages with the same value. The Collapse Key comes into play when a device is offline (e.g. airplane mode) or in doze mode; if multiple messages are available with the same collapse key value when a device comes back online, it will display only the most recent message and discard previous that have the same value. Android & Amazon only.
Enter the key in the text field.
Custom Keys
Custom keys are additional key-value pairs in your push notification payload for use by custom code in your app. You can use custom keys to pass additional campaign identifiers for analytics, pass user information to the device, control the look and feel of the app, provide image links, etc.By default, a custom key is sent to push notifications on all platforms, but you can choose platform-specific keys as well if your message is going out to more than one platform, e.g., one imageURL for iOS and another imageURL for Android.
Select a platform, then enter the key and value. Click Add Another for additional keys.
When sending a Message Center message created using the Interactive editor (or created using a template that was created using the Interactive editor), Custom Keys is in the Message Center Options section in the composer’s Delivery step. Use that Custom Keys option to set key-value pairs that apply specifically to your Message Center message. See Custom Keys (Message Center) below.
Custom Keys (Message Center)
You can set Custom KeysAdditional key-value pairs in your push notification payload for use by custom code in your app. You can use custom keys to pass additional campaign identifiers for analytics, pass user information to the device, control the look and feel of the app, provide image links, etc. that apply specifically to a Message Center message.
If you created your Message Center message using the Visual editor, you can add custom keys on the editor’s Options tab. See: Creating content: Visual editor.
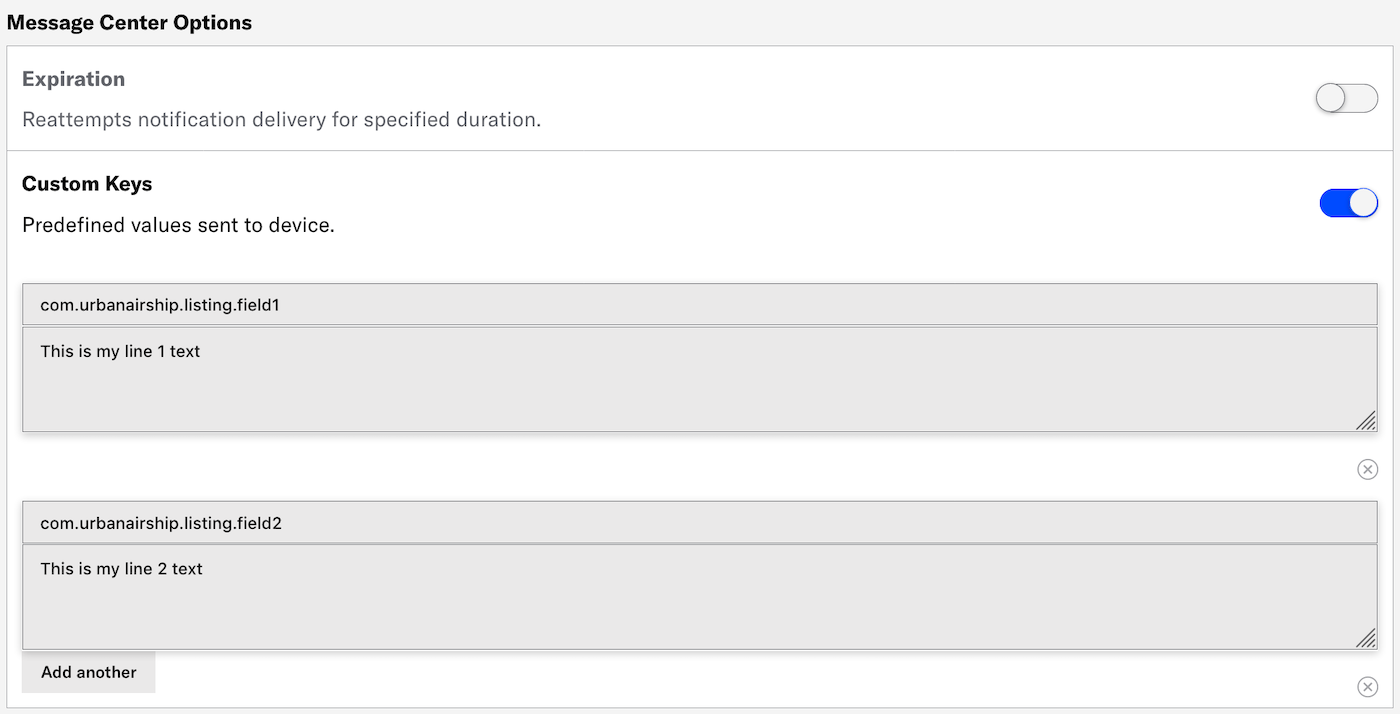
For Message Center messages created with the Interactive editor (or created using a template that was created using the Interactive editor), set custom keys in the Message Center Options section in a composer’s Delivery step.
Add a key and value. Click Add Another for additional keys.
If your Message Center is set up with Named UserA customer-provided identifier used for mapping multiple devices and channels to a specific individual. filtering, include a custom key with named_user_id as the key and the user’s actual ID as the value.
See Filtering by Named User in Message Center Overview in our platform documentation.
Preview Lines
Message Center supports a message preview, which is how the message appears as listed in the inbox. In the Visual editor you enter preview Lines 1 and 2 on the Message Center tab. Creating content: Visual editor.
For Message Center messages created with the Interactive editor, you can add preview lines via Custom Keys in the Message Center Options in a composer’s Delivery step.
You must perform some development work before your app can display preview lines in the inbox.
Use com.urbanairship.listing.field1 and com.urbanairship.listing.field2 as keys representing preview lines 1 and 2. In the Value field for each key, enter the text that you want to show on each line of the preview.
You can personalize preview lines using HandlebarsHandlebars is Airship’s templating language for personalization. Handlebars expressions use double curly braces wrapped around a content template, ranging from a simple variable, e.g., {{first_name}}, to complex evaluations of personalization data. to reference AttributesMetadata used for audience segmentation and personalization. They extend the concept of Tags by adding comparison operators and values to determine whether or not to target a user, helping you better evaluate your audience. or Custom EventEvents that indicate that a user performed a predefined action, such as adding an item to a shopping cart, viewing a screen, or clicking an Unsubscribe button. Custom events can trigger automation, including Sequences, Scenes, and Surveys. You can code them into your app or website, or send them to Airship from an external source using the custom event API. Custom events contain properties that you can use to personalize messages. properties.
Delivery Priority
The delivery priority option sends your notification using Firebase Cloud Messaging (FCM) high priority. When not enabled, messages default to normal priority. Android only.From Google’s About FCM Messages: Delivery options: Setting the priority of a message :
High priority. FCM attempts to deliver high priority messages immediately, allowing the FCM service to wake a sleeping device when necessary and to run some limited processing (including very limited network access). High priority messages generally should result in user interaction with your app. If FCM detects a pattern in which they don’t, your messages may be de-prioritized.
Expiration
The delivery expiration option discards your message if it hasn’t been delivered to a device within a specific period of time.Select one of:
Duration: Enter the number of minutes, hours, or days past your defined send time to expire the delivery.
Date & Time: Enter the date and time when delivery attempts should cease.
- Push Notifications
- If a device is online, the notification will be delivered immediately. If a
device is offline, the push service for each platform, e.g., APNs for iOS
and FCM for Android, preserves the notification and attempts to deliver it
as soon as it comes online, up until the expiration date.
The default expiration for push notifications without an expiration date is 30 days for APNs and 28 days for FCM.
For Web Notifications, if no expiration is set and a device is offline, the delivery service, e.g., Google or Mozilla, preserves the notification and attempts to deliver it as soon as it comes online, for a maximum of 28 days.
There is no way to remove a delivered push notification.
- In-App Messages
- Since In-App Messages are delivered via push notifications, they will not be delivered past the expiration date if the user has been offline. In addition, Airship will not display an in-app message past the expiration date.
- Message Center
- If you selected the Visual Editor when creating your Message Center message, Message Center expiration is coupled with push notifications and in-app messages.
Expiration (Message Center)
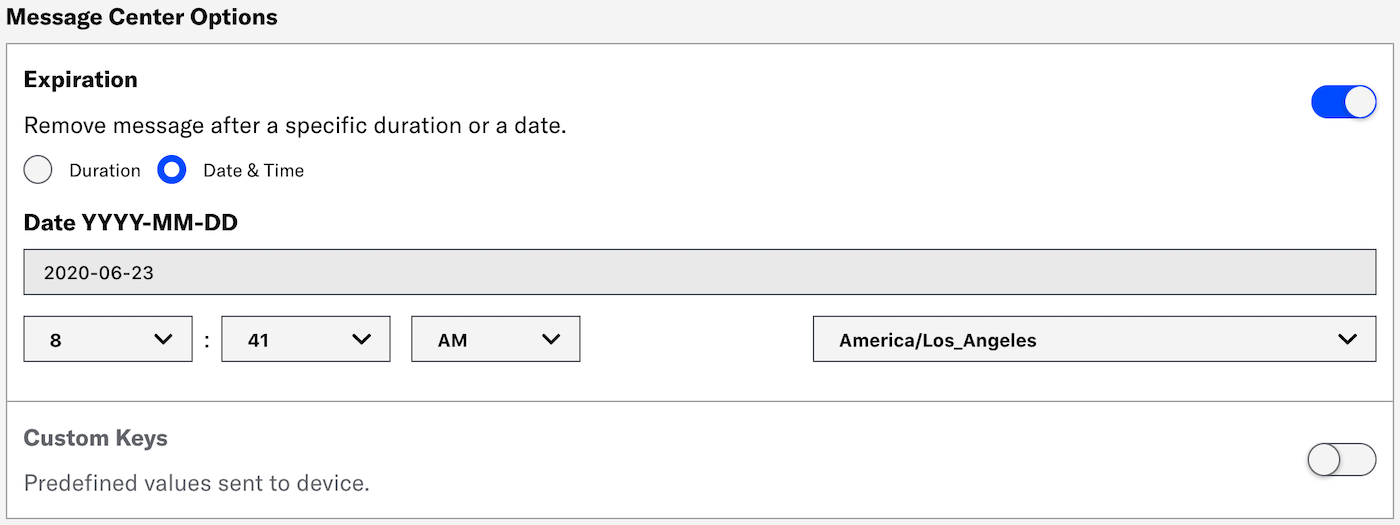
The Expiration for Message Center removes the message from users’ inboxes. This may be helpful if the message represents a coupon, sale, or specific event and needs to expire on a specific date and time, or after a period of time has elapsed (duration).
If you created your Message Center message using the Visual editor, you can specify a duration on the editor’s Options tab. Creating content: Visual editor.
For Message Center messages created with the Interactive editor (or created using a template that was created using the Interactive editor), set expiration in the Message Center Options section in a composer’s Delivery step. Select one of:
- Duration: Enter the number of minutes, hours, or days past your defined send time to remove the message.
- Date & Time: Select the date, time, and time zone when the message should be removed.
Expiration (SMS)
The delivery expiration option discards your message if it hasn’t been delivered to a device within a specific period of time. 72 hours is the default. SMS Only.
Enter the number of hours, between 1 and 72.
Group
A delivery group uses an identifier to group related notifications from your app into a single stack. Notifications bearing the same group identifier are stacked together. iOS 12 and later only.Enter an identifier in the text field.
Remember to use the same identifier for subsequent messages you wish to group.
Icon
Enter a URL to add an icon to your web push notification, overriding the default icon specified in your Web Notifications configuration. Safari is not supported. See also: Media guidelines.
If your Airship plan includes CDN support, you can also upload media or select from previously uploaded media:
- Select Upload and click Insert Media.
- The default sort order is most recent upload first.
- You can search by file name or keyword.
- A file preview appears after upload or selection. Select the play icon () to preview audio and video files.
- Enter a term in the search field below the preview and select from results, or select Add keyword: [term].
- Select the clear icon () to remove a keyword.

See also Media library. Contact Support if you are interested in enabling CDN media hosting.
Ignore Channel Message Limits
Enable this option to override the project-level Message LimitsLimits that cap the number of messages you can send within a specified time frame, preventing you from over-messaging your users. They are set at the project level., ensuring that your audience will receive your message even if they’ve reached the message limit. You may want to override message limits for important messages like breaking news, account alerts, or location proximity-based messages. Overriding message limits does not override Sequence Rule LimitsLimits that cap the number of messages a user can receive from a sequence within a time frame, preventing you from over-messaging your audience, e.g., a maximum of 1 per day. Rule limits are set per sequence. or Automation Rule LimitsLimits that cap the number of messages a user can receive from an automation within a time frame, preventing you from over-messaging your audience, e.g., a maximum of 1 per day. Rule limits are set per automation..
Interruption Level
Determine the degree of interruption a user experiences from a push notification. Each level has a different impact on the user’s experience, depending on their Focus settings. iOS only.
The default level is Active. Select Passive, Time Sensitive, or Critical. For Critical, also specify the alert volume level, at 10% increments.
| Interruption level | Overrides scheduled delivery | Breaks through Focus | Supports sounds/vibration | Overrides ring/silent switch | iOS minimum |
|---|---|---|---|---|---|
| Active (default) | No | No | Yes | No | n/a |
| Passive | No | No | No | No | 15 |
| Time Sensitive | Yes | Yes | Yes | No | 15 |
| Critical | Yes | Yes | Yes | Yes | 12 |
- Critical alerts require:
- A special entitlement issued by Apple.
- Feature enablement by Airship. Contact your account manager or Support if you have the Apple entitlement and want to use critical alerts with Airship.
- Critical alerts must be allowed by a user on their device.
Media
Enter a URL to add media to your push notifications for App and Web channels. See also: Media guidelines.
If your Airship plan includes CDN support, you can also upload media or select from previously uploaded media.
- Select Upload and click Insert Media.
- The default sort order is most recent upload first.
- You can search by file name or keyword.
- A file preview appears after upload or selection. Select the play icon () to preview audio and video files.
- Enter a term in the search field below the preview and select from results, or select Add keyword: [term].
- Select the clear icon () to remove a keyword.
See also Media library. Contact Support if you are interested in enabling CDN media hosting.
If using a personalized media URL for an App push notification, you must select the media type after entering the URL:

Static Image Requirement
When you enable both the iOS platform and one or more of Android and Amazon, and you do not enter a static image in the initial URL field, a Static Image field is added to the media settings. Enter a URL, or use the Upload option.
Mutable Content
The mutable content option allows a notification’s content to be changed or downloaded before delivery. This feature is automatically enabled if media is defined in the message’s Optional Features » Media settings. iOS 10 and later only.Notification Category
Send your message with a specific notification category instead of the default. A notification category is a grouping mechanism for messages in Android versions 8.0 and later, synonymous with Android notification channels. Users can set behaviors for each notification category within your Android app, determining the types of messages they are most interested in.
Select a notification category.
You must add your app’s notification categories to your Airship project before you can select them for your messages. See: Manage Android Notification Categories.
Relevance Score
The relevance score is one of multiple factors used by Apple to determine which push notifications are featured more prominently within the Notification summary. Use this setting to override the default value of 0. iOS 15 and later only.
Set a value between 1 and 10.
Require Interaction
Support for Require Interaction varies by browser and OS.
Enable the Require interaction setting to require your audience to interact with your web notification to dismiss it from the browser window. Web only.
Users may interact with a web notification in these ways:
- Click the notification, which opens the message-defined URL, or the default Action URL.
- Dismiss the notification.
- Click the Settings icon or button on the notification.
Sound
Play a custom sound when your audience receives a message. The sound file that you specify must be bundled with your app by your app developer. iOS only.
Enter default to use your audience’s default system notification sound, or the name of the sound file that you want to play, e.g. or “beep.caf”.
See iOS Notification Options for more information.
Start and End Dates
Start and end dates define the times during which an automation can deliver messages to your audience.
- Enable Start Date and/or End Date.
- Set the time, time zone, and date.
Summary
Add a summary line, supplemental text displayed with the notification. Enter your summary in the text field.
iOS: The summary appears below the push notification title.
Android and Amazon: The summary appears below the main notification text in most cases. This is the only visible text other than the title when Android Picture is visible in expanded mode, as the main notification text is suppressed.
Throttle Delivery
Enable Throttle Delivery to set a delivery rate for the message. Enter the number of messages to be sent per second. The minimum rate is 100 messages per second. Throttle Delivery is only available for the following delivery options: Send Now, Schedule, and Optimize. Not supported for Message Center.
You can change the rate after sending your message, and also pause/resume or cancel delivery within 48 hours of send time.
- Throttling must be enabled before sending the message; you cannot edit the message and enable it later.
If you combine Message Center with other App message types and pause or stop delivery within 48 hours of send time, delivery status change has no effect on Message Center delivery. Message Center messages will remain in the inbox until expiration, if set. You can also manually remove messages from the Message Center inbox.
- Go to Messages » Messages Overview.
- Change the message status:
- Click Pause or Resume.
- Click Stop to cancel delivery. You cannot resume a canceled message.
- Change the throttle rate:
- Click for the message.
- Click next to Throttle Delivery.
- Enter a new rate and click Update.
Title
Enter a title to create a heading that appears above the notification text in:
- iOS Notification Center
- Apple Watch Looks
- Android and Amazon Notification Area/Drawer
For web browsers, the title set here will override the default title.
Enter the title in the text field.
API Equivalents for Optional Features
Set Campaign Categories using the Campaigns object. See Campaigns Object in the API reference.
Start and End dates are for Automation only. You can set them using the activation_time and deactivation_time properties in the Pipeline object. See Pipeline Object in the API reference.
These options can be set using Platform Overrides:
| Composer option | API |
|---|---|
| Background Processing1,2 | content_available |
| Badge2 | badge |
| Buttons | interactive |
| Collapse Key (Amazon) | consolidation_key |
| Collapse Key (Android) | collapse_key |
| Custom Keys | extra |
| Delivery Priority3 | delivery_priority |
| Expiration | expiry |
| Group2 | thread_id |
| Icon4 | icon |
| Interruption Level2 | interruption_level |
| Media (iOS) | media_attachment |
| Media (Android and Amazon) | style |
| Mutable Content1,2 | mutable_content |
| Notification Category3 | notification_channel |
| Relevance Score2 | relevance_score |
| Require Interaction4 | require_interaction |
| Sound2 | sound |
| Summary | summary |
| Title | title |
1. Automation only
2. iOS only
3. Android only
4. Web only
Categories