Generative AI content
Use AI to create message content faster and according to guidelines you set.

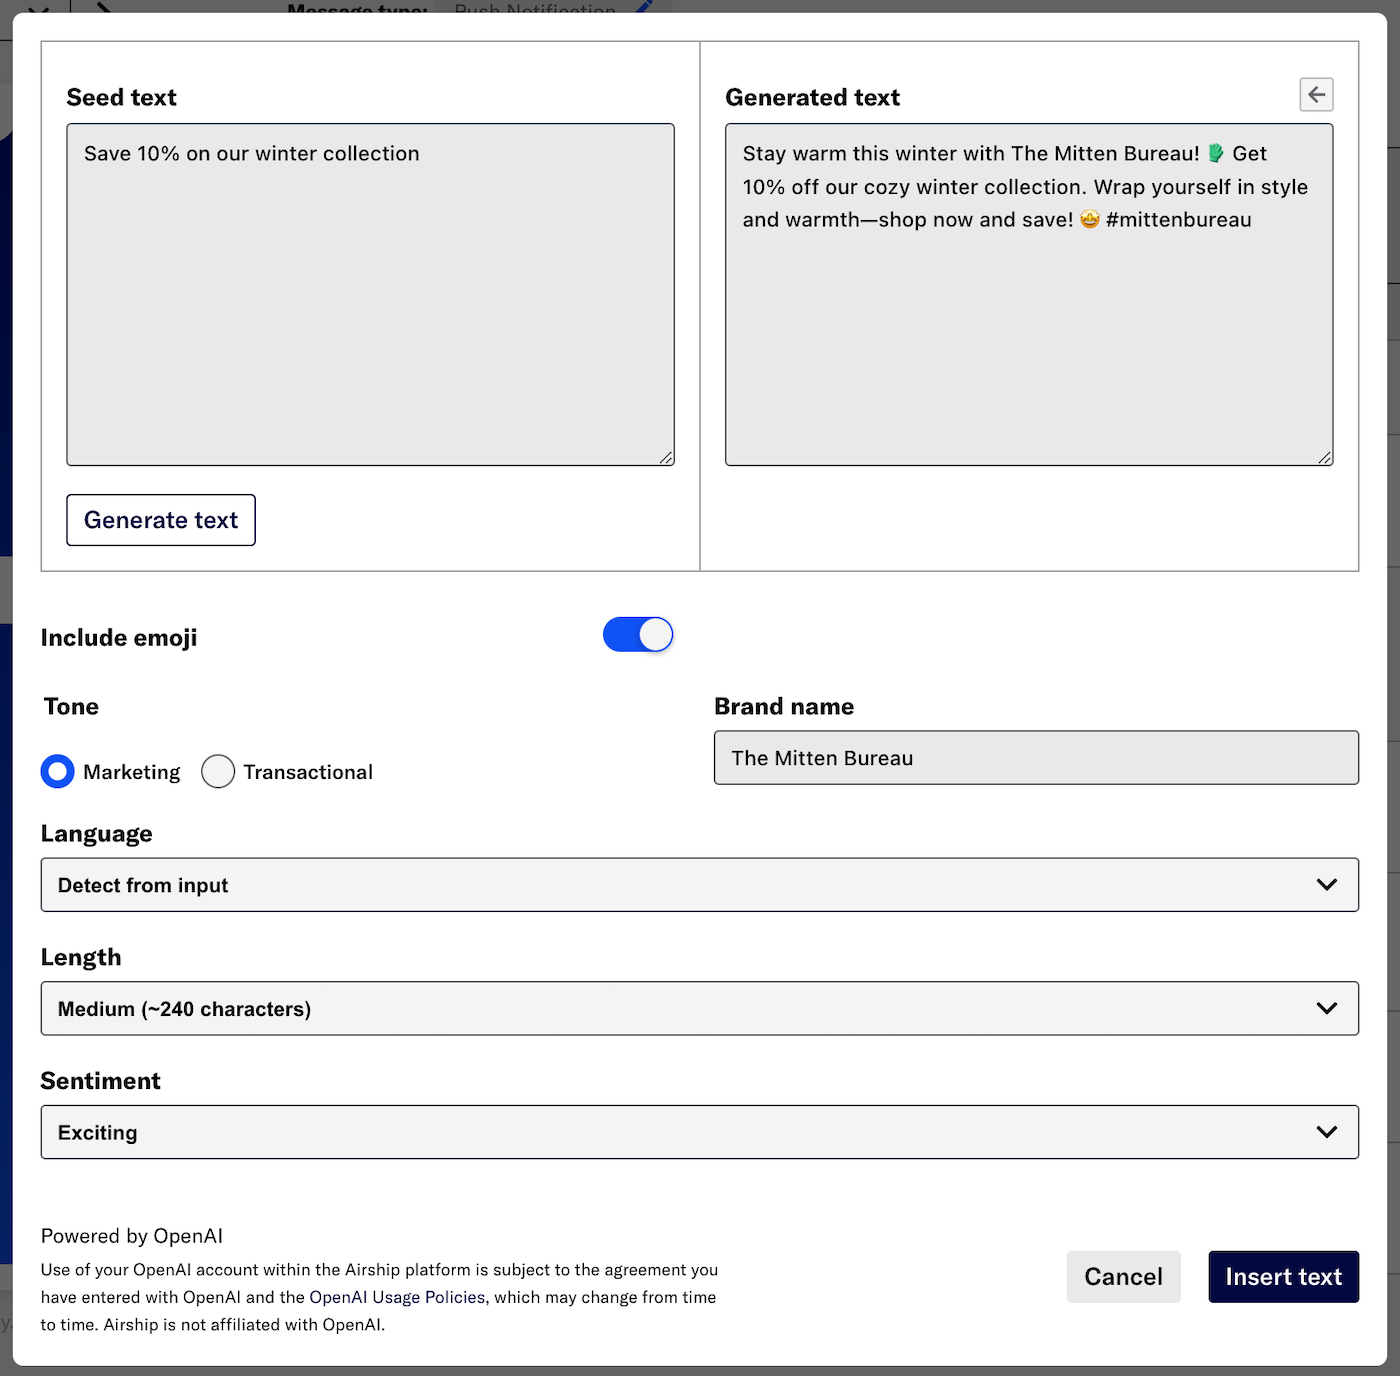
To use generative AI for your content, you enter seed text, then click Generate text to see the versions side by side. You can adjust the message tone, length, sentiment, and language. You can also include your brand name and emoji 🚀. Click the arrow to transfer the generated text for use as seed text.
This tool can be especially helpful for creating variants for A/B tests. See: About A/B testing, Sequence A/B Tests, and Scene A/B Tests.
Generative AI content is available for most text fields in templates and when composing messages. In the Interactive Editor for Message Center and Email, it is available for Title and Subject fields only.
Requirements and use with Airship
You must have an OpenAI account. When you configure your project settings, you will enter:
- Your OpenAI API key — You can copy this key from your OpenAI account .
- An Organization ID — If your API key is associated with multiple organizations, you must specify the ID that should be associated with an Airship project. OpenAI-generated text counts against the specified organization’s subscription quota. You can copy the ID from your OpenAI organization settings .
If you don’t have an OpenAI account, you can sign up here .
Airship’s integration with OpenAI does not share any customer data from Airship’s system, or other personal data Airship has access to, with OpenAI.
We recommend generating an API key for Airship use only instead of using the same API key for multiple organization IDs.
Use of your OpenAI account within the Airship platform is subject to the agreement you have entered with OpenAI and the OpenAI Usage Policies , which may change from time to time. Airship is not affiliated with OpenAI. This functionality is not intended for use with personal data or personally identifiable information.
You are advised to review OpenAI policies and documentation:
- Supported countries and territories
- Safety best practices
- API data usage policies — This functionality is not intended for use with personal data or other identifiable information. Any such usage is subject to the agreement you have entered with OpenAI, the OpenAI Usage Policies, which may change from time to time, your own organization’s standards and at your own risk. Please consult your legal counsel before implementing OpenAI to address your specific use case or regulatory requirements in your jurisdiction.
Configuring your project
See Requirements above.
- Go to Settings » Project Settings and click Manage for OpenAI.
- Enter your OpenAI API key.
- If your API key is associated with multiple organizations, specify the ID that should be associated with this Airship project.
- Review the terms and conditions and check the box to agree.
- Click Configure to save your settings.
Generating content

Click the AI icon below a text field. Text already in the field will populate the seed text.
Enter or edit the seed text. This can be a full version of the intended content or just keywords.
Click Generate text and review the generated version. You can click the arrow to transfer the generated text to use as new seed text.
Adjust the settings and click Generate text again to see the updated version.
- Tone — Marketing or Transactional. Defaults to Marketing.
- Include emoji — Optional.
- Brand name — Optional. Airship cannot guarantee how, or if, AI will insert your brand name.
- Language — Language is detected from input, but you can select a different language for the generated text.
- Length — Short (~80 characters), Medium (~240 characters), or Long (~400 characters). Length is an estimate based on OpenAI’s Tokenizer .
- Sentiment — Excited, Neutral, Positive, etc. Defaults to Neutral. Select Custom to enter a custom keyword.
Click Insert text to use the current generated text in the message field.
Review the generated content before sending any message. You can edit the Generated text field before insertion, and you can edit the text after insertion.
Categories
