Target Specific Users
Create a recipient group based on attributes, segments, audience lists, and more.
When selecting your message audience in the Message and A/B Test composers, you can select Target Specific Users to build a SegmentA grouping of audience members selected by unique or shared identifiers. Multiple identifiers can be combined within a Segment. that is used for that message only. You can build a segment using unique identifiers or by an identifier that may belong to or include multiple users, such as a tag, attribute, or event, and even other segments. See Segmentation data on this page. Use the Segment Builder to create reusable segments.
You build segments by adding segmentation data conditions organized in blocks. A block contains one or more conditions, providing a way to mix and match boolean operators. For example, you might use an OR operator for conditions in a block, and use an AND operator to join the blocks together.
First you select or search for the data you want to use in a condition. Some data types also require a value that you enter or select. Then you set the operators for evaluating the condition — True/False, Equals/Does not equal, etc. You can set AND/OR logic between conditions and blocks at any time.
Create a segment in Target Specific Users
In the Audience step of the Message or A/B Test composer, select Target Specific Users. Now you can start creating a segment.

Adding conditions
You can select from your 10 most recently created or modified segments, Uploaded listsA reusable audience list that you create. Uploaded lists are static and updatable. In the API, they are referred to as Static Lists., and Subscription listsAn audience list of users who are opted in to messaging about a specific topic. Users can manage their opt-in status per list using a Preference Center., and all your Lifecycle listsAutomatically generated audience lists that capture app open, uninstall, notification, and dormancy information within the past 24 hours, one week, or 30 days..
You can search all your segmentation data. The default filter is All, and you can select a different filter before or after entering a search term.
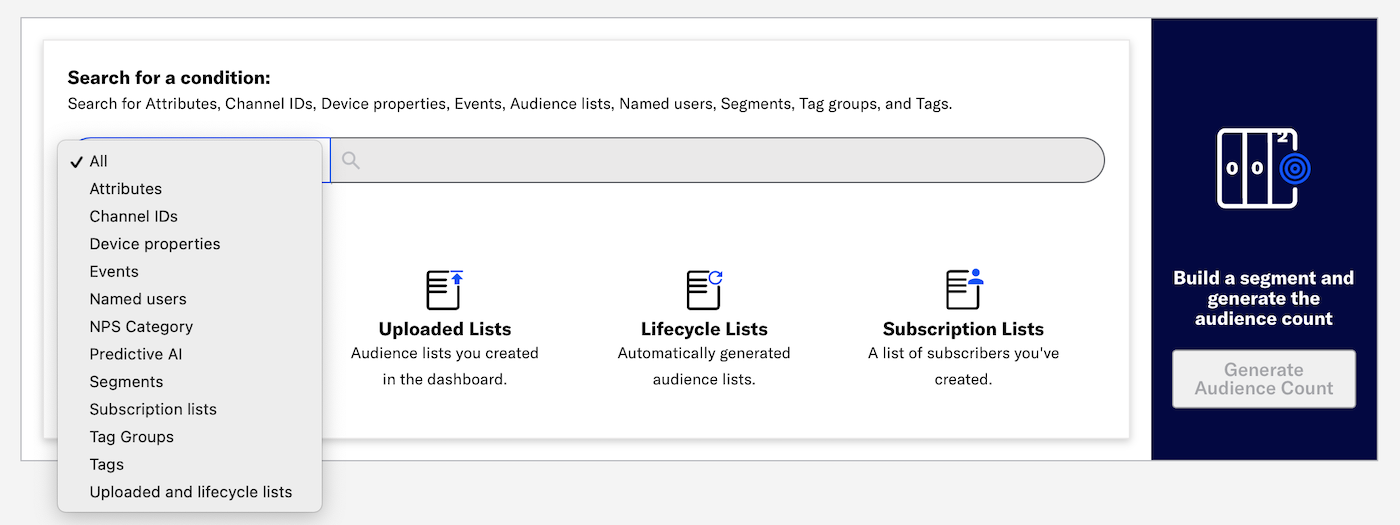
Search behavior for tags and tag groups varies by filter:
- Tags filter — Search for primary device tags (tags in the
devicetag group) only. - Tag Groups filter — Search for and select a tag group, then search within that tag group.

- All filter — Combines the behaviors of the Tags and Tag Groups filters. Use this filter to search for tags in all tag groups
- Autogroup filter — Select the filter, then click in the search box and select Autogroup.
- Predictive AI filter — Select the filter, then click in the search box and select Predicted to Churn.
- NPS Category filter — Select the filter, then click in the search box and select NPS Category.
Operators in conditions
The True/False operator determines whether to include users for whom the condition is true or false. Most data types use the True/False operator and require no additional selections or values:
- Audience lists
- Channel IDs
- Named users
- Segments
- Tags
Channel CoordinationA group of strategies you can use to target users where they are most likely to receive your message. uses the True/False operator, but you must also search for a tag. Search for and select the Orchestration tag group, then search for tag last_active, priority_platform, or user_preferred.
The Equals/Does not equal operator is used for the following data types, which also require entering or selecting a value.
- Autogroup — Enter a numeric value 1-100.
- Predicted to Churn — Select status High risk, Medium risk, or Low risk.
- NPS Category - Select category Promoter, Passive, or Detractor.
See next steps for configuring device properties, attributes, and events.
Configuring Device Properties
Select an operator, then select, search for, or enter a value. Multiple values are evaluated as a boolean OR. No configuration is required for operators Empty and Not Empty.

Equals and Does not equal are the default operators for device properties. To make all operators available, go to Settings » Project Configuration and click Manage for Dashboard Settings, then enable Segment Operators.
When using the device property Application Version, SDK Version, or Device OS Version, only semantic versioning formatting is accepted, and anything after the third decimal place is excluded, e.g.,
12.2.3-alphais compared as12.2.3.
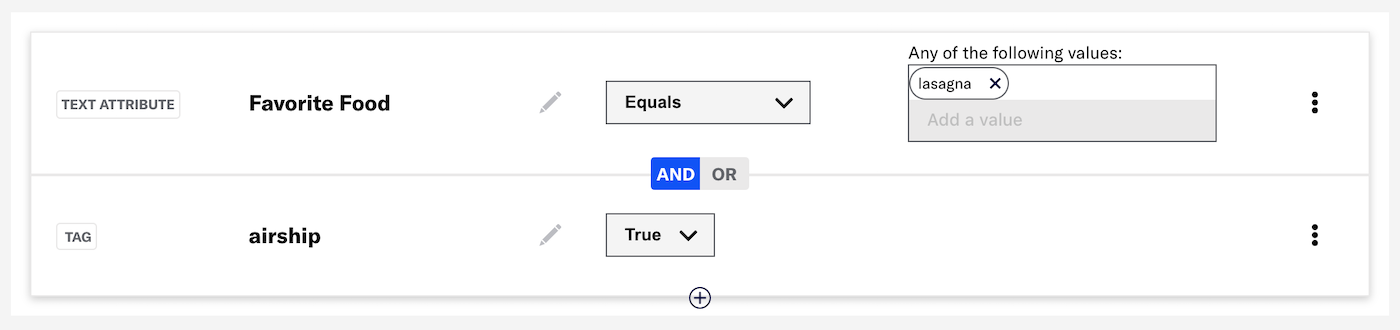
Configuring Attributes
Select an operator, then configure values or dates.
Text and Number attributes — Click Add a value and enter a value in text or number format, then click outside the field or hit Enter on your keyboard to save the value. Repeat for multiple values. Multiple values are evaluated as a boolean OR.
Date attributes — Configure a date or range. Availability and requirements depend on the operator.
- Specific — Select a Year/Month/Day. With the Equals and Does not equal operators you can also use formats Day, Month, Month/Day, and Year/Month.
- Relative — Specify the number of years/months/days/hours/minutes from today’s date. With the Equals and Does not equal operators, also select Month/Day or Year/Month/Day.
- Today — With the Equals operator, select Month/Day or Year/Month/Day. With the After and Before operators, Year/Month/Day is the only option and is preselected.
Note For the Between operator, the end date is not inclusive, e.g., selection
Between July 5 - July 17includes dates July 5 to July 16.
JSON attributes
For JSON Attributes, you target one or more properties in its schema for evaluation. For multiple properties, set boolean logic to determine whether any or all evaluations must be true for the whole condition to be true.
After selecting a JSON Attribute:
- Select Configure.
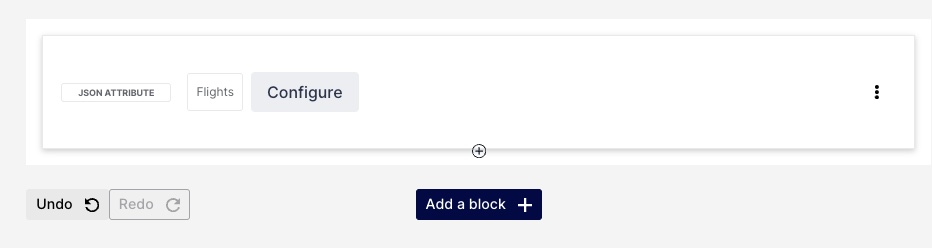
Configuring a JSON Attribute in a Segment - Under Evaluations, choose from the Select a source menu:
Option Description <alias> An alternate name defined for a property. The Attribute's schema will appear with the aliased property's line selected. Select from schema The Attribute's schema will appear. Select a property's line, then its path will appear to the right of the menu. - (For string and number properties) Select an operator and enter a value.
- (For boolean properties) Select Is true or Is false.
- (Optional for arrays in the path) Select First or Last to specify the first or last item in the array. Defaults to Any.
- Select the check mark to add the property.
- Select Add another for more properties.
- (For multiple properties) Select AND or OR to determine how to evaluate multiple properties within the condition:
- AND = all criteria must be met
- OR = any criteria must be met
- Select Done.
- Select Configure.
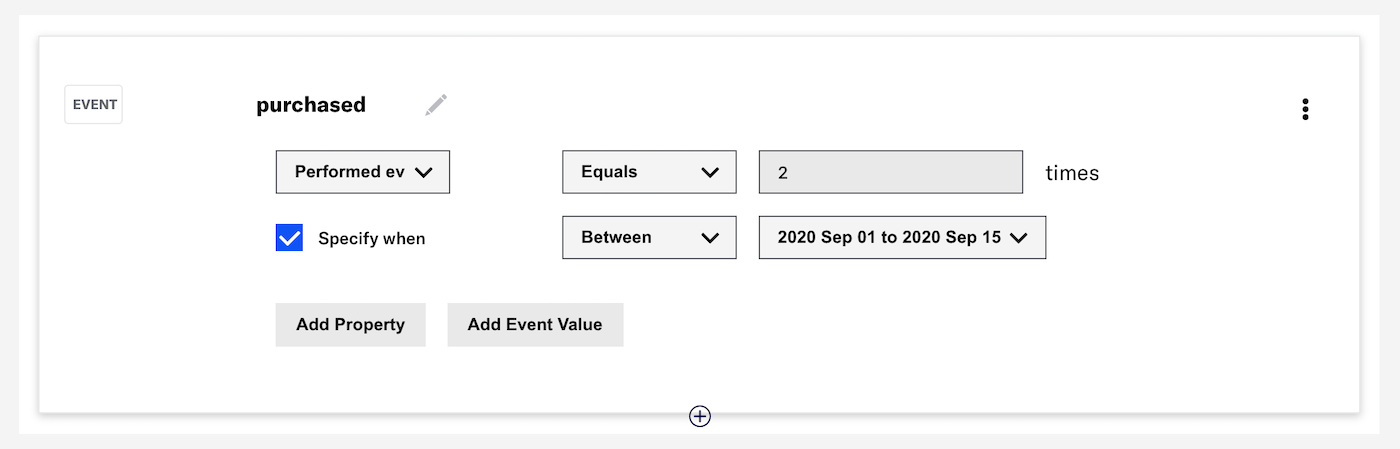
Configuring Events
Choose whether or not the event was performed, set the frequency of occurrence, and configure options.
- Select Performed event, First performed event, Last performed event, or Did not perform event.
- (For Performed event and Did not perform event only) Select the Equals or Between operator and configure the frequency of the event.
- (Optional) Click Specify when to target when the event was performed, then select an operator and configure a date or range. Availability and requirements depend on the operator.
- Specific — Select a Year/Month/Day. With the Equals operator you can also use formats Month/Day, and Year/Month.
- Relative — Specify the number of years/months/days/hours/minutes from today’s date. With the Equals operator, also select Month/Day or Year/Month/Day.
- Today — Select Month/Day or Year/Month/Day.
Note For the Between operator, the end date is not inclusive, e.g., selection
Between July 5 - July 17includes dates July 5 to July 16.
(Optional) Filter events using numeric values associated with the events, or by key/value properties attached to the events. Filtering events this way can help you more precisely target your audience.
- Click Add Property and search for a property, or click Add Event Value.
- If applicable, select the operator you want to use to evaluate the value or property.
- Enter a value, then click outside the field or hit Enter on your keyboard to save the value. Repeat for multiple values. Multiple values are evaluated as a boolean OR.
- (Optional) Click Add Property or Add Event Value to add more filters.
- Select AND/OR to determine how to evaluate multiple filters and alternatives within each filter.
- AND = all criteria must be met
- OR = any criteria must be met
Editing conditions and blocks
Options for adding and editing conditions:
- Click to change your selection within a condition, e.g., change a tag from
airshiptostarship. - Click to add a condition to a block.
- Click for Duplicate and Delete options. Deleting all conditions in a block deletes the block.
- Click Add a block and configure additional conditions.
After creating additional blocks, you can hover over a block and click Edit block to make changes.
Setting logic
Select AND or OR between conditions and blocks:
- AND = all conditions must be met
- OR = any condition must be met
When using JSON Attributes, you cannot mix AND and OR selections between conditions or blocks.
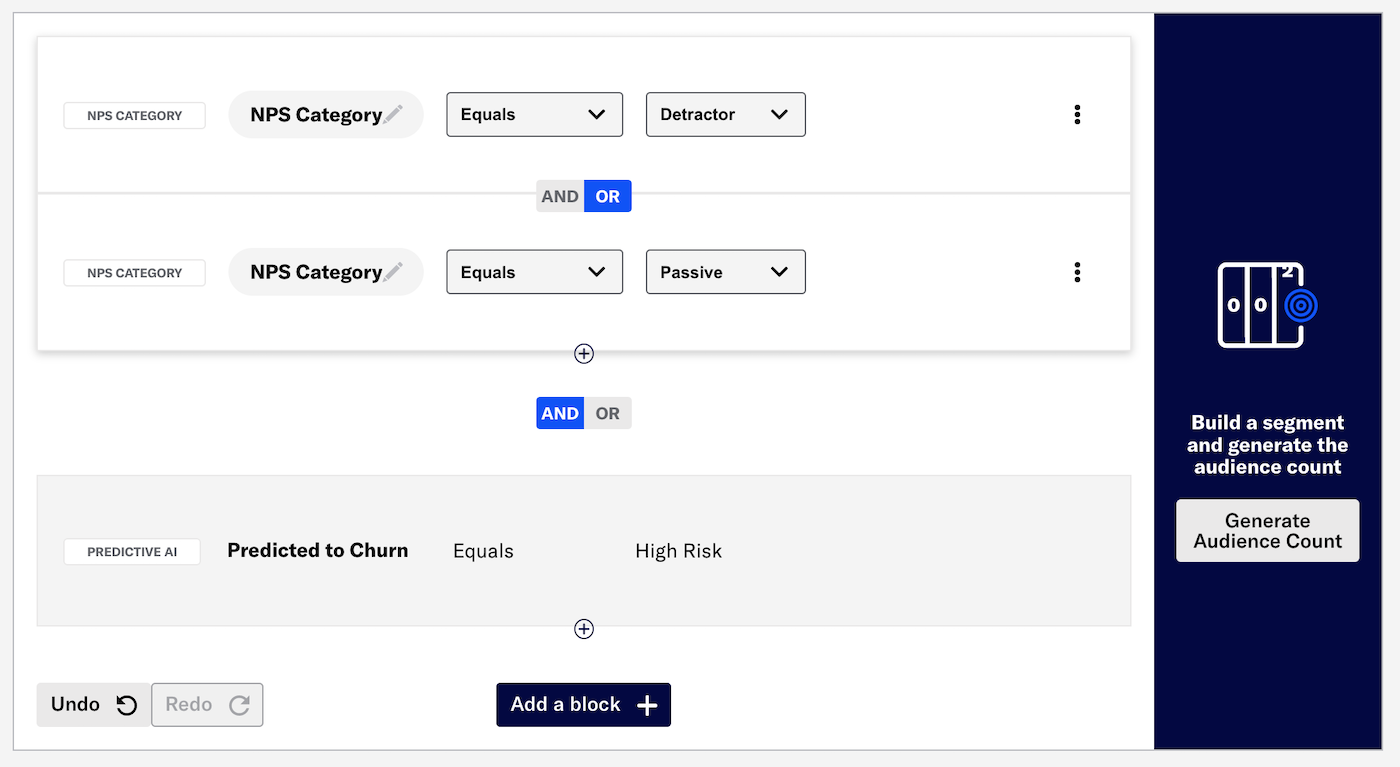
Generating audience count
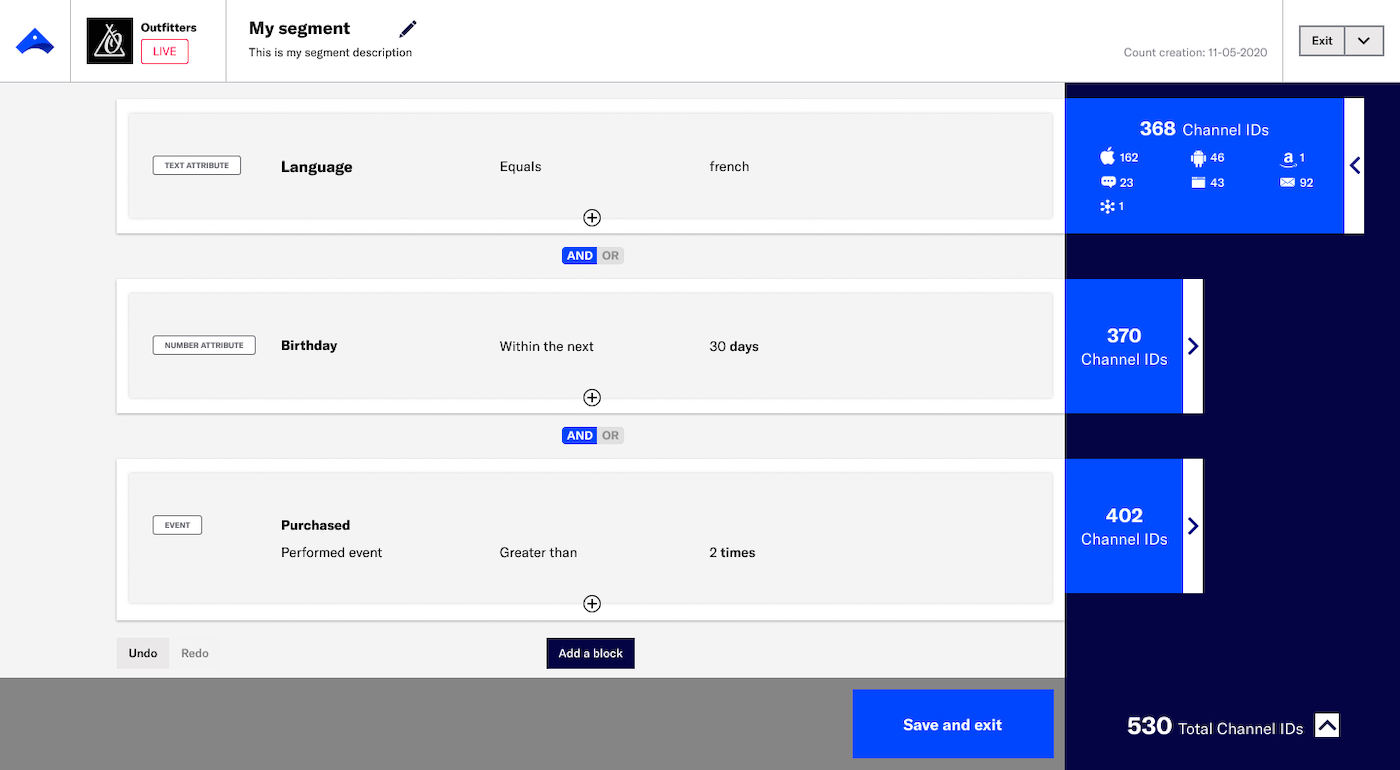
You can calculate the number of Channel IDsAn Airship-specific unique identifier used to address a channel instance, e.g., a smartphone, web browser, email address. included in segments you create in the Segment Builder and with the Target Specific Users option in the Message and A/B Test composers.
When creating segments, click Generate Audience Count. Total Channel IDs is generated for all segments. Counts per block are generated for segments with fewer than five blocks. A progress bar appears until the calculation is complete. Click Regenerate Audience Count after adding or removing criteria.
Calculations can take multiple minutes to complete, depending on audience size and query complexity.
In the Segment Builder, click or for a block or the entire segment to view the number of channel IDs per engagement channelA communication medium supported by the Airship service. Supported channels include app, web, email, SMS, and Open Channels. Within some channels there may be specific platforms with individual characteristics. Example platforms include Chrome for the web channel and Android for the mobile app channel.. The expanded view for the entire segment also lists the number of opted-in users per engagement channel.
In the composers, the number of channel IDs and opted-in users per engagement channel for a segment are listed in the Audience section in the composer’s Review step.
- For iOS, the opted-in counts only include devices opted-in to notifications and do not include devices where only background push is enabled.
- For Android, the opted-in counts include devices opted-in to notifications as well as devices where only background push is enabled.
For email, the audience count (within a block and for the segment) is the sum of channel IDs for transactional and commercial messages, and you can hover over the count to see the breakdown. Opted-in is for commercial messages only.
In Audience » Segments the count is displayed in the Audience Count column if it was already generated when creating the segment. Click Generate for any segment that does not already display its count.
Counts appear for 7 days, then you can click Generate again for a new count. A progress bar appears until the calculation is complete. Click to see the number of channel IDs and opted-in users per engagement channel.
Segmentation data
You can create segments using the following audience criteria:
- AttributesMetadata used for audience segmentation and personalization. They extend the concept of Tags by adding comparison operators and values to determine whether or not to target a user, helping you better evaluate your audience.
- Audience ListMessaging recipient groups based on either your own data or automatically-generated app user lifecycle information. You can use audience lists to target specific users. — Uploaded, Lifecycle, and Subscription lists
- AutogroupA default tag group. When devices are registered in Airship, they are automatically assigned a tag within the
autogrouptag group; the tag is a numeric value of 1 to 100. Some uses for autogroup tags are creating a control group, and to randomly Segment your audience. Autogroup must be enabled for your account — contact Support or your account manager. - Channel IDAn Airship-specific unique identifier used to address a channel instance, e.g., a smartphone, web browser, email address.
- Channel CoordinationA group of strategies you can use to target users where they are most likely to receive your message. — Last active, Priority channel, and User preference
- Device PropertiesMetadata representing the default attributes and property tags of a device, such as language and time zone settings, OS and browser versions, and notification opt-in status. Device properties are used for audience segmentation. The data used for the tags and attributes is collected automatically from the Airship SDKs, and are updated daily.
- EventsEvents represent activities in the Airship system, as well as user behavior in your app or website. You can also send external activities (e.g., POS transactions) into the Airship system as events. Events power Airship data products and can be used in audience segments, as Automation triggers, and for partner integrations.
- Named UserA customer-provided identifier used for mapping multiple devices and channels to a specific individual.
- NPS CategoryA category based on the score a user submits in an NPS survey. Ratings 9 and 10 have category Promoter, 7 and 8 are Passive, and 6 or lower are Detractor. They are available in survey reporting and are also a text attribute assigned to a user.
- NPS ScoreThe score (0-10) a user submits in an NPS survey. It is available in survey reporting and is also a number attribute assigned to a user.
- Predicted to Churn statusAnalyzes your audience for users that exhibit behaviors indicating they are likely to become inactive, and tags the users as High, Medium, or Low Risk.
- SegmentA grouping of audience members selected by unique or shared identifiers. Multiple identifiers can be combined within a Segment.
- TagMetadata that you can associate with channels or Named Users for audience segmentation. Generally, they are descriptive terms indicating user preferences or other categorizations, e.g.,
wine_enthusiastorweather_alerts_los_angeles. Tags are case-sensitive.
Lifecycle audience lists are not supported for Web, Email, SMS, or Open channels.
Categories