Sequence triggers
A trigger is an event that initiates an automation or sequence. This page details the triggers and options for sequences.
Configuring a sequence trigger
You configure triggers in the Journey MapA visualization of messaging components that can be connected to create a continuous user experience. You can also create and edit from the map.. Select a sequence, then you can add, edit, or remove triggers.

If a sequence does not have a trigger configured:
Select the trigger card and then the pencil icon (). If multiple triggers are configured, first select the trigger stack to expand it, and then select a trigger card.
Select and configure a trigger.
(Optional) Under Settings, define the times during which the trigger is active for the sequence. Trigger start and end dates are evaluated before sequence start and end dates.
- Enable Start Date and/or End Date.
- Set the time, time zone, and date.
(Optional) Under Conditions, build a SegmentA grouping of audience members selected by unique or shared identifiers. Multiple identifiers can be combined within a Segment. to filter the audience members entering the sequence. Creating a segment here uses the same segmentation data and procedure as in the Segment builder. You cannot set Conditions for the Inactivity or Manual Entry trigger.
Select Save.
To add another trigger, select the plus icon () below the configured triggers. Adding more triggers to an existing sequence does not require publishing changes. To delete a trigger, select its card, and then select the trash can icon ().
You can configure up to 10 triggers unless you are using the Inactivity trigger.
You can also edit the trigger for draft and paused sequences:
- Select a trigger card and then the pencil icon (). If multiple triggers are configured, first select the trigger stack to expand it, then select a trigger card.
- Make your changes.
- Select Save.
You can route users to a sequence when an In-App AutomationMessages cached on users’ devices and displayed when users meet certain conditions within your app, such as viewing a particular screen or opening the app a certain number of times. or SceneA single or multi-screen in-app experience cached on users’ devices and displayed when users meet certain conditions in your app or website, such as viewing a particular screen or when a Custom Event occurs. They can be presented in fullscreen, modal, or embedded format using the default swipe/click mode or as a Story. Scenes can also contain survey questions. displays on a device or when they select a button in an In-App Automation. See Linking Journey components in the Journeys documentation.
Triggers
Supported triggers per channel:
| Trigger | App | Web | SMS | Open | |
|---|---|---|---|---|---|
| Contact Association | ✓ | ✓ | ✓ | ✓ | ✓ |
| Custom Event | ✓ | ✓ | ✓ | ✓ | ✓ |
| Date Attribute | ✓ | ✓ | ✓ | ✓ | ✓ |
| Double Opt-In | ✓ | ||||
| Feature Flag Interaction Event | ✓ | ✓ | |||
| First Seen | ✓ | ✓ | ✓ | ✓ | ✓ |
| Inactivity | ✓ | ✓ | |||
| Location | ✓ | ||||
| Location Attributes | ✓ | ||||
| Manual Entry | ✓ | ✓ | ✓ | ✓ | ✓ |
| Predicted to Churn | ✓ | ✓ | |||
| Recurring Schedule | ✓ | ✓ | ✓ | ✓ | ✓ |
| Specific Date and Time | ✓ | ✓ | ✓ | ✓ | ✓ |
| Subscription | ✓ | ✓ | ✓ | ||
| Tag Change | ✓ | ✓ | ✓ | ✓ | ✓ |
Contact Association
The Contact Association trigger initiates a sequence when an anonymous channel is associated with a Named UserA customer-provided identifier used for mapping multiple devices and channels to a specific individual.. To configure, select the Contact Association trigger. No further setup is required.
Custom Event
The Custom Event trigger initiates an Automation or Sequence when a Custom Event associated with members of your audience occurs. See: Custom Events.
Configuration steps:
- Search for and select an event. Results include events that occurred in the last 30 days. If the event name you search for does not appear, click Use [search term] to use the event name as typed.
- (Optional) Click Add Another to add more events. Airship handles multiple events as a boolean OR.
- (Optional) Follow the Filtering Custom Events steps to add custom event filters.
- (Optional) Set the maximum age for the events. If an event is received after it is older than a certain age, the automation or sequence will not start.
- Enable Event Expiration.
- Enter a value in minutes, hours, days, months, or years.
If you are a Radar customer and have configured the Airship and Radar integration, Radar location events and properties will be available for use with the Custom Event trigger.
Filtering Custom Events
When configuring the Custom Event trigger you can filter custom events using numeric values associated with those custom events, or by key/value properties attached to the events. Filtering events this way can help you more precisely target your audience.
For example, if you have a custom event named “Purchase”, with a purchase category fedoras and a value 125.0 representing the dollar amount of the purchase, you can add these criteria to the Purchase event so that your message is only seen by users spending at least $125 on fedoras.
- Properties are only available for custom events defined in your project.
- Acceptable values and operators for event properties are based on configuration settings when adding the events to your project.
- The filter does not show events and event properties for custom events associated with Named UsersA customer-provided identifier used for mapping multiple devices and channels to a specific individual.. You can still use events associated with named users as triggers, but you must enter their information manually.
- Select Add event properties for the custom event.
- Select Add property and search for a property or select Add event value.
- If applicable, select the operator you want to use to evaluate the value or property.
- Enter or select the value you want to filter for.
- (Optional) Select the plus icon () to add an alternative for a filter.
- (Optional) Select Add property or Add event value to add more filters.
- Select All or ANY to determine how to evaluate multiple filters and alternatives within each filter.
- ALL = all criteria must be met (boolean AND)
- ANY = any criteria must be met (boolean OR)
- Select Save.
Filtering custom events using file upload
You can use file upload to provide multiple values to match against a specified event property’s value. For string properties only.
For example, for a point-of-sale system that emits events when a sale occurs, an event might have the following data:
name: "sale-completed"
properties:
   customer_id: 234234
   store_id: 103843
   region: "northwest-usa"
To trigger only when sales occur in the regions of northwest-usa and southwest-usa but not midwest-usa or any other region, you would do the following to filter your custom events:
- Search for or enter the property name
region. - Select operator File upload (is one of).
- Upload a
.txtfile containing valuesnorthwest-usaandsouthwest-usa.
Provide your values in a line delimited .txt file. Each value must be on a separate line. 100 KB maximum file size.
Date Attribute
The Date Attribute trigger initiates a Sequence for your entire audience or for a specified Segment based on the month and day of a date attribute. You can enter your selected audience into the Sequence on the next occurrence of the actual attribute date or a number of days before or after the date. See also: See also: Segmenting your audience and AttributesMetadata used for audience segmentation and personalization. They extend the concept of Tags by adding comparison operators and values to determine whether or not to target a user, helping you better evaluate your audience..
Configuration steps:
- Select your audience: all users or a segment.
- (Segment audience only) Search for and select a segment. Select View segment detail to open it in the Segment Builder and confirm the audience.
- Set when the audience should start the sequence.
- Search for and select a date attribute.
After saving, you can select the trigger card to view the segment name and scheduled send time relative to the attribute date. Select the name to open it in the Segment Builder.
Segmentation data is evaluated at send time. For example, if your sequence targets an audience list whose members change over time, it is sent to the current version of the list when the sequence is triggered.
Double Opt-In
The Double Opt-In trigger initiates an Automation or Sequence when a member of your audience opts in to commercial email messaging. You must provide an opt-in link in the body of the message, and users must follow the link to confirm opting in.You can filter the trigger by using properties attached to the opt-in event, and you can reference the properties using HandlebarsHandlebars is Airship’s templating language for personalization. Handlebars expressions use double curly braces wrapped around a content template, ranging from a simple variable, e.g., {{first_name}}, to complex evaluations of personalization data. to personalize the message content. If you choose to use properties in these ways:
- Your developer must add the properties when setting up email channel registration.
- You cannot search for properties when filtering. Instead, you will enter a property name, then opt to use the name as entered.
- The property name you enter when filtering (or for handlebars personalization) must be identical to the name in the
propertiesobject for the opt-in event.
For additional requirements and usage details, see: Double Opt-InA process where users who sign up for messaging must confirm opting in before they can receive messages..
No configuration is required after selecting the trigger, but you can filter by properties attached to the double opt-in event:
- Select Add Property.
- Enter a property in the search field and select Use [property].
- Select the operator you want to use to evaluate the property.
- Enter a value. Select to add additional values. Multiple values are evaluated as a boolean OR.
- (Optional) Select Add Property to add more filters.
- Select ALL/ANY to determine how to evaluate multiple filters and alternatives within each filter using a boolean AND/OR.
- AND = all criteria must be met
- OR = any criteria must be met
Feature Flag Interaction Event
The Feature Flag Interaction Event trigger initiates a Sequence when a Feature FlagAn experimentation tool for controlling the availability of content or functionality in your app or website. A flag’s Configurations determine the audience, schedule, and property values to apply when the flag is enabled. Flag properties enable making immediate code updates, bypassing the need for traditional code changes and release processes. interaction event occurs. You can trigger for users with access to the flagged feature, users who do not have access to the flagged feature, or both.
The interaction event must be implemented for the app or website. See Interaction events in the Feature Flags guide.
Configuration steps:
- Search for a flag by name, display name, or description.
- Select who can trigger the Sequence:
Option Description Users with feature access Trigger for members of the Feature Flag audience, which includes includes all Configuration audiences for a flag. Users without feature access Trigger for users who are not members of the Feature Flag audience. - Enter the number of times the event must occur before the Sequence is triggered.
First Seen
The First Seen trigger initiates an Automation or Sequence when members of your audience opt in to notifications or open your app for the first time. The behavior of the First Seen trigger varies by channel:
- Apps: Triggers the automation or sequence when users first open your app.
- Web, SMS, and open channels: Triggers the automation or sequence when users opt in to notifications.
- Email: Triggers the automation or sequence when users opt in to commercial notifications.
To configure, select the First Seen trigger. No further setup is required.
Users added to Airship through an Inline ListAn ad-hoc, CSV-formatted list of email, SMS, app, web, or open channel addresses that you want to register and send a message to. Unlike static lists or segments, you upload this list when creating your message. Airship registers new addresses in the list as channels when you send the message. or the create-and-send APIUsed to simultaneously register and send a notification to
email,sms, oropenchannels; synonymous with the Upload Users feature. are purposely excluded from the First Seen trigger, preventing them from receiving duplicate messages when added to the system.Automation: The First Seen trigger requires a delay of at least one hour to ensure delivery. Set a delay in the Delivery step in an automation.
Sequences: For the First Seen trigger, a delivery delay shorter than one hour is allowed but may result in dropped sends. Set a delay as the first step when creating a new message.
Inactivity
The Inactivity trigger:
- Cannot be combined with other triggers. It must be the only trigger for a Sequence.
- Does not support adding Conditions.
The Inactivity trigger initiates an Automation or Sequence when a member of your audience does not use your app or website for a period of time. The inactivity period begins the later of a) the creation time of the automation or sequence, or b) the last app or website activity by the user.
To configure, enter the period of inactivity in days.
Location
The Location trigger requires Gimbal integration.
The Location trigger initiates an Automation or Sequence based on an audience member’s device location. You can select a maximum of 20 locations per automation or sequence.
Configuration steps:
Click Select a Location.
Enter a search term. Results, if any, display on the map and are listed on the Results tab. There are two types of locations available for selection: geofences and beacons.
Click a result for a detailed view of a location.
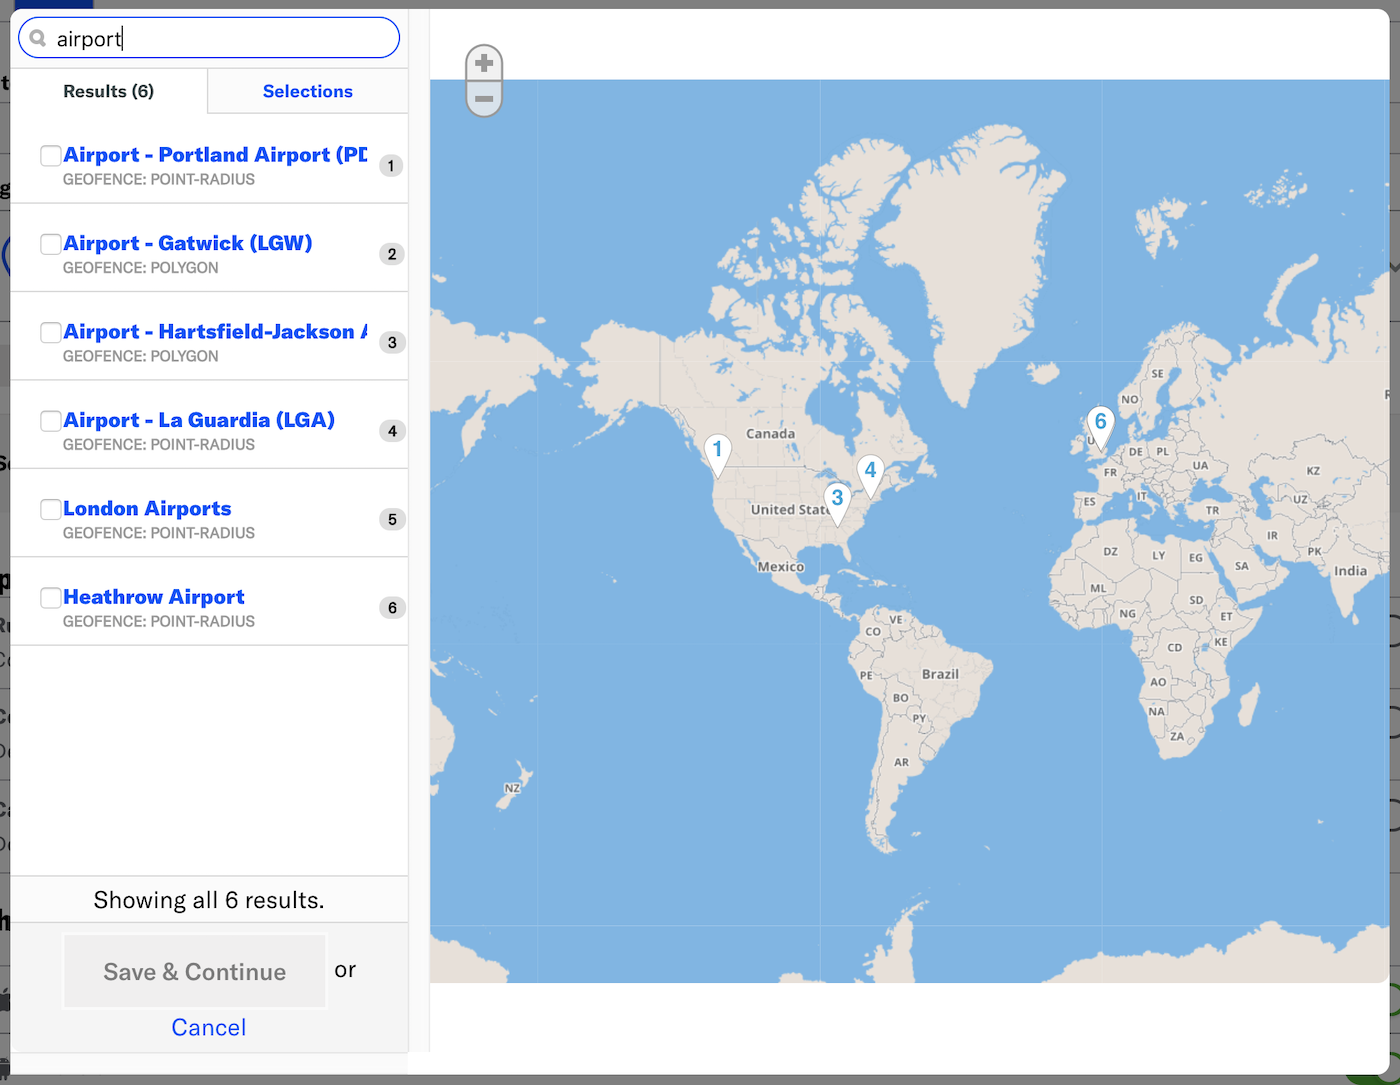
If selecting a geofence, the map will zoom to the selected location. Click and drag, and use the +/- zoom controls to change the displayed area.
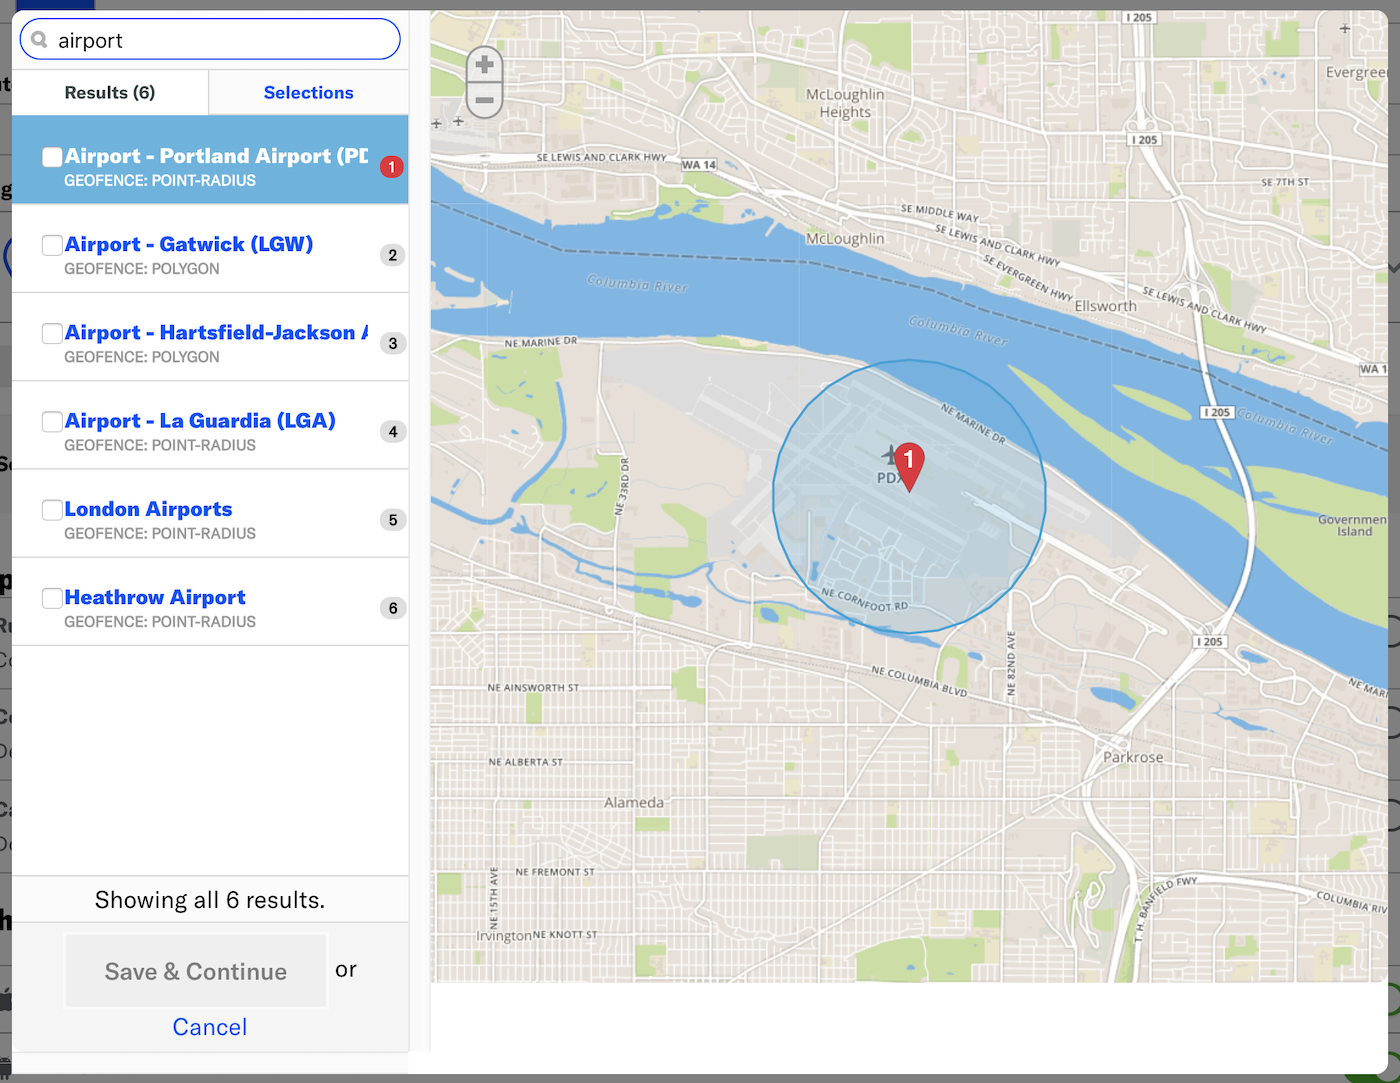
On the Results tab, check the box next to the locations you want to use as the trigger.
Review the Selections tab, then click Save and continue.
(Optional) Click Select a Location to add more locations.
Choose whether to trigger your automation or sequence when the user enters or exits a location.
Location Attributes
The Location Attributes trigger requires Gimbal integration.
The Location Attributes trigger initiates an Automation or Sequence based on key/value pair metadata associated with a particular location. You can add a maximum of 50 location attributes per automation or sequence.
Configuration steps:
Enter a key/value pair for the location you want to use as the message trigger.

(Optional) Click to add an alternative location attribute.
(Optional) Click Add Another to add more location attributes.
Select ALL/ANY to determine how to evaluate multiple location attributes and alternatives within each location attribute.
- ALL = all criteria must be met (boolean AND)
- ANY = any criteria must be met (boolean OR)
Note By default, the automation or sequence is triggered if the audience meets ALL the location attributes. For example, if you selected ALL, with attributes
half_offandhas_cafe, you’d only reach users who enter or exit locations that meet both conditions. If you select ANY, you’d reach all users who enter a location running a half-off campaign as well as all users who enter a location that has a cafe.Choose whether to trigger your automation or sequence when the user enters or exits a location.
Manual Entry
The Manual Entry trigger does not support adding Conditions.
The Manual Entry trigger initiates a Sequence for the audience members in a specified Segment. See also: Segmenting your audience.
Configuration steps:
- Search for and select a segment. Select View segment detail to open it in the Segment Builder and confirm the audience.
- Select Save.
- Select the card for the trigger you just saved. You can select the segment name to open it in the Segment Builder.
- Select Enter to enter the segment into the sequence so they can start receiving messages.
- Enter is not available until after the sequence has been started.
- If you enter the same segment into the sequence more than once, the users may receive the same messages from the sequence more than once.
Segmentation data is evaluated at send time. For example, if your sequence targets an audience list whose members change over time, it is sent to the current version of the list when the sequence is triggered.
Predicted to Churn
The Predicted to Churn trigger initiates an Automation or Sequence when Airship predicts an audience member’s likelihood of becoming inactive, or churning. Predictive Churn analyzes your audience for users that exhibit behaviors indicating they are likely to become inactive, and tags the users as High, Medium, or Low Risk.
To enable Predictive Churn features, go to Settings » Project configuration and click Manage for Predictive AI.
Configuration steps:
Select a risk profile.
- High risk: Users most likely to become inactive.
- Medium risk: Users who exhibit signs of potentially becoming inactive.
- Low risk: Users least likely to become inactive.
Choose whether to apply the trigger when the risk is added or removed.
Recurring Schedule
The Recurring Schedule trigger initiates a Sequence for the audience members in a specified Segment periodically at specified intervals. You can also set an end date for the Sequence and exclusion periods. See also: Segmenting your audience.
Configuration steps:
Search for and select a segment. Select View segment detail to open it in the Segment Builder and confirm the audience.
Specify the delivery interval by number of hours/days/weeks/months/years. For weeks, also specify which days of the week when the sequence will be triggered.
Set the initial date to trigger the sequence.
Set the initial time and time zone to trigger the sequence.
(Optional) Specify when the sequence can no longer be triggered.
- Enable End Date.
- Enter a date.
- Set the time and time zone.
(Optional) Specify dates or days of the week when the sequence should not be triggered. If you select the hours interval, you can also specify which hours of the day should be excluded. If you select the weeks interval, you can only specify which dates should be excluded.
If the scheduled date and time fall during an excluded period, Airship waits to trigger until the next available valid time. For example, if you scheduled weekly on Thursdays but added the date for Thanksgiving Day as an exclusion, the next available trigger time would be the Thursday after Thanksgiving Day.
- Enable Do not send.
- Select Add date exclusion, enter a date, and repeat for additional dates.
- Select Add day exclusion and select days.
- Select Add time exclusion and set start and end times.
After saving, you can select the trigger card to view the segment name, interval, and initial scheduled date and time (UTC). Select the name to open it in the Segment Builder.
Segmentation data is evaluated at send time. For example, if your sequence targets an audience list whose members change over time, it is sent to the current version of the list when the sequence is triggered.
Specific Date and Time
The Specific Date and Time trigger initiates a Sequence for the audience members in a specified Segment at a set date and time. See also: Segmenting your audience.
Configuration steps:
- Enter a date in YYYY-MM-DD format and select the time and time zone.
- Search for and select a segment. Select View segment detail to open it in the Segment Builder and confirm the audience.
After saving, select the trigger card to view the segment name and scheduled date and time (UTC). Select the name to open it in the Segment Builder.
Segmentation data is evaluated at send time. For example, if your sequence targets an audience list whose members change over time, it is sent to the current version of the list when the sequence is triggered.
Subscription
The Subscription trigger initiates an Automation or Journey when a member of your audience opts in to or out of a subscription list. Lists enabled for Auto opt-in are not available for this trigger. See: Auto opt-in.
Configuration steps:
- Search for and select at least one list.
- Specify whether to trigger when users opt in to, or opt out of, the list.
Tag Change
The Tag Change trigger initiates an Automation or Sequence when a tag is added or removed from a device.Configuration steps:
- Search for a tag. If the tag you search for does not appear, click Create [search term] to create a new tag. You can select a tag group filter before or after searching.
- (Optional) Click Add Another to add more tags. Airship handles multiple tags as a Boolean OR.
- Choose whether to apply the trigger when a tag is added or removed.
Trigger options
These steps are for configuring options in sequence’s Settings.
- Go to Journeys and select a sequence.
- Select the pencil icon ().
- Select Settings in the header.
- Select the Trigger tab.
- Configure one or more of the trigger options described below.
- Select Next, then Save & Continue.
You will return to the Sequence ManagerA preview of the messages in a Sequence, with options for editing and testing, and for running experiments.. You can start adding messages, or select Exit , then Save and exit to return to the map.
Start and End Dates
Define the times during which a sequence can deliver messages to your audience.
Trigger start and end dates are evaluated before sequence start and end dates. Verify settings in both locations before starting a sequence or publishing changes.
- Enable Start Date and/or End Date.
- Set the time, time zone, and date.
Frequency limits: Ignore Channel Message Limits
Enable this option to override the project-level Message LimitsLimits that cap the number of messages you can send within a specified time frame, preventing you from over-messaging your users. They are set at the project level., ensuring that your audience will receive your message even if they’ve reached the message limit. Overriding message limits does not override Rule limits (see below).
Frequency limits: Rule Limits
Rule limits cap the number of messages a user can receive from a Sequence within a time frame, preventing you from over-messaging your audience, e.g., a maximum of 1 per day. Rule limits are set per Sequence.- Enable Rule Limits.
- Select Add a daily limit and/or Add an all-time limit and enter a number.
Categories