Xamarin Setup
How to install the Airship Xamarin module.
We provide native binding packages for iOS and Android, and a cross-platform .NETStandard package for shared codebases:
- Native Bindings: The native bindings contain all the functionality of the iOS/Android SDKs, but provide no cross-platform interface.
- .NET Standard Library: The .NET Standard library exposes a common subset of functionality between the iOS and Android SDKs. This library can be used within shared codebases (e.g., a Xamarin Forms app).
Setup
This guide applies to apps built with Xamarin and Xamarin.Forms.
Please refer to the Airship .NET MAUI Setup guide for instructions to integrate Airship in .NET MAUI applications.
Before you begin, set up Push and any other Airship features for Mobile. The Xamarin bindings, like the SDKs that they wrap, are platform-specific, so this would be a good time to familiarize yourself with the SDK APIs and features for each platform you wish to target.
Android Integration
Android Packages
| Package name | Description |
|---|---|
| airship.android.core | Core SDK support |
| airship.android.adm | ADM push provider support |
| airship.android.fcm | FCM push provider support |
| airship.android.automation | In-App Automation, In-App Messaging, and Landing pages support |
| airship.android.layout | In-App Automation support |
| airship.android.messagecenter | Message Center support |
| airship.android.preferencecenter | Preference Center support |
Push Provider
The Airship SDK for Android is split into modules which allow you to choose the push providers included in your application. You must install at least one push provider in your Android app. You can install more than one provider.
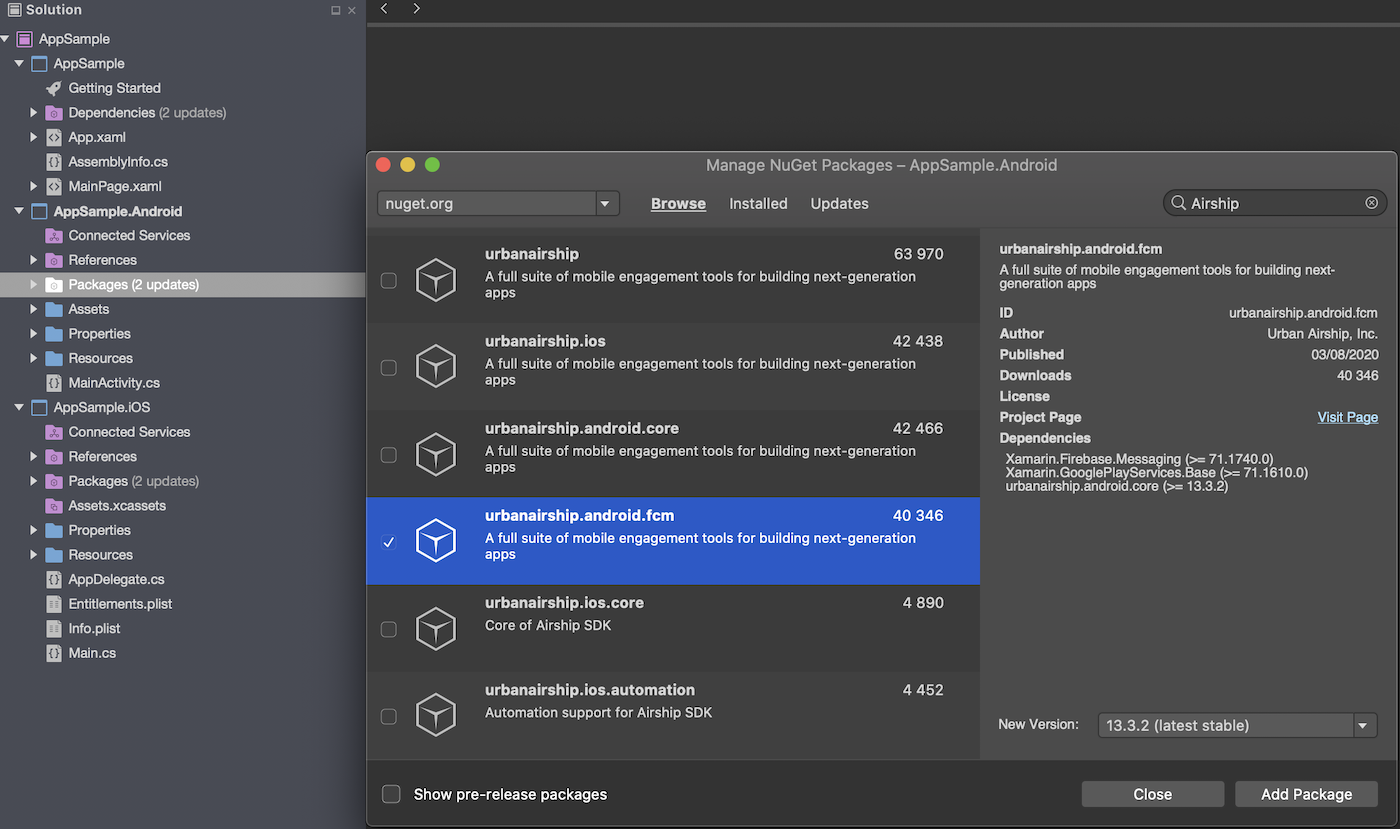
As with the core SDK bindings, the push provider(s) can be installed via the NuGet package manager in Visual Studio:
- Double-click the Packages folder in the Solution Explorer.
- With
nuget.orgselected as the source, search for Airship SDK. - Choose one or more of the push provider packages and select Add Package.
Airship Config
Airship config options are a convenient way to pass custom settings to your app
without needing to edit the source code. By default, the Airship SDK loads
these settings from the airshipconfig.properties file located in your
application’s Assets directory. Use this file, among other things, to set the
backend credentials for your app, and to toggle between development and production builds. In order
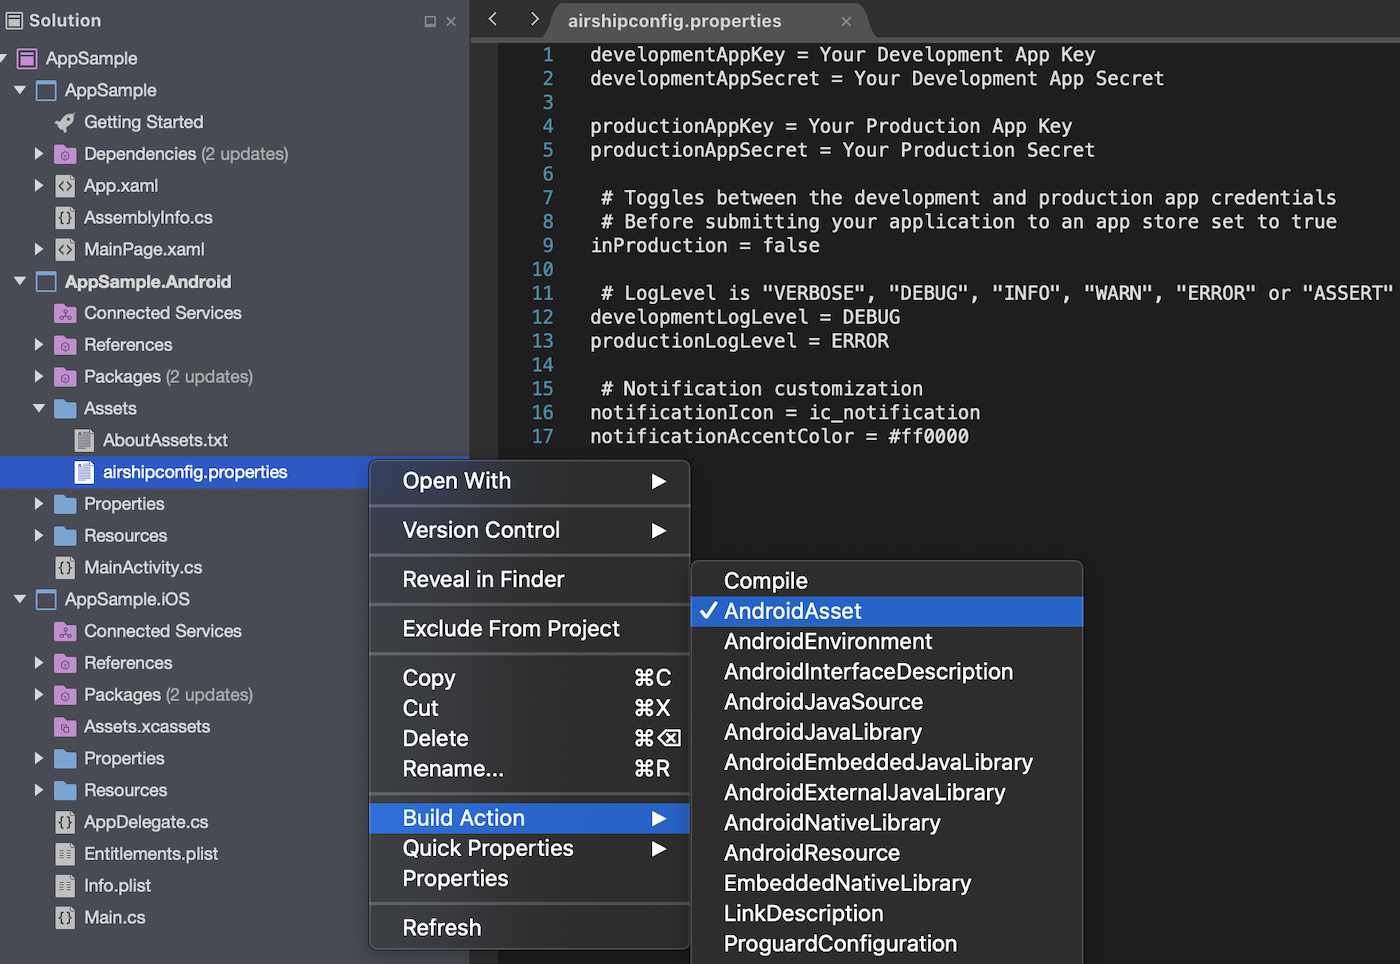
for this file to be visible to the SDK during TakeOff, be sure that its
Build Action is set to AndroidAsset in your app project.
airshipconfig.propertiesdevelopmentAppKey = Your Development App Key
developmentAppSecret = Your Development App Secret
productionAppKey = Your Production App Key
productionAppSecret = Your Production Secret
# Toggles between the development and production app credentials
# Before submitting your application to an app store set to true
inProduction = false
# LogLevel is "VERBOSE", "DEBUG", "INFO", "WARN", "ERROR" or "ASSERT"
developmentLogLevel = DEBUG
productionLogLevel = ERROR
# Notification customization
notificationIcon = ic_notification
notificationAccentColor = #ff0000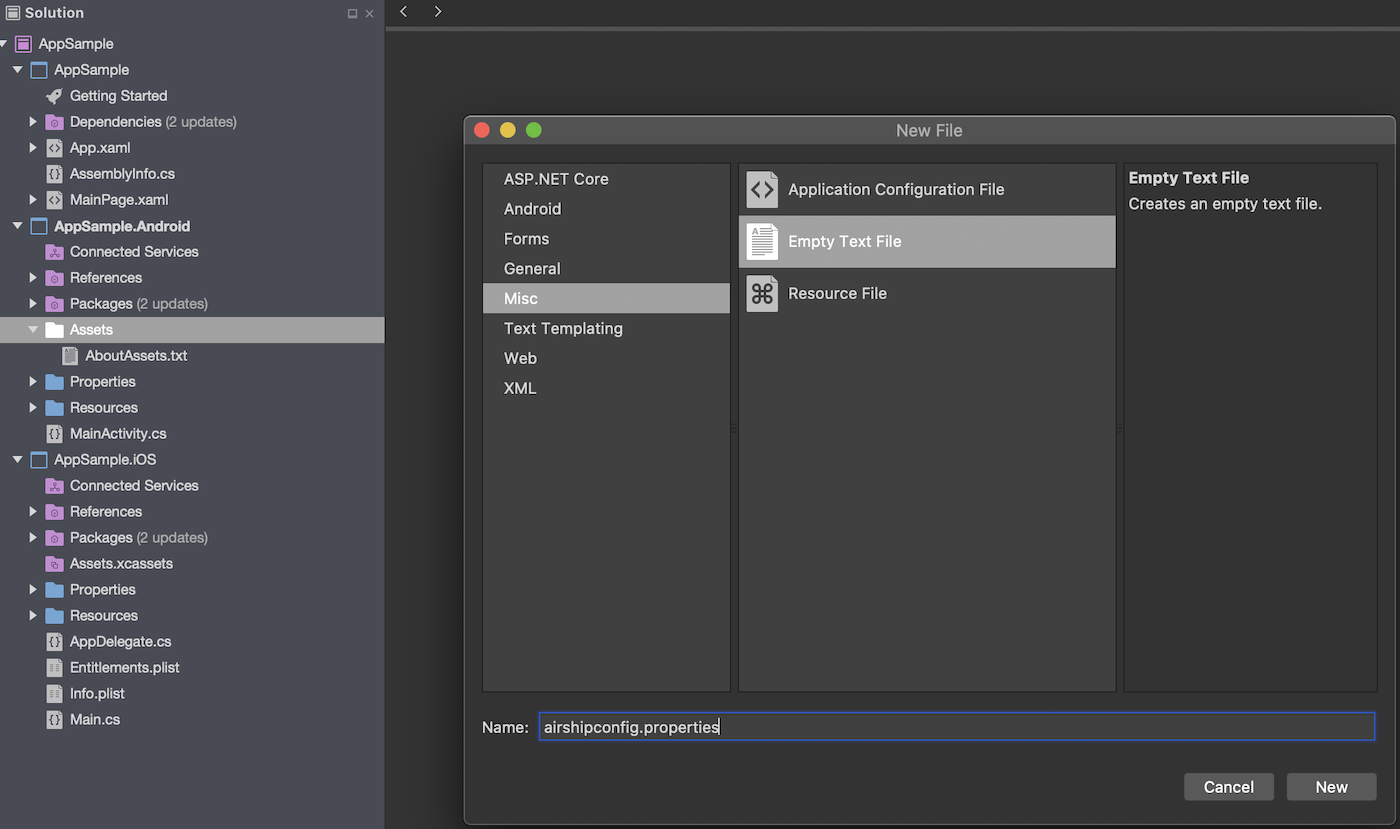
EU Cloud Site
If your app uses Airship’s EU cloud site, you will need to add that to airshipconfig.properties.
# EU Cloud Site
site = EU
FCM-specific instructions
As shown in Xamarin’s Remote Notifications with Firebase Cloud Messaging document, specify the receiver in the Android Manifest. Then follow FCM Android Setup and FCM Push Provider Setup to configure your application to use FCM.
AndroidManifest.xml<?xml version="1.0" encoding="utf-8"?>
<manifest xmlns:android="http://schemas.android.com/apk/res/android" android:versionCode="1" android:versionName="1.0" package="com.urbanairship.sample">
<uses-sdk android:minSdkVersion="21" />
<application android:theme="@style/AppTheme" >
<!-- START Manual Firebase Additions -->
<receiver
android:name="com.google.firebase.iid.FirebaseInstanceIdInternalReceiver"
android:exported="false" />
<receiver
android:name="com.google.firebase.iid.FirebaseInstanceIdReceiver"
android:exported="true"
android:permission="com.google.android.c2dm.permission.SEND" >
<intent-filter>
<action android:name="com.google.android.c2dm.intent.RECEIVE" />
<action android:name="com.google.android.c2dm.intent.REGISTRATION" />
<category android:name="${applicationId}" />
</intent-filter>
</receiver>
<!-- END Manual Firebase Additions -->
</application>
</manifest>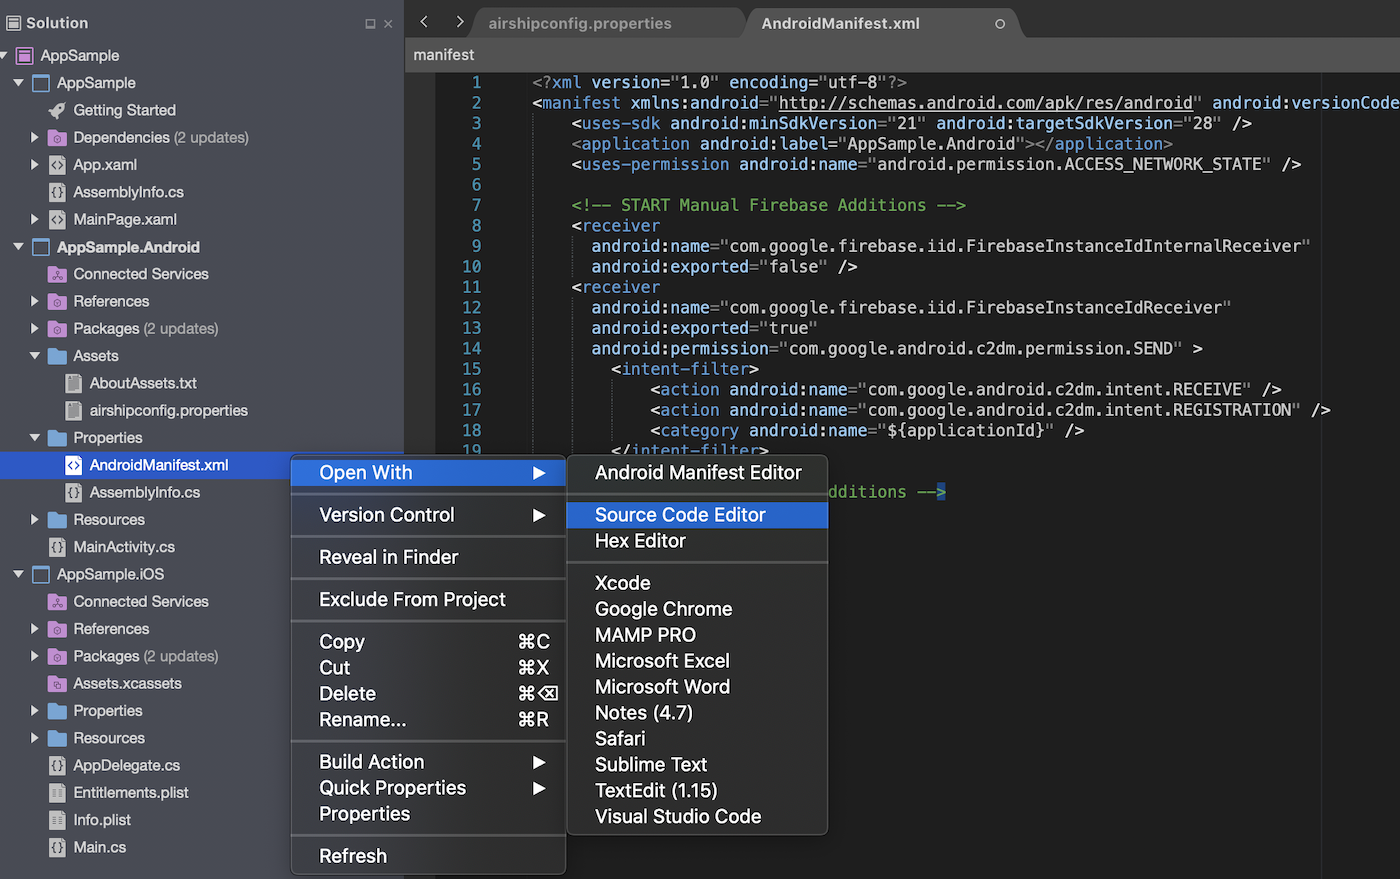
TakeOff
Create a class that extends Autopilot. Register the autopilot in the Assemblyinfo.cs
to generate the required metadata in the AndroidManifest.xml file.
[Register("com.example.SampleAutopilot")]
public class SampleAutopilot : Autopilot
{

  public override void OnAirshipReady(UAirship airship)
  {
    // perform any post takeOff airship customizations
  }

  public override AirshipConfigOptions CreateAirshipConfigOptions(Context context)
  {
    /* Optionally set your config at runtime
    AirshipConfigOptions options = new AirshipConfigOptions.Builder()
         .SetInProduction(!BuildConfig.DEBUG)
         .SetDevelopmentAppKey("Your Development App Key")
         .SetDevelopmentAppSecret("Your Development App Secret")
         .SetProductionAppKey("Your Production App Key")
         .SetProductionAppSecret("Your Production App Secret")
         .SetNotificationAccentColor(ContextCompat.getColor(this, R.color.color_accent))
         .SetNotificationIcon(R.drawable.ic_notification)
         .Build();
    return options;
    */
    return base.CreateAirshipConfigOptions(context);
  }
}[assembly: MetaData("com.urbanairship.autopilot", Value = "sample.SampleAutopilot")]If your app targets Android Kitkat (4.4), a bug in Xamarin prevents automatic takeoff
from executing in the SDK. As a simple workaround, you can add an Autopilot.AutomaticTakeOff
call in the OnCreate method of your main Activity, as shown below. This will ensure that
your Autopilot class works as expected. Apps targeting versions of Android greater than
4.4 can safely ignore this detail.
protected override void OnCreate (Bundle savedInstanceState)
{
Autopilot.AutomaticTakeOff(this.ApplicationContext);
...
}
iOS Integration
iOS Packages
The Airship Xamarin component comes with full native bindings on the iOS SDK. The majority of these
bindings can be installed using a single package named airship.ios. Location support
and notification extensions are provided as separate packages.
| Package name | Description |
|---|---|
| airship.ios | Umbrella SDK support |
| airship.ios.notificationcontentextension | Notification content extension support |
| airship.ios.notificationserviceextension | Notification service extension support |
While the airship.ios package is ideal for most use cases, more finely grained packages
are available as well for apps that require more modular integrations.
| Package name | Description |
|---|---|
| airship.ios.core | Core SDK support (excluding Automation, Message Center and Extended Actions) |
| airship.ios.basement | Basement |
| airship.ios.automation | Automation support |
| airship.ios.messagecenter | Message Center support |
| airship.ios.extendedactions | Extended Actions support |
| airship.ios.preferencecenter | Preference center support |
Airship Config
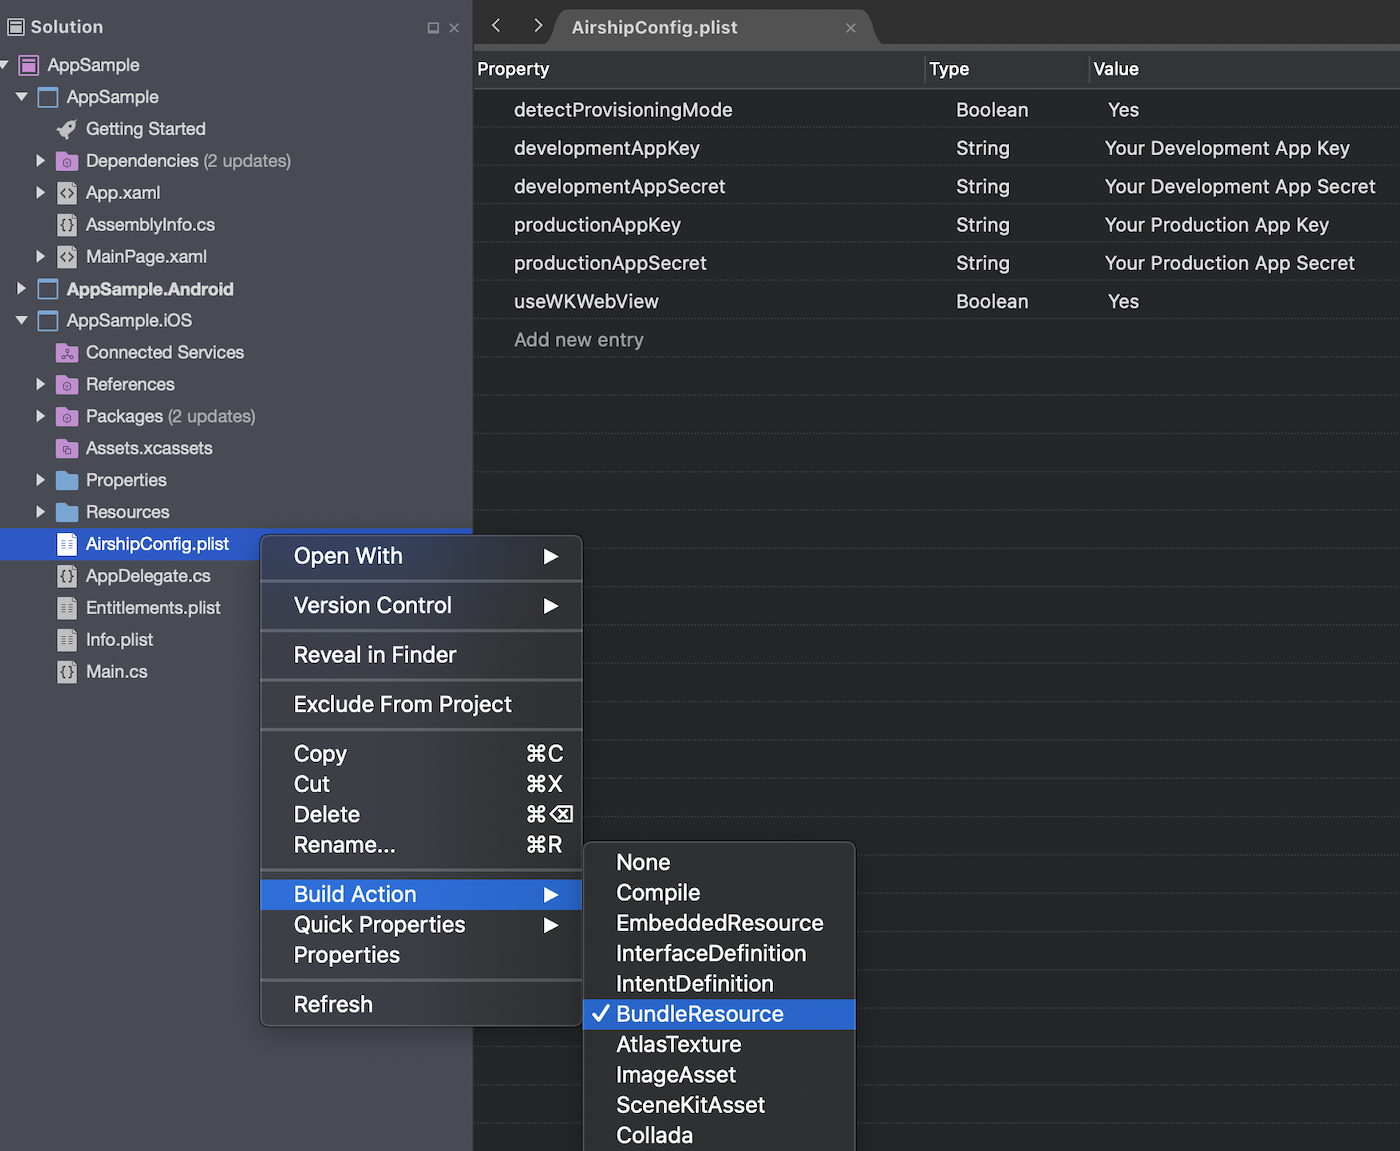
Provide an AirshipConfig.plist file with the application’s configuration. In order
for this file to be visible to the SDK during TakeOff, be sure that its
Build Action is set to BundleResource in your app project.
AirshipConfig.plist<?xml version="1.0" encoding="UTF-8"?>
<!DOCTYPE plist PUBLIC "-//Apple//DTD PLIST 1.0//EN" "http://www.apple.com/DTDs/PropertyList-1.0.dtd">
<plist version="1.0">
<dict>
<key>detectProvisioningMode</key>
<true/>
<key>developmentAppKey</key>
<string>Your Development App Key</string>
<key>developmentAppSecret</key>
<string>Your Development App Secret</string>
<key>productionAppKey</key>
<string>Your Production App Key</string>
<key>productionAppSecret</key>
<string>Your Production App Secret</string>
<key>useWKWebView</key>
<true/>
</dict>
</plist>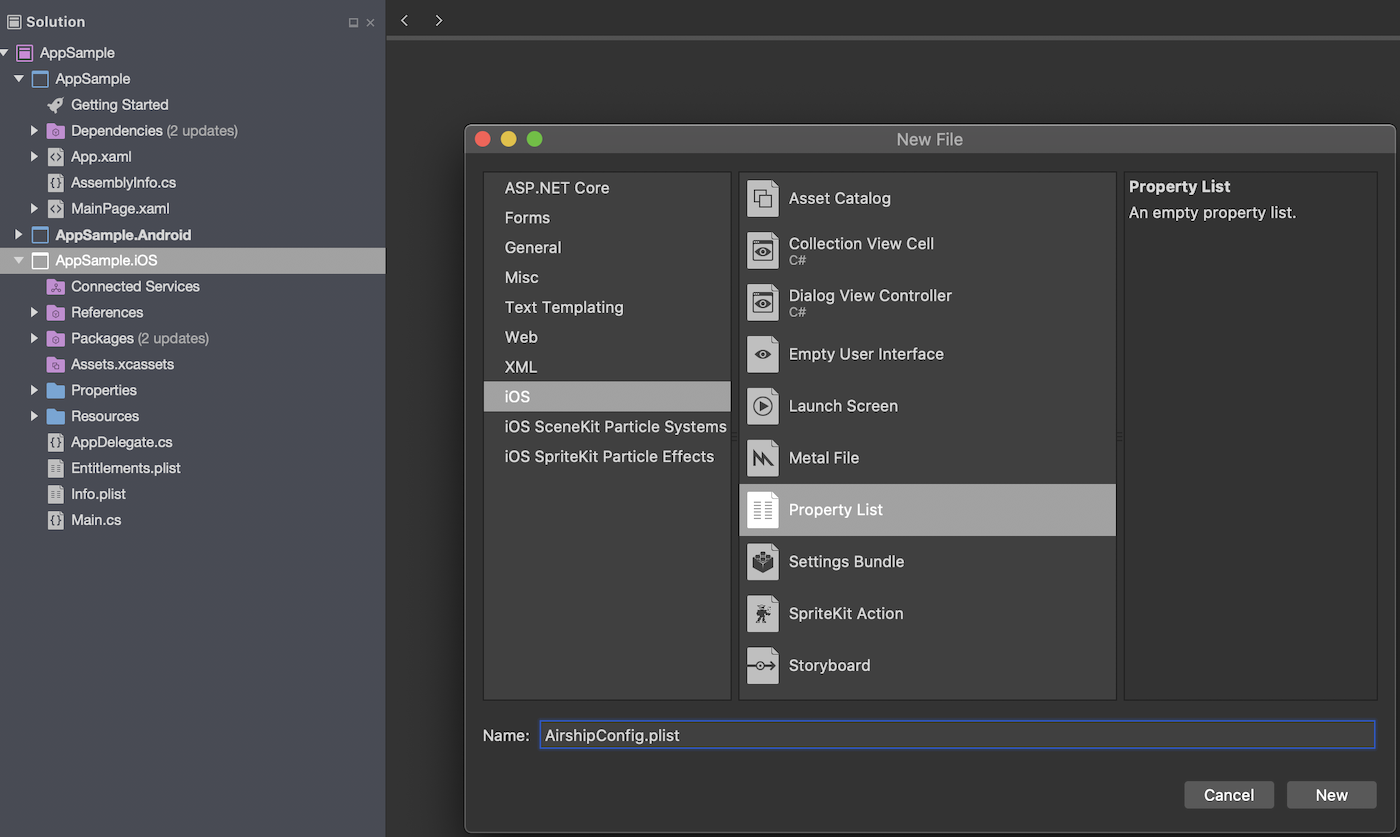
EU Cloud Site
If your app uses Airship’s EU cloud site, you will need to add that to AirshipConfig.plist.
  <key>site</key>
  <string>EU</string>
TakeOff
The Airship SDK requires only a single entry point in the app
delegate, known as takeOff. Inside your application delegate’s
FinishedLaunching method, initialize a shared UAirship instance by
calling
UAirship takeOff
.
This will bootstrap the SDK and look for settings specified in the
AirshipConfig.plist config file.
If the takeOff process fails due to improper or missing configuration, the shared
UAirship instance will be null. The Airship SDK always logs implementation errors at
high visibility.
[Register ("AppDelegate")]
public class AppDelegate : UIApplicationDelegate
{
   public override bool FinishedLaunching(UIApplication application, NSDictionary launchOptions)
   {
      UAirship.TakeOff();
      // Configure airship here
      return true;
   }
}
Notification Service Extension
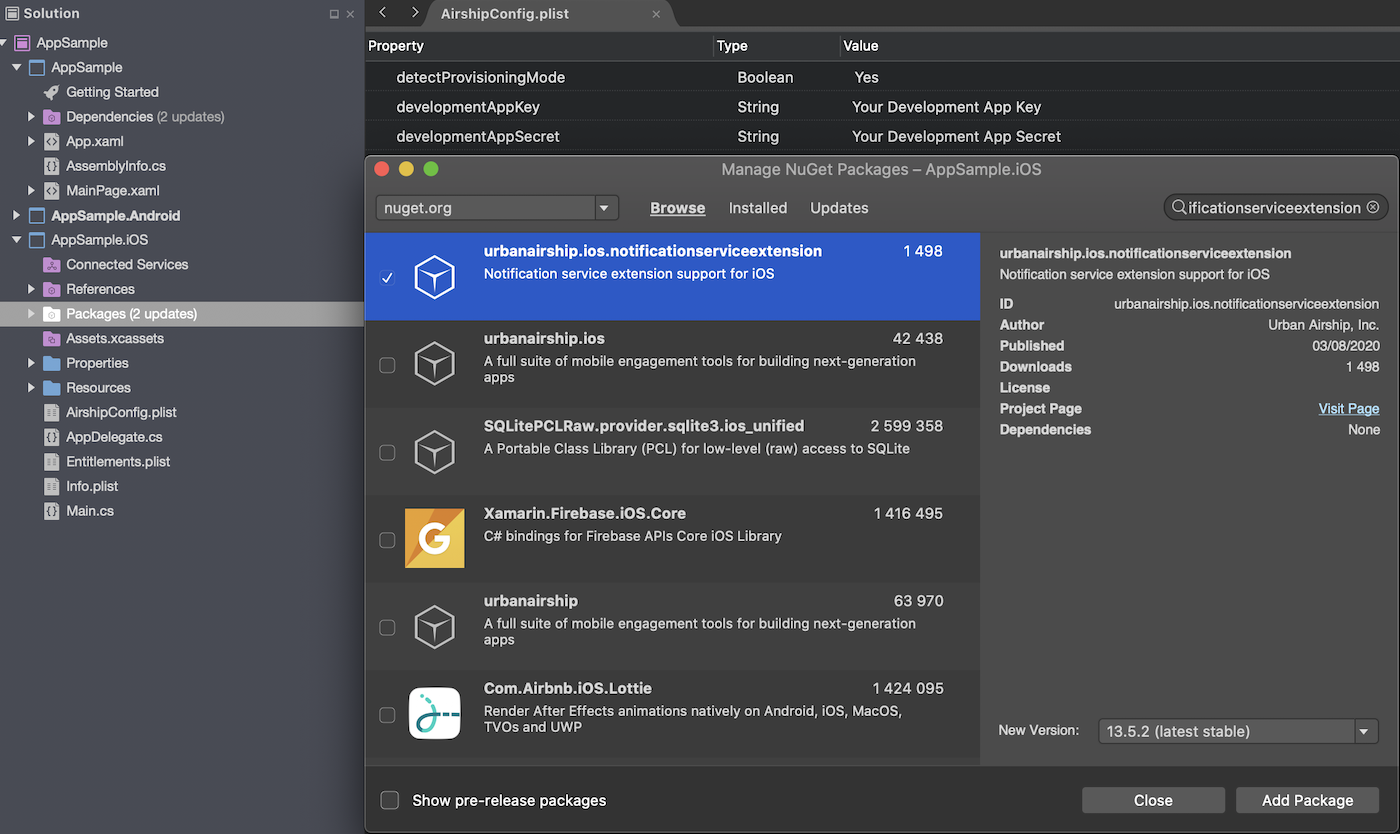
In order to take advantage of iOS notification attachments, such as images, animated gifs, and video, you will need to add the Notification Service Extension NuGet package to your project.
Add a new NuGet package in Visual Studio
Search for “airship.ios.notificationserviceextension”
Follow the iOS Notification Service Extension Guide.
Notification Content Extension
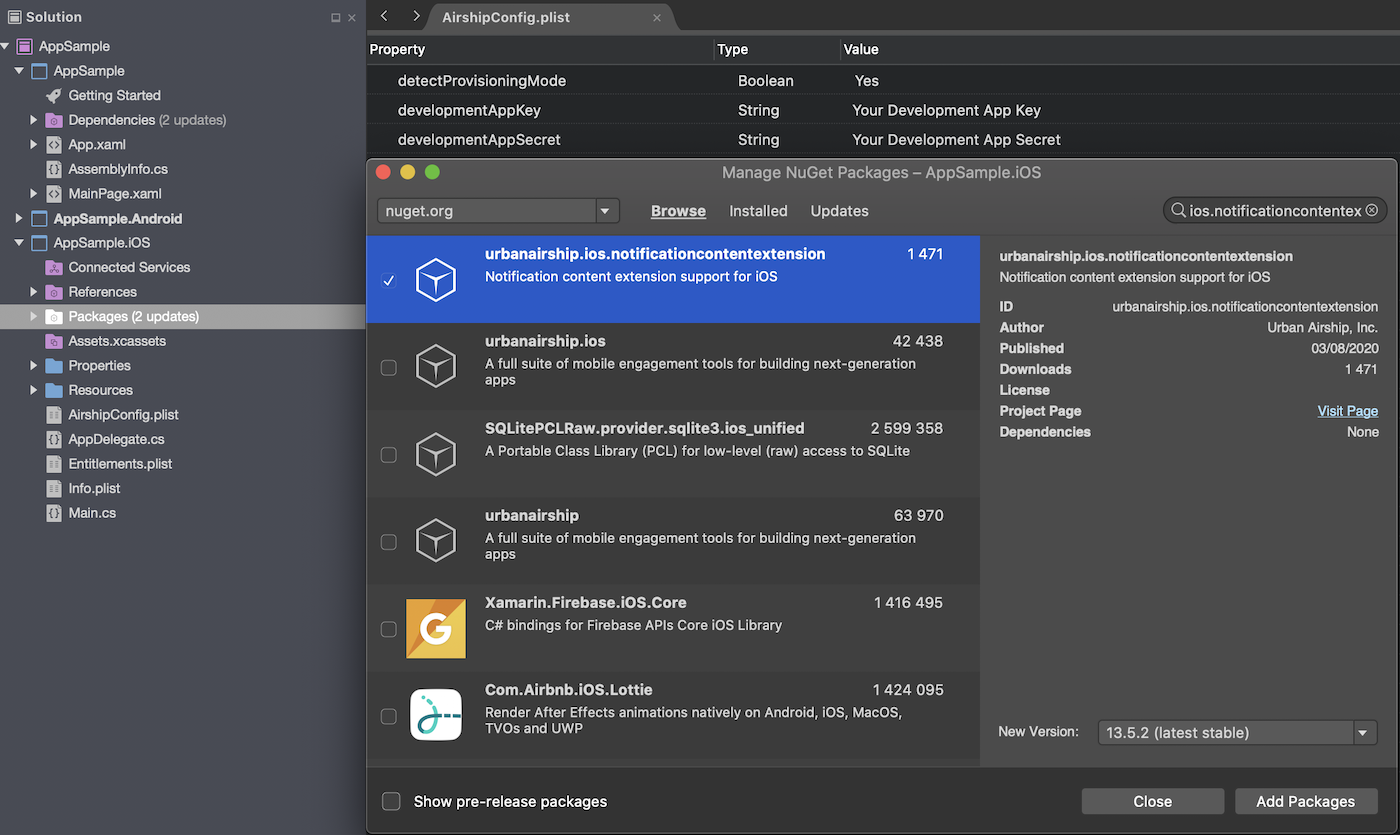
The iOS SDK’s Notification Content Extension provides support for carousel UI. To include this in your app, add the Notification Content Extension NuGet package to your project.
Add a new NuGet package in Visual Studio
Search for “airship.ios.notificationcontentextension”
Follow the iOS Notification Content Extension Guide.
UA Xamarin Components Installation
Installing the Airship components is a quick and easy process, seamlessly integrated into Visual Studio. You have two installation options:
- Native bindings: If you are only working with one platform, or if there is no reason for you to have a shared codebase between your platform projects, this may be an appropriate option.
- .NET Standard library + native bindings: If you are working with multiple platforms, and you have a shared codebase (e.g., a Forms app), this may be an appropriate option. You can use the .NET Standard library in the shared codebase, while the native bindings can handle platform-specific calls in each platform project.
If you choose to install .NET Standard library, note that it must be installed in each platform-specific project.
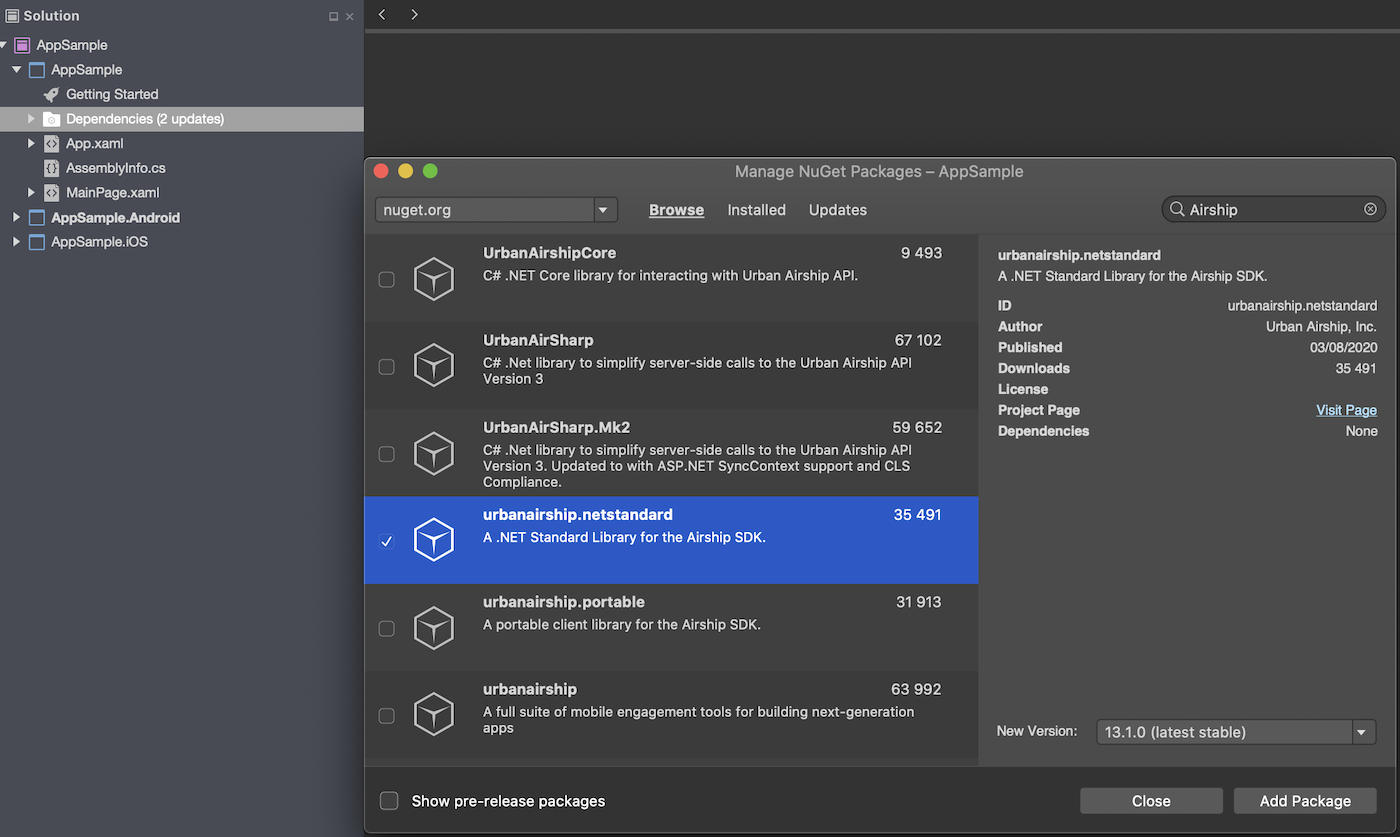
All components can be installed via the NuGet package manager.
NuGet
The SDK can be installed via the NuGet package manager:
- Double-click the Packages folder in the Solution Explorer.
- With
nuget.orgselected as the source, search for Airship SDK. - Choose either the .NET Standard library or native bindings and select Add Package.
The Airship SDK packages were updated in 2018 to reflect the modularization of the Android SDK, which is
now split into Core, ADM, FCM, and a set of feature modules. The original package named urbanairship is deprecated
and out of date, but currently remains in NuGet. When in doubt, check the release date of the package before
installing.
Core Native Bindings for Android:
PM> Install-Package airship.android.coreCore Native Bindings for iOS:
PM> Install-Package airship.ios.NET Standard Library:
PM> Install-Package airship.netstandardNative Bindings
Using the native binding libraries is similar to using either the Android or iOS SDKs. Below we provide a simple comparison between setting a named user ID in the native SDK and binding library. In general, the two changes you will notice between the bindings and SDKs are:
- Method calls are generally capitalized.
- Getters/setters are generally converted into properties.
Android
// Set the named user ID
UAirship.shared().getContact().identify("NamedUserId");// Set the named user ID
UAirship.Shared().Contact.Identify("NamedUserId");For more information on the Android SDK, please see the Android platform documentation.
iOS
// Set the named user ID
Airship.contact.identify("NamedUserId")// Set the named user ID
UAirship.Contact.Identify("NamedUserId");For more information on the iOS SDK, please see the iOS platform documentation.
.NET Standard Library
The .NET Standard library provides a unified interface for common SDK calls, allowing users to place common code in a shared location. This is ideal for working with Xamarin Forms – simply add the NuGet dependency and all of these calls should be available from your shared codebase.
Because the .NET Standard library currently has no shared interface for initializing
the app (i.e., calling takeOff), you must install the native
bindings into each platform-specific project.
The .NET Standard library calls are accessible through the Airship class, found in the UrbanAirship.NETStandard namespace.
Full documentation for the .NET Standard library can be found here.
Implementation best practices
Make sure to set up logging. Internal logging can be valuable when troubleshooting issues that arise when testing.
Anytime you make any changes or updates to the SDK, test on a development device to ensure your integration was successful. Also make sure analytic information is still flowing to your Airship project before sending the app to production.
Categories
