iOS Setup
How to install the iOS Airship SDK.
Requirements
- Minimum iOS version supported
15+ - Requires Xcode
15.3+
SDK Installation
The Airship SDK can be installed using CocoaPods, Swift Package Manager, Carthage, or manually. Pick the option that makes the most sense for your project.
CocoaPods
Before you begin, ensure that you have CocoaPods installed. If you are having troubles with CocoaPods, check out the troubleshooting guide .
$ gem install cocoapodsUpdate the podfile
The Airship pod is divided up into several subspects that can be installed
independently and in combination with one another when only a particular
selection of functionality is desired:
Airship/Core: Push messaging features including channels, tags, named user and default actionsAirship/MessageCenter: Message centerAirship/Automation: Automation and in-app messagingAirship/PreferenceCenter: Preference Center module.Airship/FeatureFlags: Feature Flags module.Airship/ObjectiveC: Objective-C bindings.
If no subspec is defined, all subspecs will be included.
Example podfile:
# Airship SDK
target "<Your Target Name>" do
  pod 'Airship'
end
Example podfile:
target "<Your Target Name>" do
  pod 'Airship/Core'
  pod 'Airship/MessageCenter'
  pod 'Airship/Automation'
  pod 'Airship/FeatureFlags'
end
Explicitly specify the tvOS platform in your podfile when targeting tvOS. Cocoapods automatic platform selection can also be used if the platform must be left unspecified.
When targeting tvOS - specify the platform in your podfile:
platform :tvos, '11.0'Install the pods
$ pod installAfter running pod install, an Xcode workspace (extension .xcworkspace) will be generated.
Make sure to always open it instead of the project file (extension .xcodeproj)
when building your projects.
Swift Package Manager
In your Xcode project, go to the Package Dependencies tab of the project settings.
Add a new package by clicking on the plus sign (+).
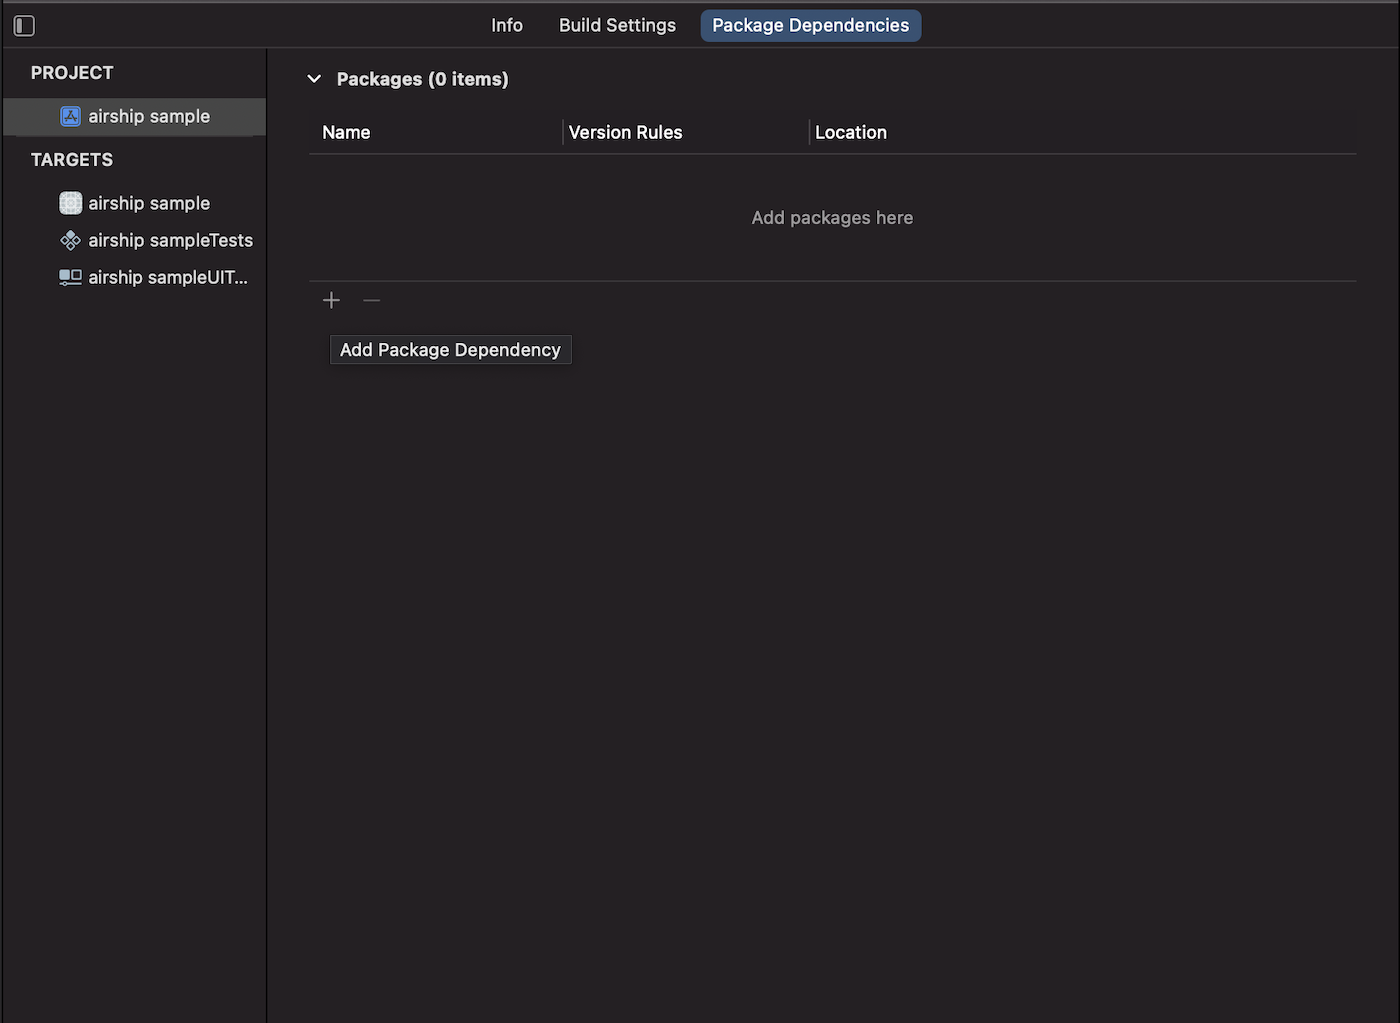
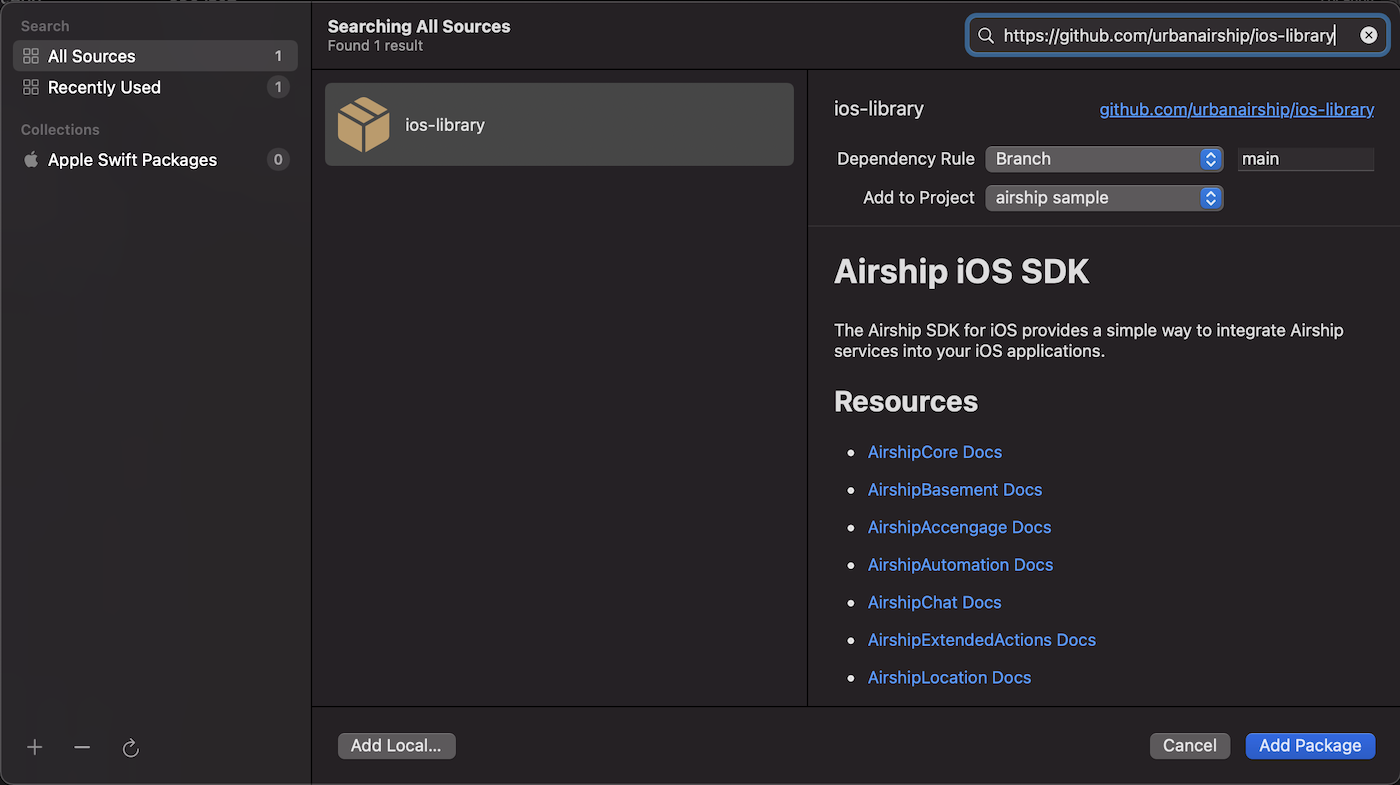
Then, search for the package using the url.
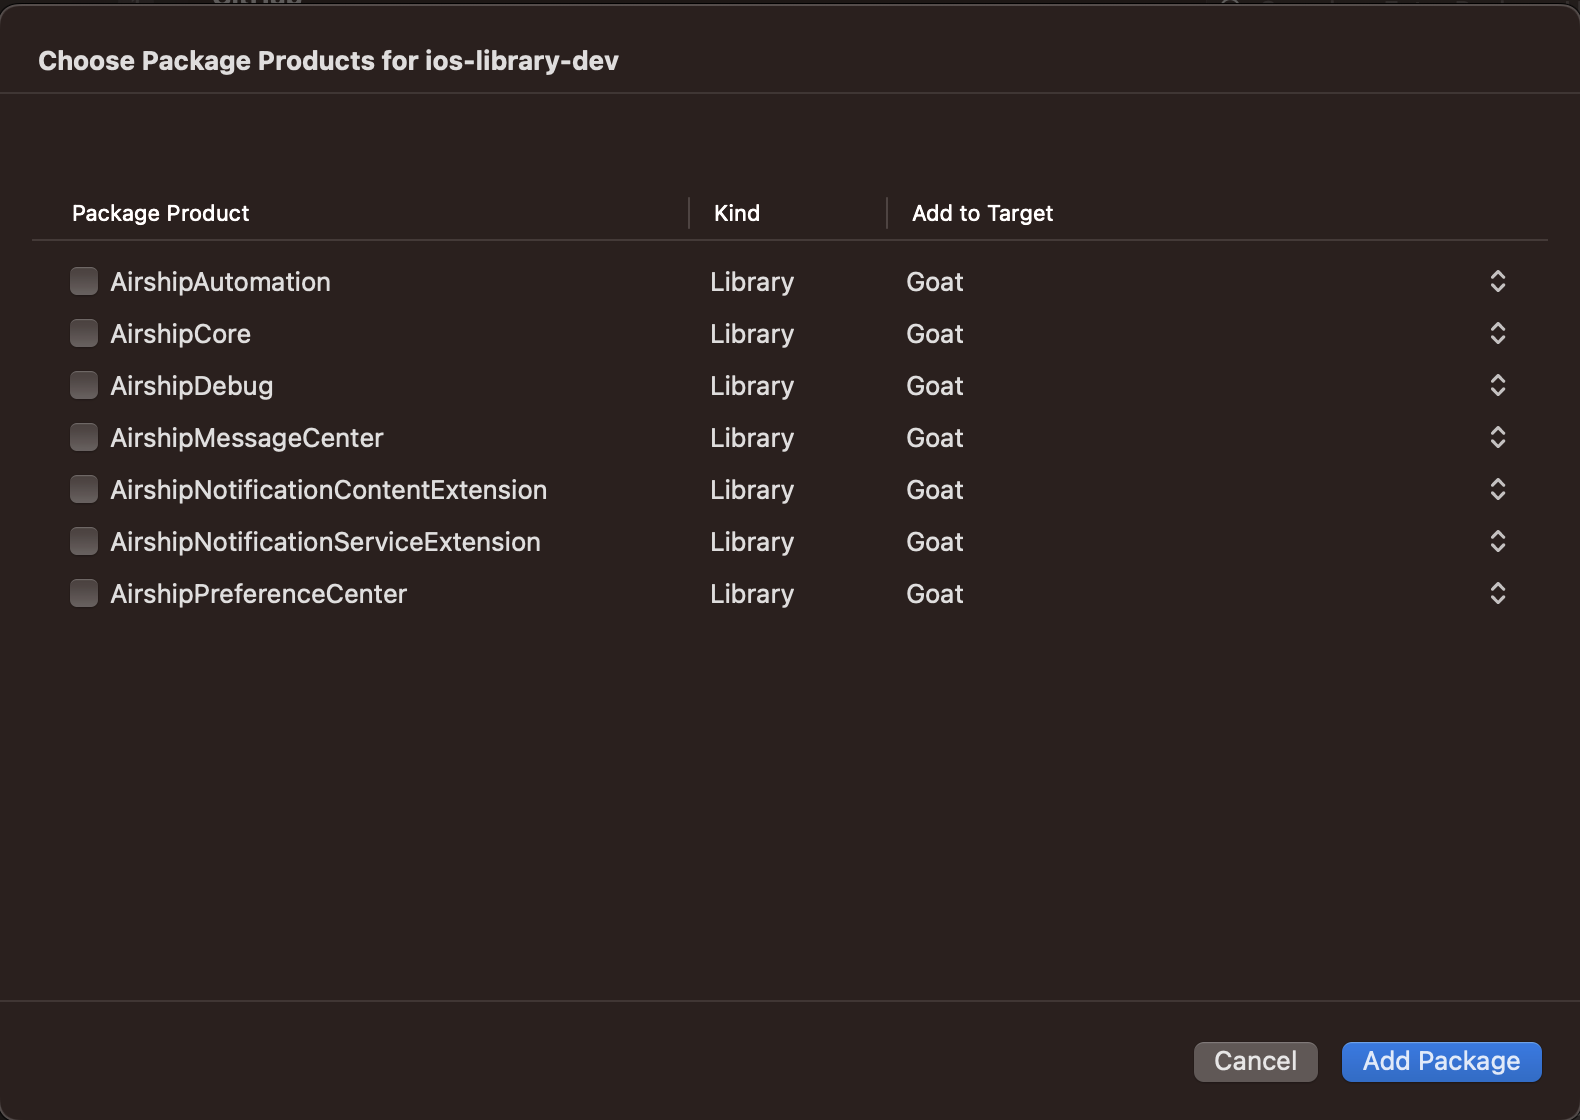
Choose Airship package products that you want to include in your app.
Carthage
Before you begin, ensure you have Carthage installed.
Adding the SDK framework to your application
Verify Enable Modules and Link Frameworks Automatically are enabled in the project’s Build Settings.
Follow Carthage’s adding frameworks to an application instructions to add frameworks to your application.
Specify the Airship iOS SDK in your cartfile:
github "urbanairship/ios-library"Carthage builds against the Airship project will result in several framework build products. Follow the selecting frameworks section to select the correct frameworks for your use case.
Manual
Start by downloading and decompressing the latest version of the iOS SDK .
Inside the folder you should see a collection of XCFrameworks. Follow the selecting frameworks section to select the correct XCFrameworks for your use case.
Add an XCFramework to your project
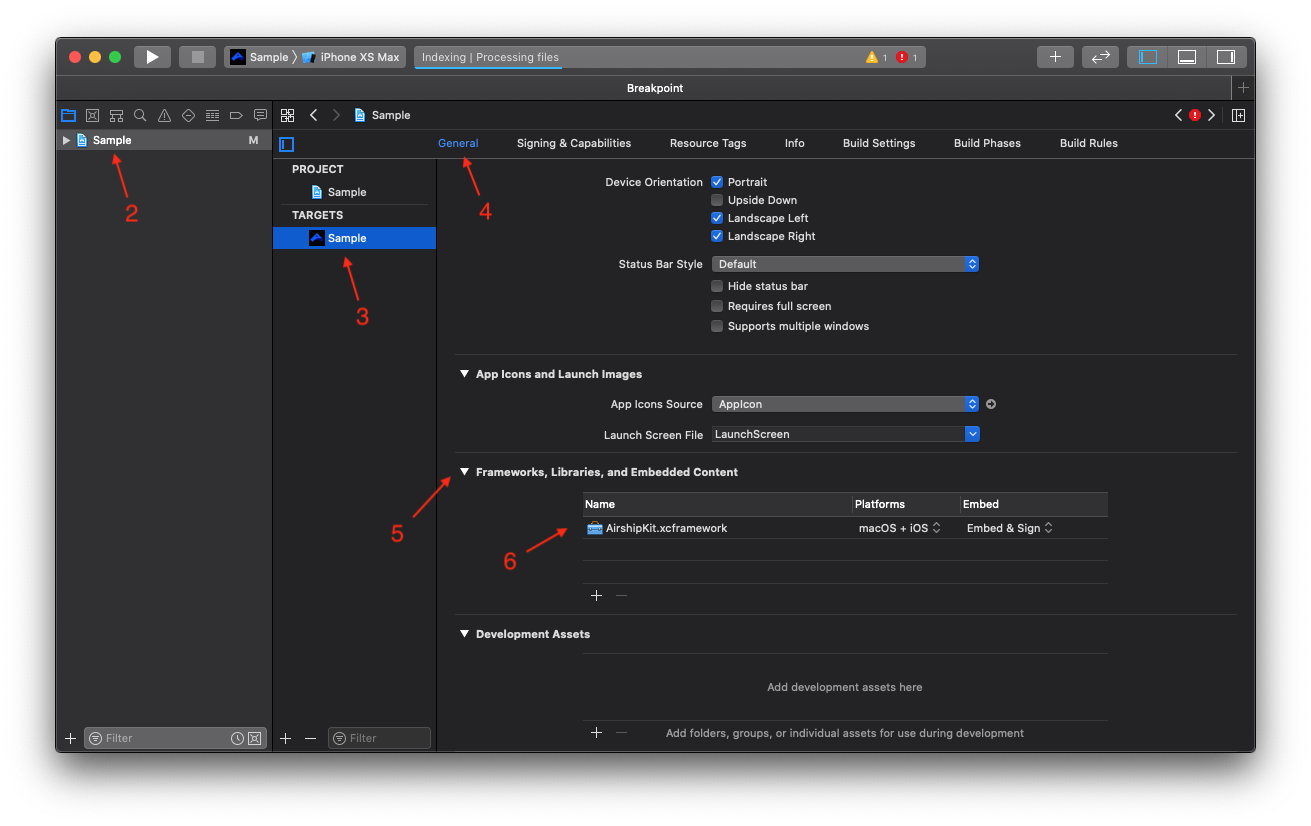
- Open your project in Xcode.
- Click on your project in the Project Navigator.
- Select your target.
- Make sure the General tab is selected.
- Scroll down to Frameworks, Libraries, and Embedded Content.
- Drag in desired XCFrameworks from the downloaded SDK. It is wired up automatically as a dependency of your target.
Verify Build Settings:
Enable Modules should be set to Yes
Link Frameworks Automatically should be set to Yes
Selecting frameworks
Installation steps that require integrating frameworks or XCFrameworks necessitate choosing the correct standalone framework(s) that match the needs of the desired use case.
The available frameworks include:
AirshipBasement: Required by AirshipCore.AirshipCore: Push messaging features including channels, tags, named user and default actionsAirshipMessageCenter: Message centerAirshipAutomation: Automation and in-app messagingAirshipPreferenceCenter: Preference CenterAirshipFeatureFlags: Feature FlagsAirshipObjectiveC: Objective-C Bindings
Extension frameworks:
AirshipNotificationServiceExtension: Service extension features
The primary Airship framework includes the standard feature set and is advisable for most use cases. Feature frameworks may be used independently and in combination with one another when only a particular selection of functionality is desired. Extension frameworks are necessary for implementing the content and service extensions.
Update the Target’s Capabilities
Use Xcode to enable push notifications in the target’s Signing & Capabilities pane:
Open your project in Xcode.
Click on your project in the Project Navigator.
Select your main app target and then click the
Signing & Capabilitiestab.If you do not see Push Notifications enabled, click
+ Capabilityand addPush Notifications.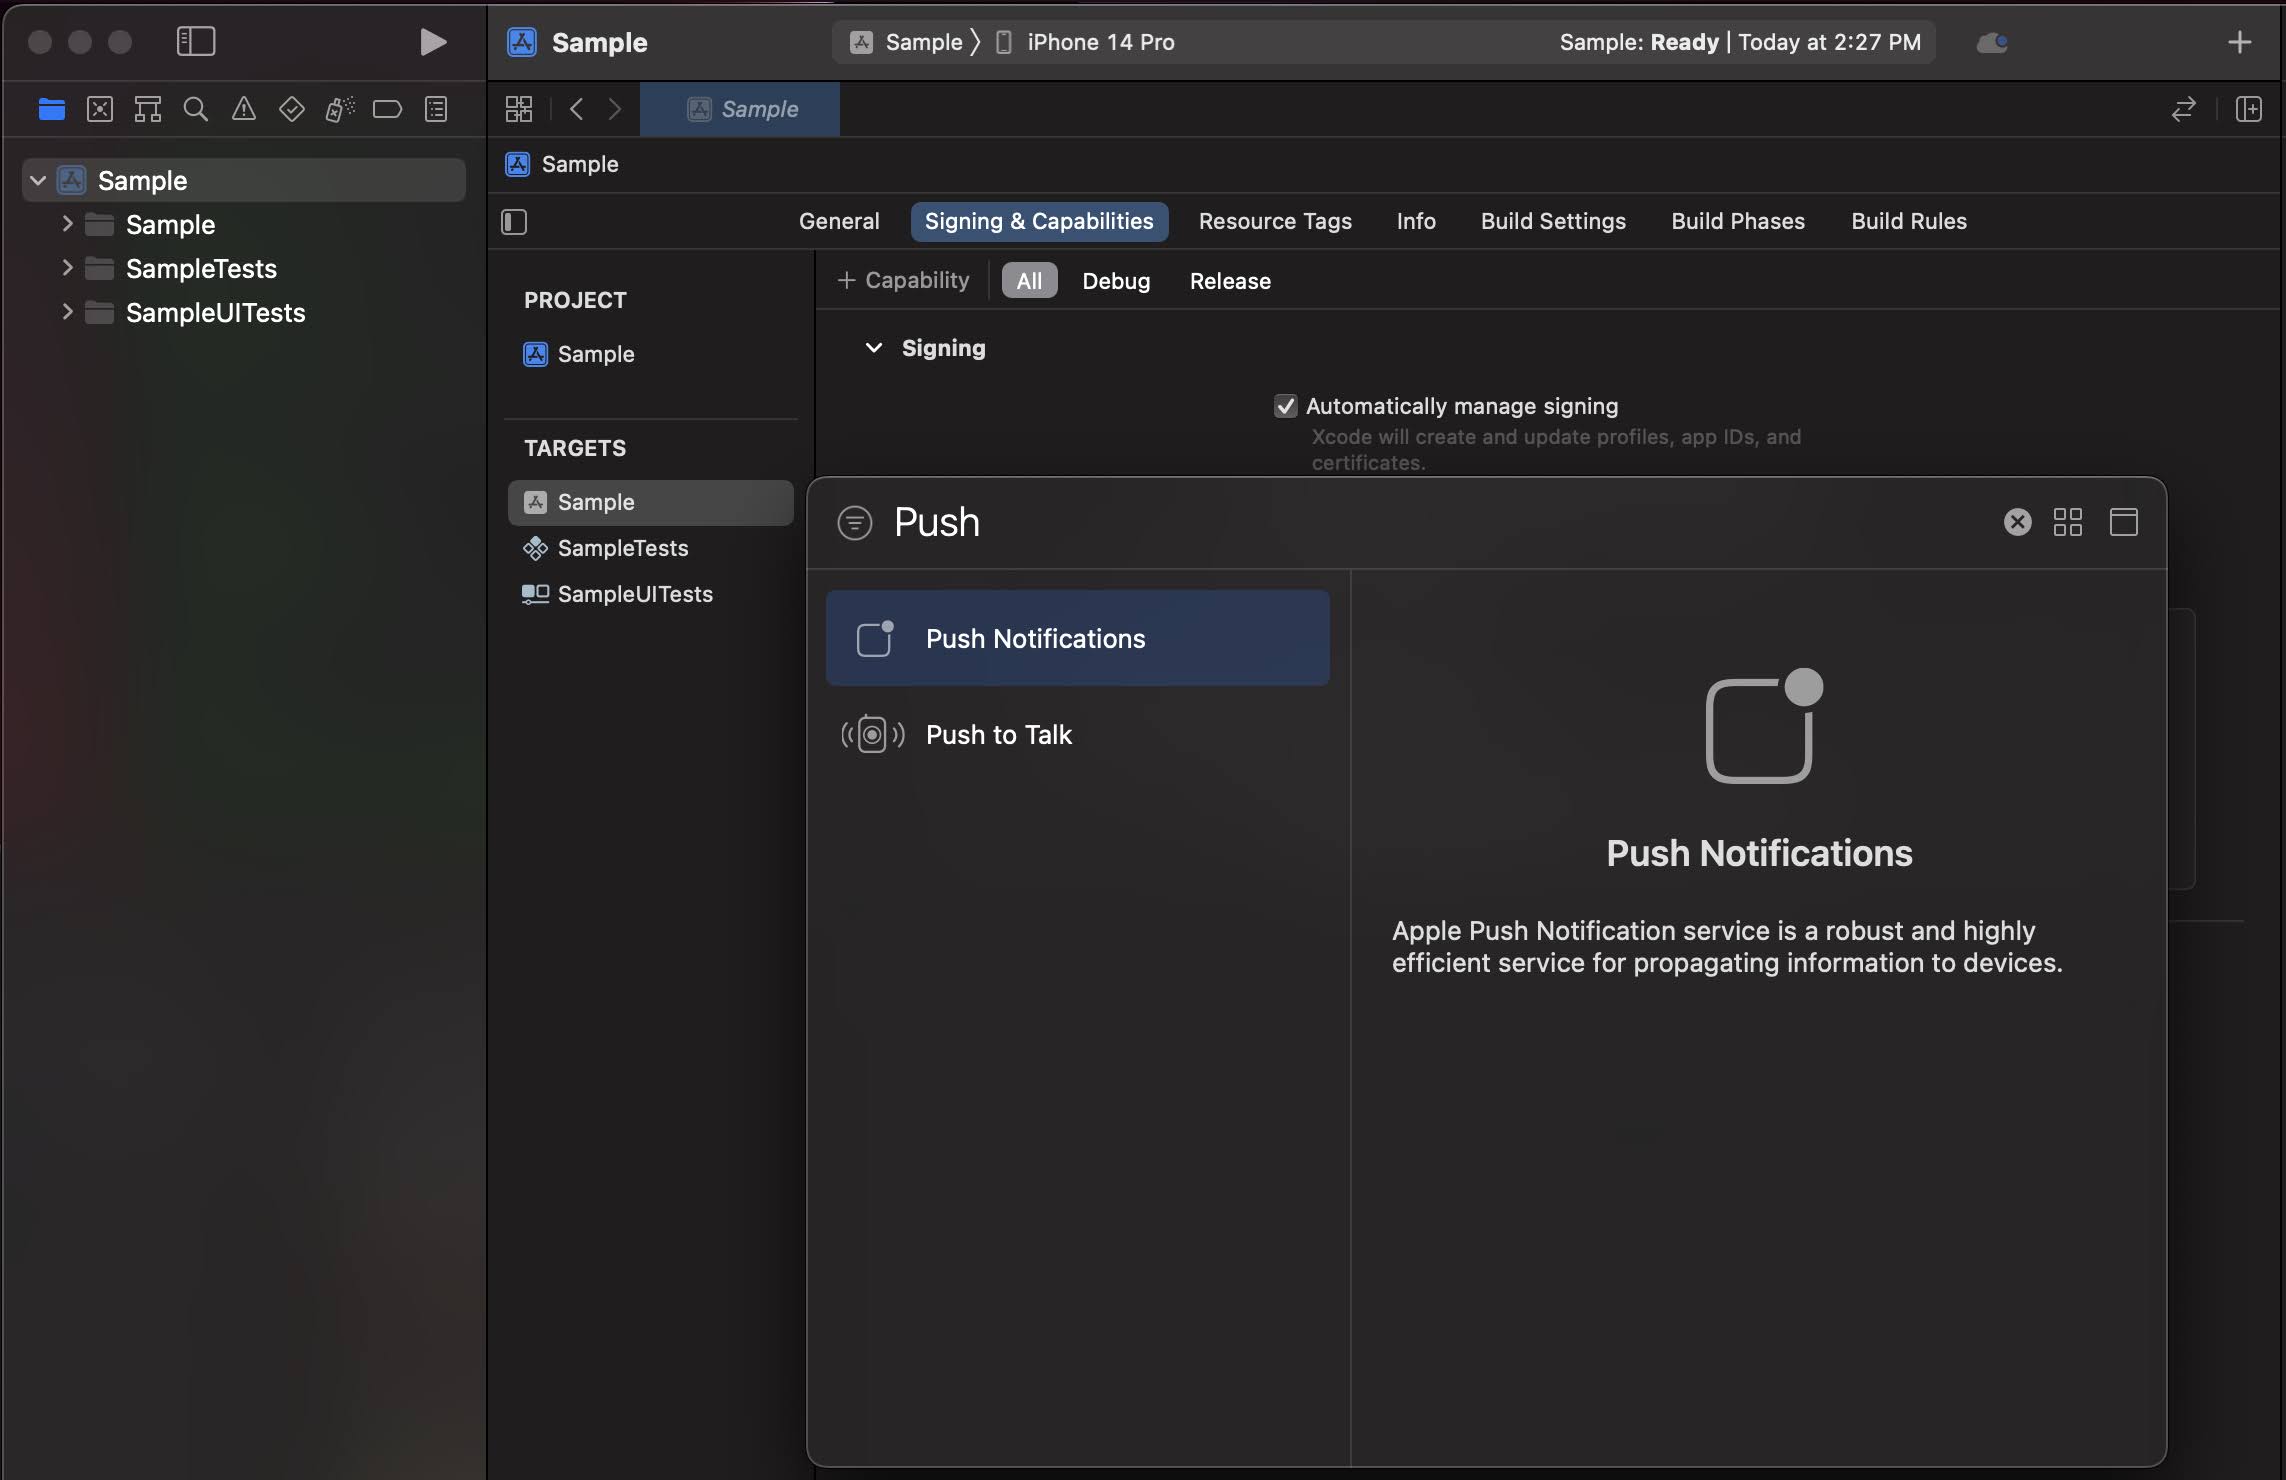
Next enable background notifications in the target’s Signing & Capabilities pane:
Select your main app target and then click the
Signing & Capabilitiestab.Click
+ Capabilityand addBackground Modes.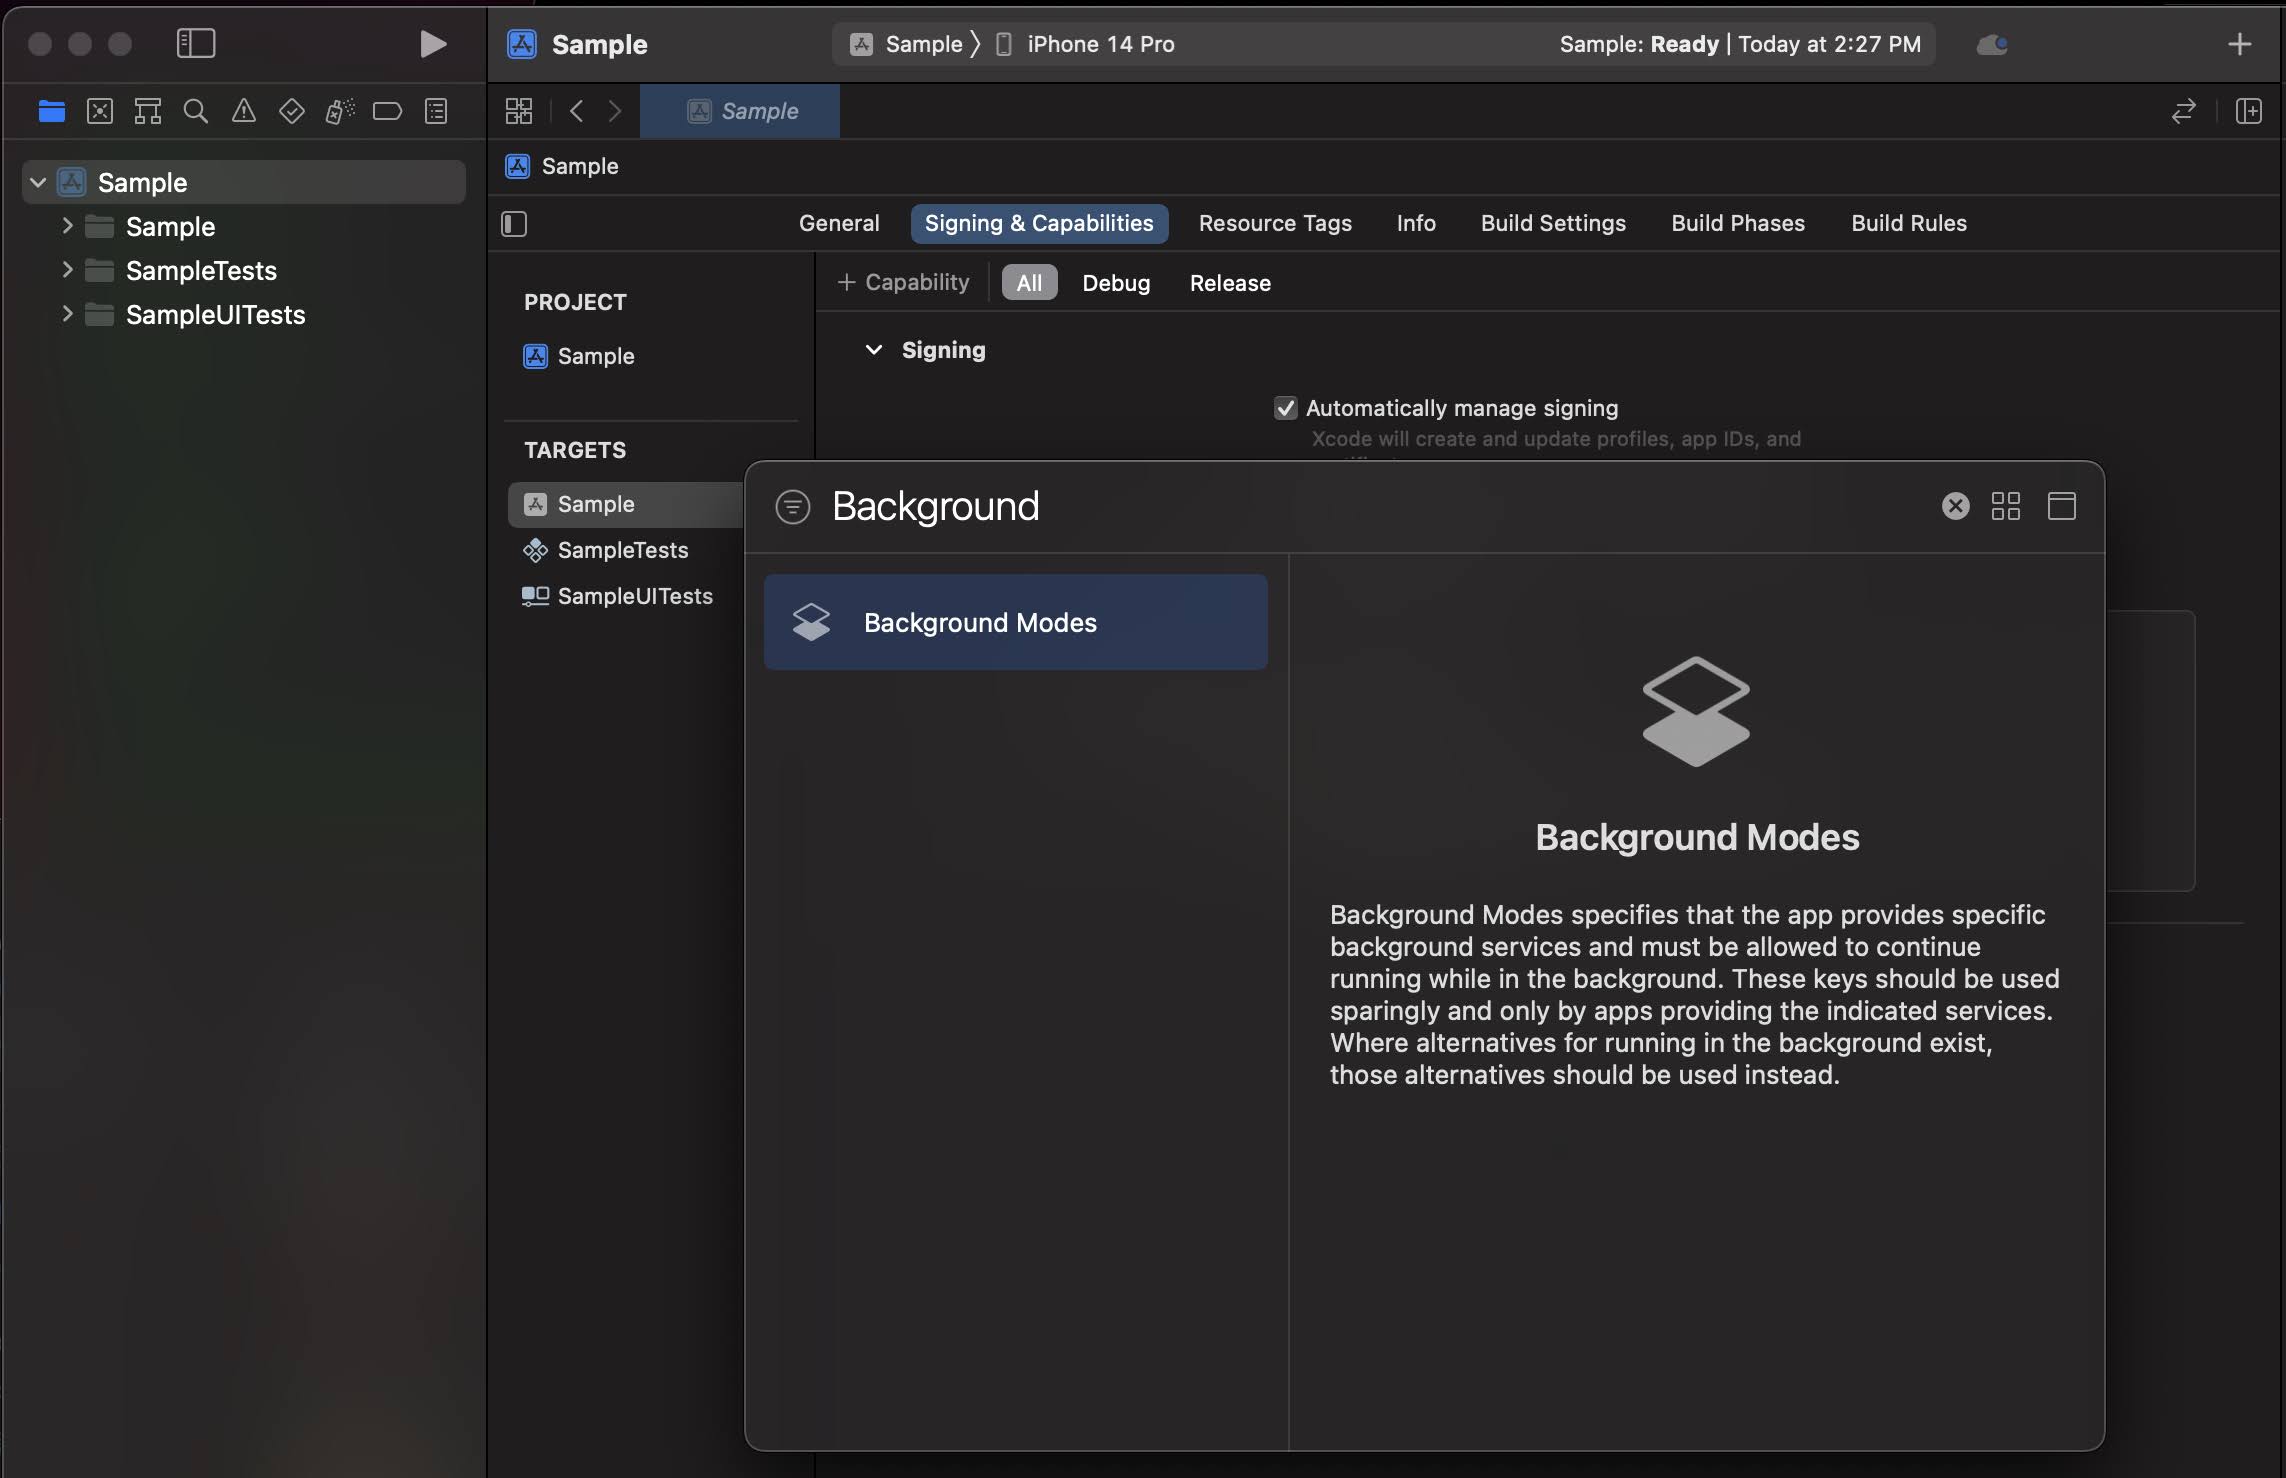
In the
Background Modessection, select theRemote notificationscheckbox.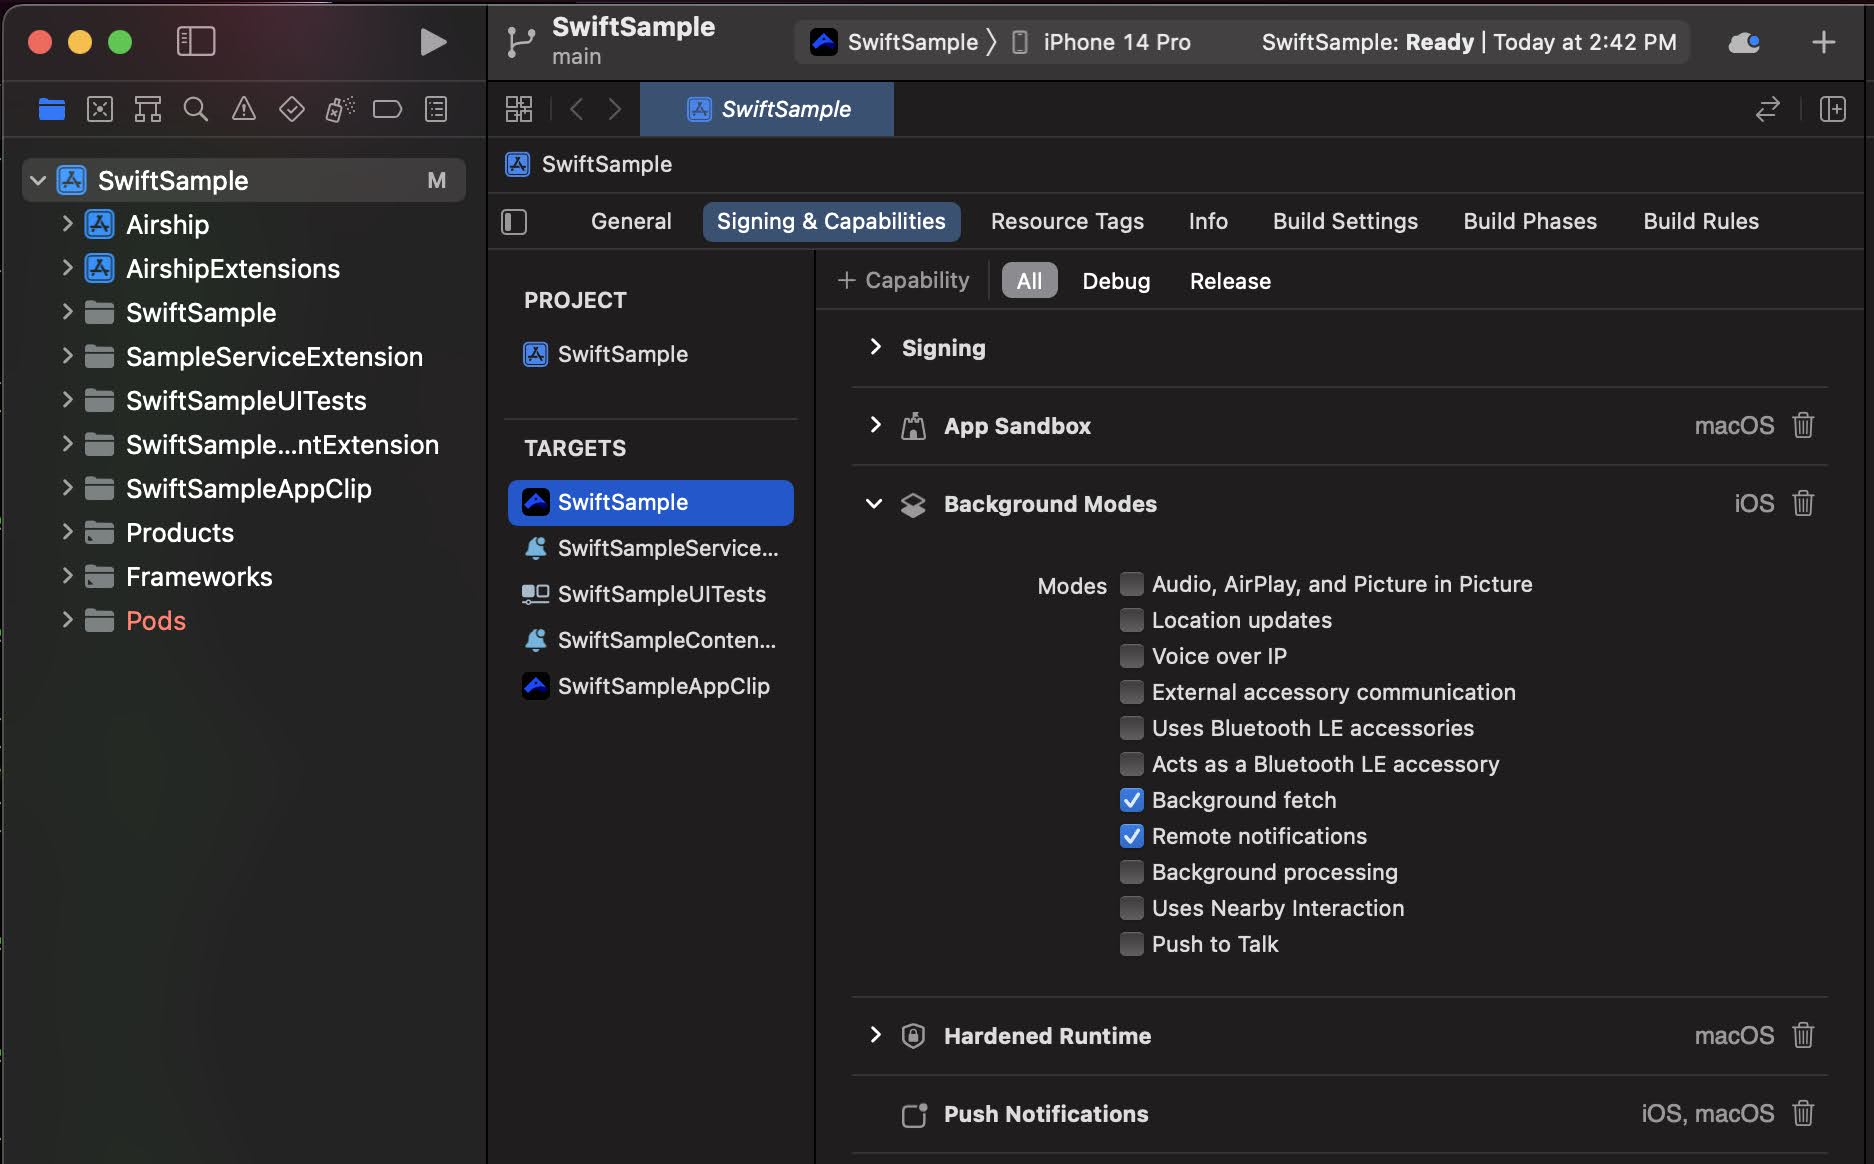
Initialize Airship
The Airship SDK requires only a single entry point in the app
delegate, known as takeOff. The Airship SDK must be initialized during the application delegate’s application(_:didFinishLaunchingWithOptions:) method.
Initialize the shared
Airship
instance by calling takeOff(_:launchOptions:) with the config and launch options.
Configuring Airship
Call takeOff
@UIApplicationMain
@MainActor
class AppDelegate: UIResponder, UIApplicationDelegate {

    func application(_ application: UIApplication,didFinishLaunchingWithOptions launchOptions: [UIApplication.LaunchOptionsKey : Any]? = nil) -> Bool {

        // Create Airship config
        var config = AirshipConfig()

        // Set default credentials. Alternatively you can set production and development separately
        config.defaultAppKey = "YOUR APP KEY"
        config.defaultAppSecret = "YOUR APP SECRET"

        // Set site. Either .us or .eu
        config.site = .us

        // Allowlists for opening URLs. Use * to allow anything
        config.urlAllowListScopeOpenURL = ["*"]

        // Call takeOff
        try! Airship.takeOff(config, launchOptions: launchOptions)

        return true
    }
}
@implementation AppDelegate
- (BOOL)application:(UIApplication *)application didFinishLaunchingWithOptions:(NSDictionary *)launchOptions {
UAConfig *config = [UAConfig config];
// Set default credentials. Alternatively you can set production and development separately
config.defaultAppKey = @"YOUR APP KEY";
config.defaultAppSecret = @"YOUR APP KEY";
// Set site. Either UACloudSiteUS or UACloudSiteEU
config.site = UACloudSiteUS;
// Allowlists. Use * to allow anything
config.URLAllowListScopeOpenURL = @[@"*"];
// Call takeOff
NSError *airshipError;
[UAirship takeOff:config launchOptions:launchOptions error:&airshipError];
// Handle error
NSAssert(airshipError == nil, @"TakeOff failed %@", airshipError);
return YES;
}
@endThe takeOff method will throw in the following conditions:
takeOffalready successfully called.takeOffwas called without anAirshipConfiginstance and it fails to parseAirshipConfig.plisttakeOffwas called without anAirshipConfiginstance and the parsedAirshipConfig.plistis invalid (missing credentials)takeOffwas called with anAirshipConfiginstance with invalid config (missing credentials)
No error will be thrown if the config is properly setup and Airship is only called once during application(_:didFinishLaunchingWithOptions:). The absence of an error does not guarantee
that the provided app credentials are valid. Airship only verifies that the credentials exist for the specified production mode and conform to the expected length and character set. For
new integrations, review the logs for any warnings or errors to ensure a proper setup.
URL allowlist
SDK 17+ allows all URLs. After upgrading to SDK 17, you will see an implementation error until you either set your own defaults or accept the Airship default of allowing all URLs.
The URLAllowList controls which URLs the Airship SDK is able to act on. The SDK divides up usages of URLs into two different scopes:
SCOPE_OPEN_URL: Only URLs allowed for this scope can be opened from an action, displayed in landing page, or displayed in an HTML in-app message. Defaults to allowing all URLs if not specified in the config.SCOPE_JAVASCRIPT_INTERFACE: These URLs are checked before the Airship JavaScript interface is injected into the webview. Defaults to any Airship originated URLs.
Allowed URLs should be provided when configuring the Airship Config options.
<pattern> := '*' | <scheme>'://'<host>/<path> | <scheme>'://'<host> | <scheme>':/'<path> | <scheme>':///'<path>
<scheme> := <any char combination, '*' are treated as wild cards>
<host> := '*' | '*.'<any char combination except '/' and '*'> | <any char combination except '/' and '*'>
<path> := <any char combination, '*' are treated as wild cards>
Cloud Site
Airship config will default to the US cloud site. If your application is set up for the EU site, you must set the site on the config options to .eu.
Fallback loading
If no config is returned, Airship will default to loading config from the AirshipConfig.plist file in your application’s bundle. Config keys match the field names of the
with
AirshipConfig
instance.
Customizing Airship behavior
Airship provides common config options in AirshipConfig, however some more advanced configuration must be set directly on the Airship instance. Custom push handling, deep linking, etc., should be configured during application(_:didFinishLaunchingWithOptions:), right after takeOff. This will ensure Airship is properly configured before handling any messages.
Call takeOff
func application(_ application: UIApplication,didFinishLaunchingWithOptions launchOptions: [UIApplication.LaunchOptionsKey : Any]? = nil) -> Bool {
    // ...

    // Call takeOff
    try! Airship.takeOff(config, launchOptions: launchOptions)

    // Customize Airship

    return true
}
- (BOOL)application:(UIApplication *)application didFinishLaunchingWithOptions:(NSDictionary *)launchOptions {
// ...
// Call takeOff
[UAirship takeOff:config launchOptions:launchOptions error:nil];
// Customize Airship
return YES;
}Automatic Integration
The Airship SDK will automatically integrate with your app,
so you do not need to implement any of the push-related
UIApplicationDelegate or UNUserNotificationCenterDelegate protocol methods.
The SDK is able to do this by intercepting app
delegate messages and forwarding them to your original app delegate,
using a technique known as method swizzling.
This should be compatible with the vast majority of applications, out
of the box. If you have advanced use cases for your app delegate,
or if you would otherwise prefer to disable this behavior, you can set
AirshipConfig.isAutomaticSetupEnabled
to false.
If you choose to disable automatic integration, you will need to forward the appropriate methods to the Airship SDK.
Manual Integration
UIApplicationDelegate methods
func application(_ application: UIApplication, didFinishLaunchingWithOptions launchOptions: [UIApplication.LaunchOptionsKey : Any]? = nil) -> Bool {
    // Set up the UNUserNotificationCenter delegate
    UNUserNotificationCenter.current().delegate = self
}

func application(_ application: UIApplication, didRegisterForRemoteNotificationsWithDeviceToken deviceToken: Data) {
    AppIntegration.application(application, didRegisterForRemoteNotificationsWithDeviceToken: deviceToken)
}

func application(_ application: UIApplication, didFailToRegisterForRemoteNotificationsWithError error: Error) {
    AppIntegration.application(application, didFailToRegisterForRemoteNotificationsWithError: error)
}

func application(_ application: UIApplication, didReceiveRemoteNotification userInfo: [AnyHashable : Any]) async -> UIBackgroundFetchResult {
    return await AppIntegration.application(application, didReceiveRemoteNotification: userInfo)
}
UserNotificationCenterDelegate methods
func userNotificationCenter(_ center: UNUserNotificationCenter, didReceive response: UNNotificationResponse) async {
    await AppIntegration.userNotificationCenter(center, didReceive: response)
}
func userNotificationCenter(_ center: UNUserNotificationCenter, willPresent notification: UNNotification) async -> UNNotificationPresentationOptions {
    return await AppIntegration.userNotificationCenter(center, willPresent: notification)
}
UIApplicationDelegate methods
- (BOOL)application:(UIApplication *)application didFinishLaunchingWithOptions:(NSDictionary *)launchOptions {
    // Set up the UNUserNotificationCenter delegate
    [UNUserNotificationCenter currentNotificationCenter].delegate = self;
    return YES;
}

- (void)application:(UIApplication *)application didRegisterForRemoteNotificationsWithDeviceToken:(NSData *)deviceToken {
    [UAAppIntegration application:application didRegisterForRemoteNotificationsWithDeviceToken:deviceToken];
}

- (void)application:(UIApplication *)application didFailToRegisterForRemoteNotificationsWithError:(NSError *)error {
    [UAAppIntegration application:application didFailToRegisterForRemoteNotificationsWithError:error];
}

- (void)application:(UIApplication *)application didReceiveRemoteNotification:(NSDictionary *)userInfo fetchCompletionHandler:(void (^)(UIBackgroundFetchResult))completionHandler {
    [UAAppIntegration application:application didReceiveRemoteNotification:userInfo fetchCompletionHandler:completionHandler];
}
UAUserNotificationCenterDelegate methods
- (void) userNotificationCenter:(UNUserNotificationCenter *)center willPresentNotification:(UNNotification *)notification withCompletionHandler:(void (^)(UNNotificationPresentationOptions))completionHandler {
    [UAAppIntegration userNotificationCenter:center willPresentNotification:notification withCompletionHandler:completionHandler];
}

- (void) userNotificationCenter:(UNUserNotificationCenter *)center didReceiveNotificationResponse:(UNNotificationResponse *)response withCompletionHandler:(void (^)(void))completionHandler {
    [UAAppIntegration userNotificationCenter:center didReceiveNotificationResponse:response withCompletionHandler:completionHandler];
}
App Clips
An App Clip can make some of an app’s functionality available to users who don’t have the full app installed. This guide demonstrates what you need to do in order to create an App Clip within your app.
Register an App Clip identifier
An App Clip requires a separate application identifier in the Apple developer portal, and a separate project in the Airship dashboard. Therefore, you need to follow the same steps required for the application itself both on the Apple Developer Portal and Airship dashboard.
In order to create a push certificate to use with your App Clip, you’ll need to create a new application identifier.
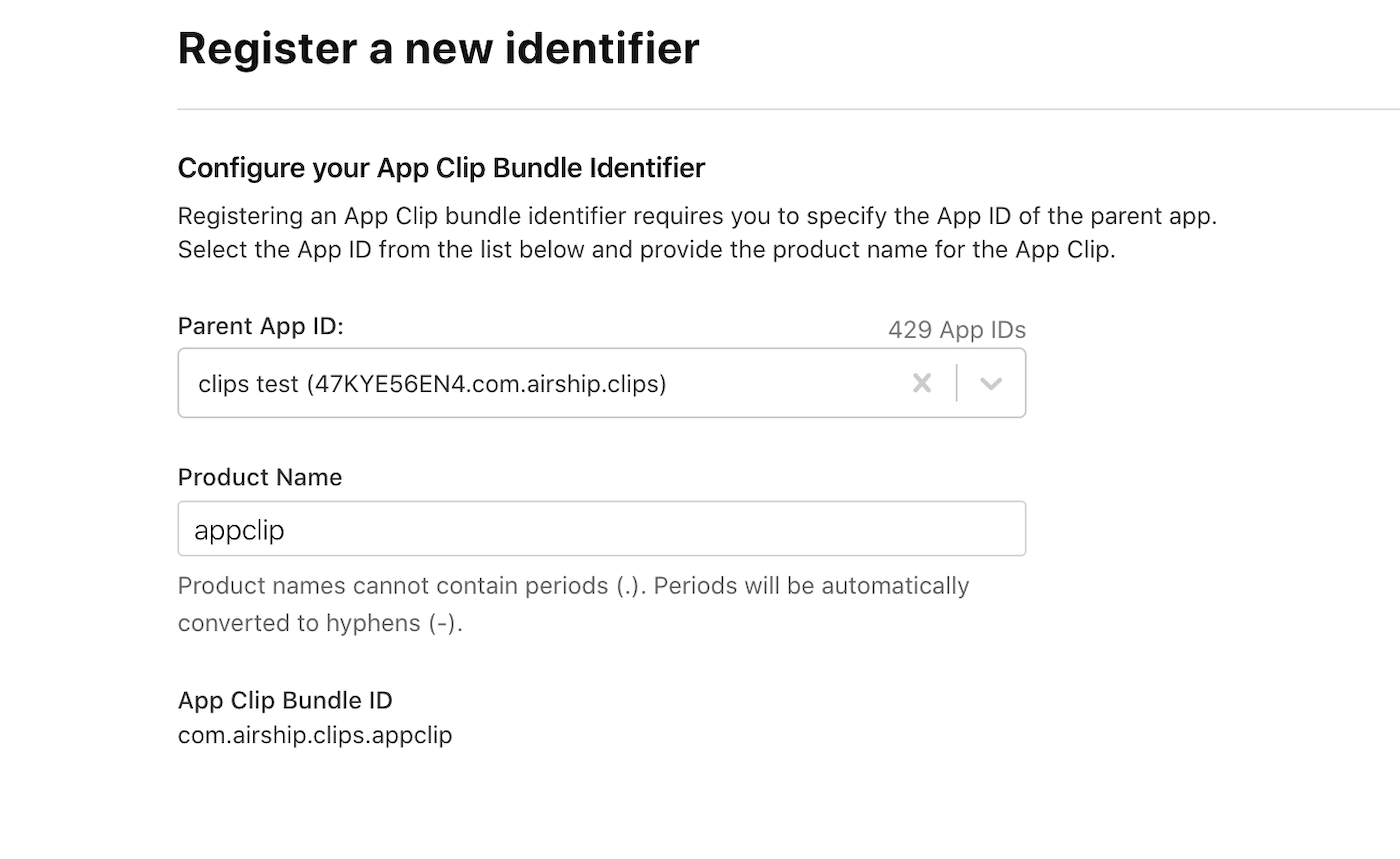
In the Certificates, Identifiers & Profiles section of your Apple developer account, register a new app ID, and select the App Clip as the identifier type:

Specify the app ID of the parent app and the product name:
Create an App Clip in your project
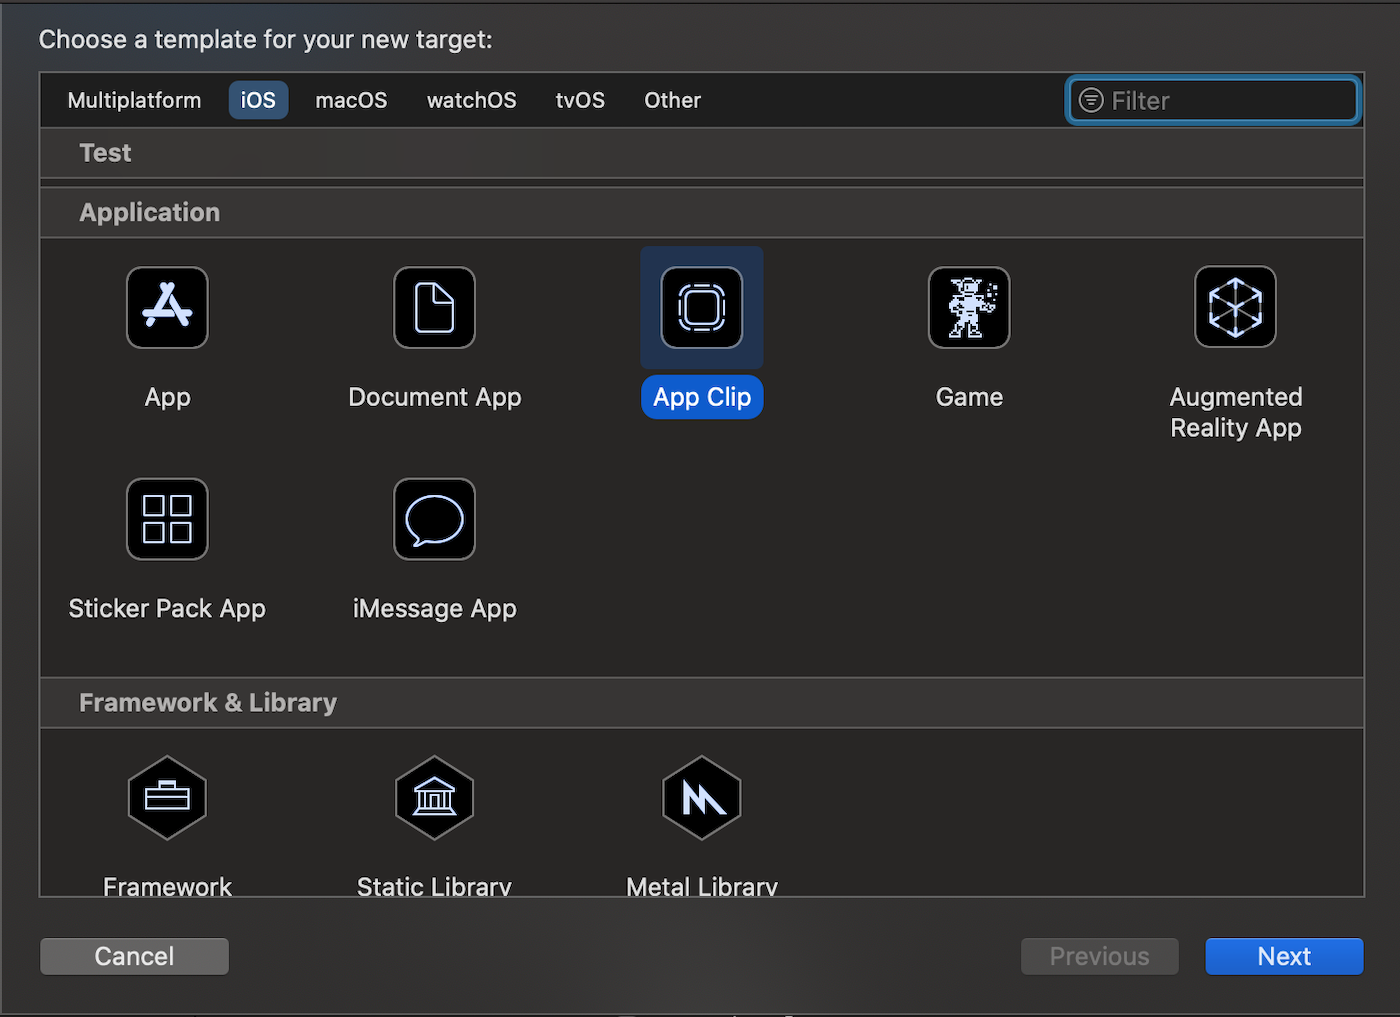
Add an App Clip target to your application by selecting File -> New -> Target… and then selecting the App Clip icon in the Application section:
Make sure to add the push notification capability to your App Clip target.
To enable ephemeral notifications in your App Clip, add a following line to your info.plist file:

To be able to send push notifications for an extended period of time, set the extendedPushNotificationPermissionEnabled property of UAPush to true:
Airship.push.extendedPushNotificationPermissionEnabled = trueUAirship.push.extendedPushNotificationPermissionEnabled = YES;Notification Service Extension
To take advantage of notification attachments, such as images, animated gifs, and video, you will need to create a notification service extension .
Create a new iOS target in Xcode
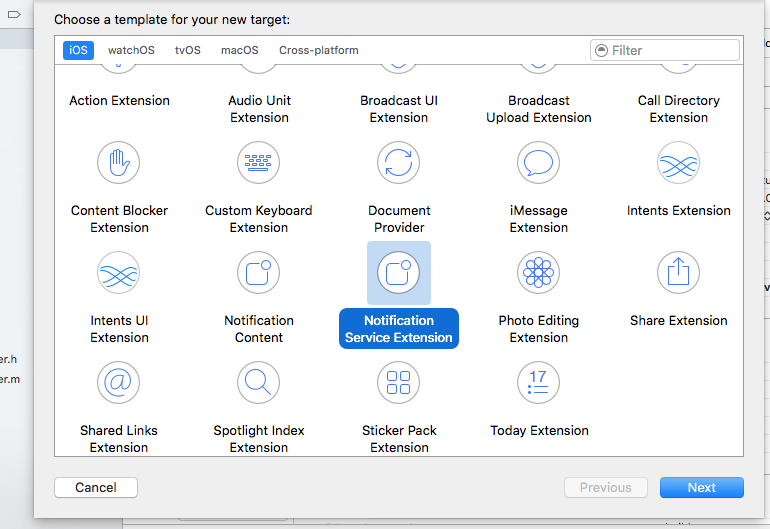
In Xcode, click the File menu, select New » Target…, then click the Notification Service Extension template.
Typically, extensions are named with a suffix on the main application’s ID. In
this example the bundle identifier would be
com.urbanairship.sample.ExampleServiceExtension.
Check that your app’s target Embed App Extensions contains your newly created
extension.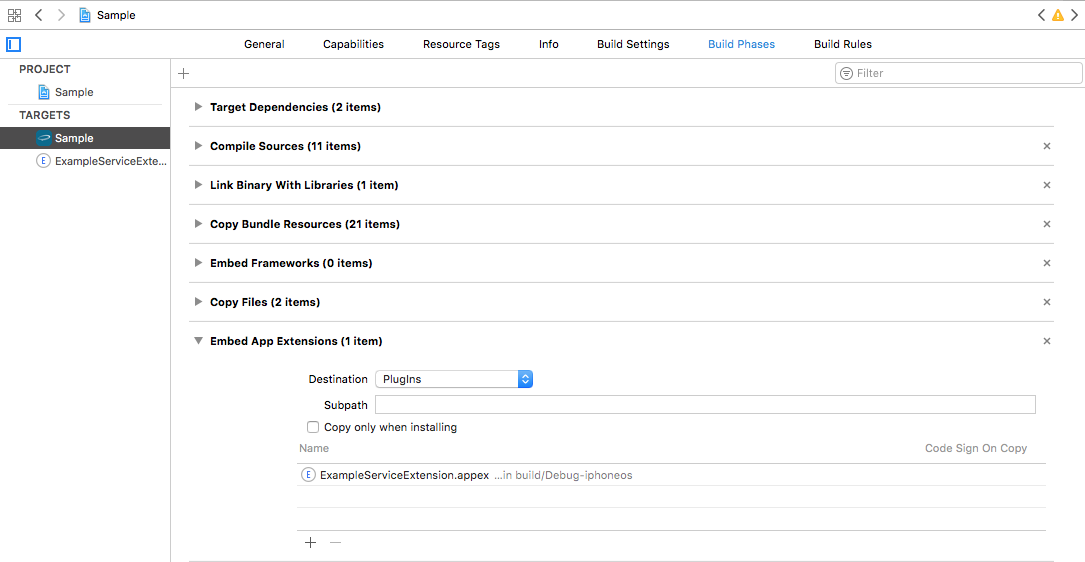
Install Airship Notification Service Extension Dependencies
CocoaPods
Service extensions depend on the NotificationService subspec of the AirshipExtensions pod.
Example podfile:
target "<Your Service Extension Target Name>" do
  pod 'AirshipServiceExtension'
end
Install using the following command:
$ pod installCarthage
Before you begin, ensure you have Carthage installed.
Adding the SDK framework to your application
Follow Carthage’s adding frameworks to an application instructions to add AirshipNotificationServiceExtension.framework to your service extension target.
If you are also using the Airship SDK, follow the instructions above for installation.
Specify the Airship iOS SDK in your cartfile:
github "urbanairship/ios-library"Verify Enable Modules and Link Frameworks Automatically are enabled in the project’s Build Settings.
Manual
Follow the same manual process to install AirshipNotificationServiceExtension.xcframework using the same method that you followed to install Airship.xcframework, except add AirshipNotificationServiceExtension.framework to your service extension target.
Modify the Service Extension
CocoaPods
Extension:
// Notification.swift

import AirshipServiceExtension

class NotificationService: UANotificationServiceExtension {

}
// NotificationService.h
@import AirshipServiceExtension;
@interface NotificationService : UANotificationServiceExtension
@end
// NotificationService.m
@import Foundation;
import "NotificationService.h"
@implementation NotificationService
@endCarthage and Manual
Extension:
// Notification.swift

import AirshipNotificationServiceExtension

class NotificationService: UANotificationServiceExtension {

}
// NotificationService.h
@import AirshipNotificationServiceExtension;
@interface NotificationService : UANotificationServiceExtension
@end
// NotificationService.m
@import Foundation;
import "NotificationService.h"
@implementation NotificationService
@endDelete all dummy source code for your new extension and inherit from
UANotificationServiceExtension in NotificationService.
Implementation best practices
Make sure to set up logging. Internal logging can be valuable when troubleshooting issues that arise when testing.
Anytime you make any changes or updates to the SDK, test on a development device to ensure your integration was successful. Also make sure analytic information is still flowing to your Airship project before sending the app to production.
Categories

