Adding your channel ID to a test group
When sending your first notification, you will choose Test Users as your audience. Follow these steps to find your channel ID and add it to a test group.
Your channel ID is only available if you have already integrated the Airship SDK with your app or website. If you have not yet integrated the SDK, follow the steps in Create a Messaging Project.
You have two options for finding your channel ID and adding it to a Test GroupA preview group is audience group used for previewing personalized content in the dashboard. Wherever a personalization preview is available, you can select a preview group, and its group members’ attributes will appear for any Handlebars references to attributes. You can enable any preview group as a test group so you can send test messages to its group members. These messages appear as tests in Messages Overview.:
Option 1: Speak with one of your developers about getting your mobile app or web channel added to a test group.
Option 2: Find your channel ID and add it to a test group. Follow the steps on this page.
Find Your Mobile App Channel ID
You must first build into your app a mechanism to expose the device’s Channel IDAn Airship-specific unique identifier used to address a channel instance, e.g., a smartphone, web browser, email address. to the console. See: Mobile: Channels.
You can view the console with these tools:
- iOS: iPhone Configuration Utility or Xcode
- Android: Android Debug Bridge
If you didn’t write the device identifier to the console, you can use the steps here to help retrieve it: Using Charles Proxy to profile an Airship Implementation .
Even if you’re comfortable with using Charles Proxy, you may want to speak with your developer before you attempt to retrieve your Channel ID yourself. Your app may have been designed with a hidden feature that allows you to quickly retrieve your ID, saving you the difficulty of working with Charles Proxy.
Find Your Web Browser Channel ID
A channel ID is an Airship-specific unique identifier for a channel instance, e.g., a smartphone, web browser, email address. Your channel ID is only available if you have already integrated the Airship SDK with your website. To access your web channel ID, you will need to open the Developer console in your browser and paste in a small amount of code. Instructions for Google Chrome and Mozilla Firefox are provided.
Open the console via keyboard shortcut or the menu.
Google Chrome
- Keyboard Shortcuts: In macOS you can go directly to the console with Cmd+Opt+J. In Windows, the shortcut is Ctrl+Shift+J.
- Menu: Click and go to More Tools » Developer Tools, then select the Console tab.
Mozilla Firefox
- Keyboard Shortcuts: In macOS you can go directly to the console with Cmd+Opt+K. In Windows, the shortcut is Ctrl+Shift+K.
- Menu: Click the “hamburger” icon and go to More Tools » Web Developer Tools, then select the Console tab.

The channel ID in a successful console response Paste
UA.then(sdk => {console.log(sdk.channel.id)})in the console, then hit Enter. If a browser has registered, the resulting line is the channel ID.
Common errors:
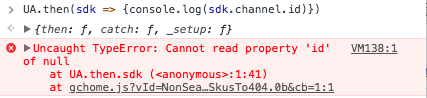
Response: null The SDK will return
nullif the browser is unregistered. Only registered browsers will have a channel ID. See our documentation on how to register the current browser with Airship.
Response: UA is not defined A
UA is not definedresponse can indicate that the SDK snippet is not present within the page. Navigate to a page on your site that does have the SDK snippet and repeat step 2 above.Note Ideally, the SDK snippet will be present in every page on your site, as per the Add JavaScript Snippet section of our Web Getting Started guide. If, for testing or other reasons, you have added the snippet to just one page of your site, you will need to be on that specific page for retrieving your Web channel ID to be successful.
Create a Test Group
The following steps are an abbreviation of the Preview and Test Groups documentation. See the linked version for caveats and additional information.
- Select the Audience menu, then Preview and Test Groups.
- Select Create group.
- Enter a name for the group.
- Enable Test group.
- Select Save and continue.
- Select Add user and enter your name and app or web channel ID.
- Select Done.
Now you are ready to send your first message.
Categories