Push Notifications for the Apple SDK
How to configure your application to receive and respond to notifications.
Before setting up push notifications in your app, you need to configure APNs (Apple Push Notification service) in the Airship dashboard. See iOS Channel Configuration for instructions on uploading your APNs certificate or token.
Enable Capabilities
Before enabling push notifications, you need to configure your app’s capabilities in Xcode.
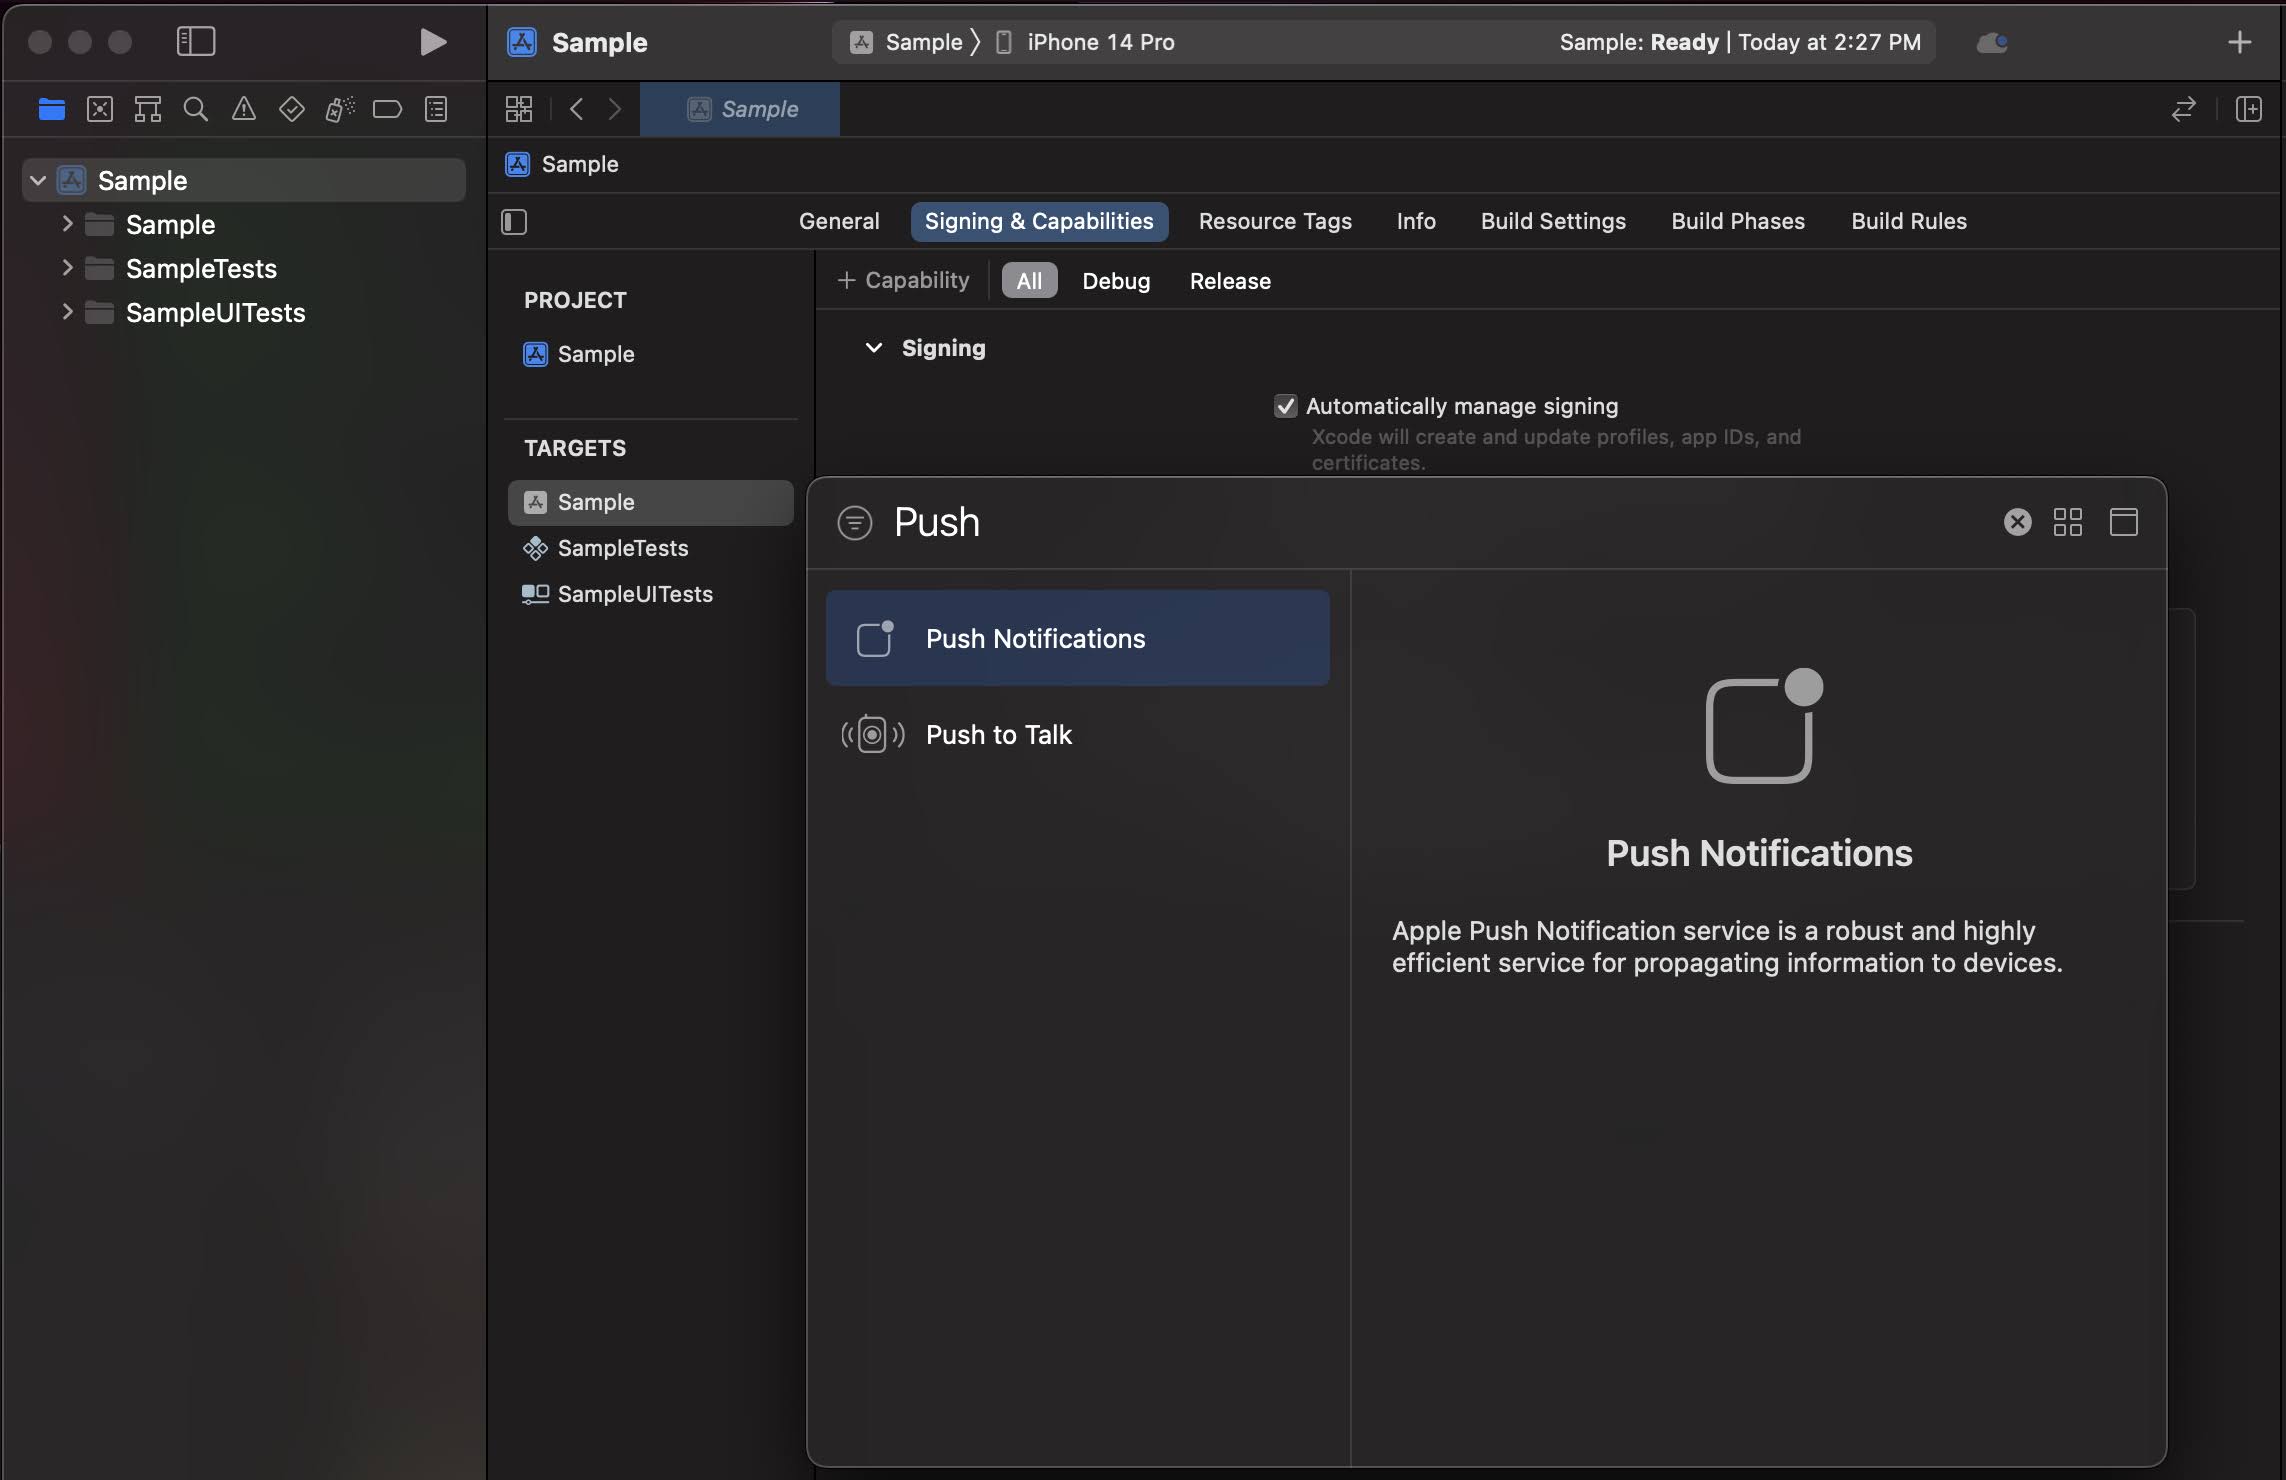
Enable Push Notifications Capability
Open your project in Xcode.
Click on your project in the Project Navigator.
Select your main app target and then click the Signing & Capabilities tab.
If you do not see Push Notifications enabled, click + Capability and add Push Notifications.

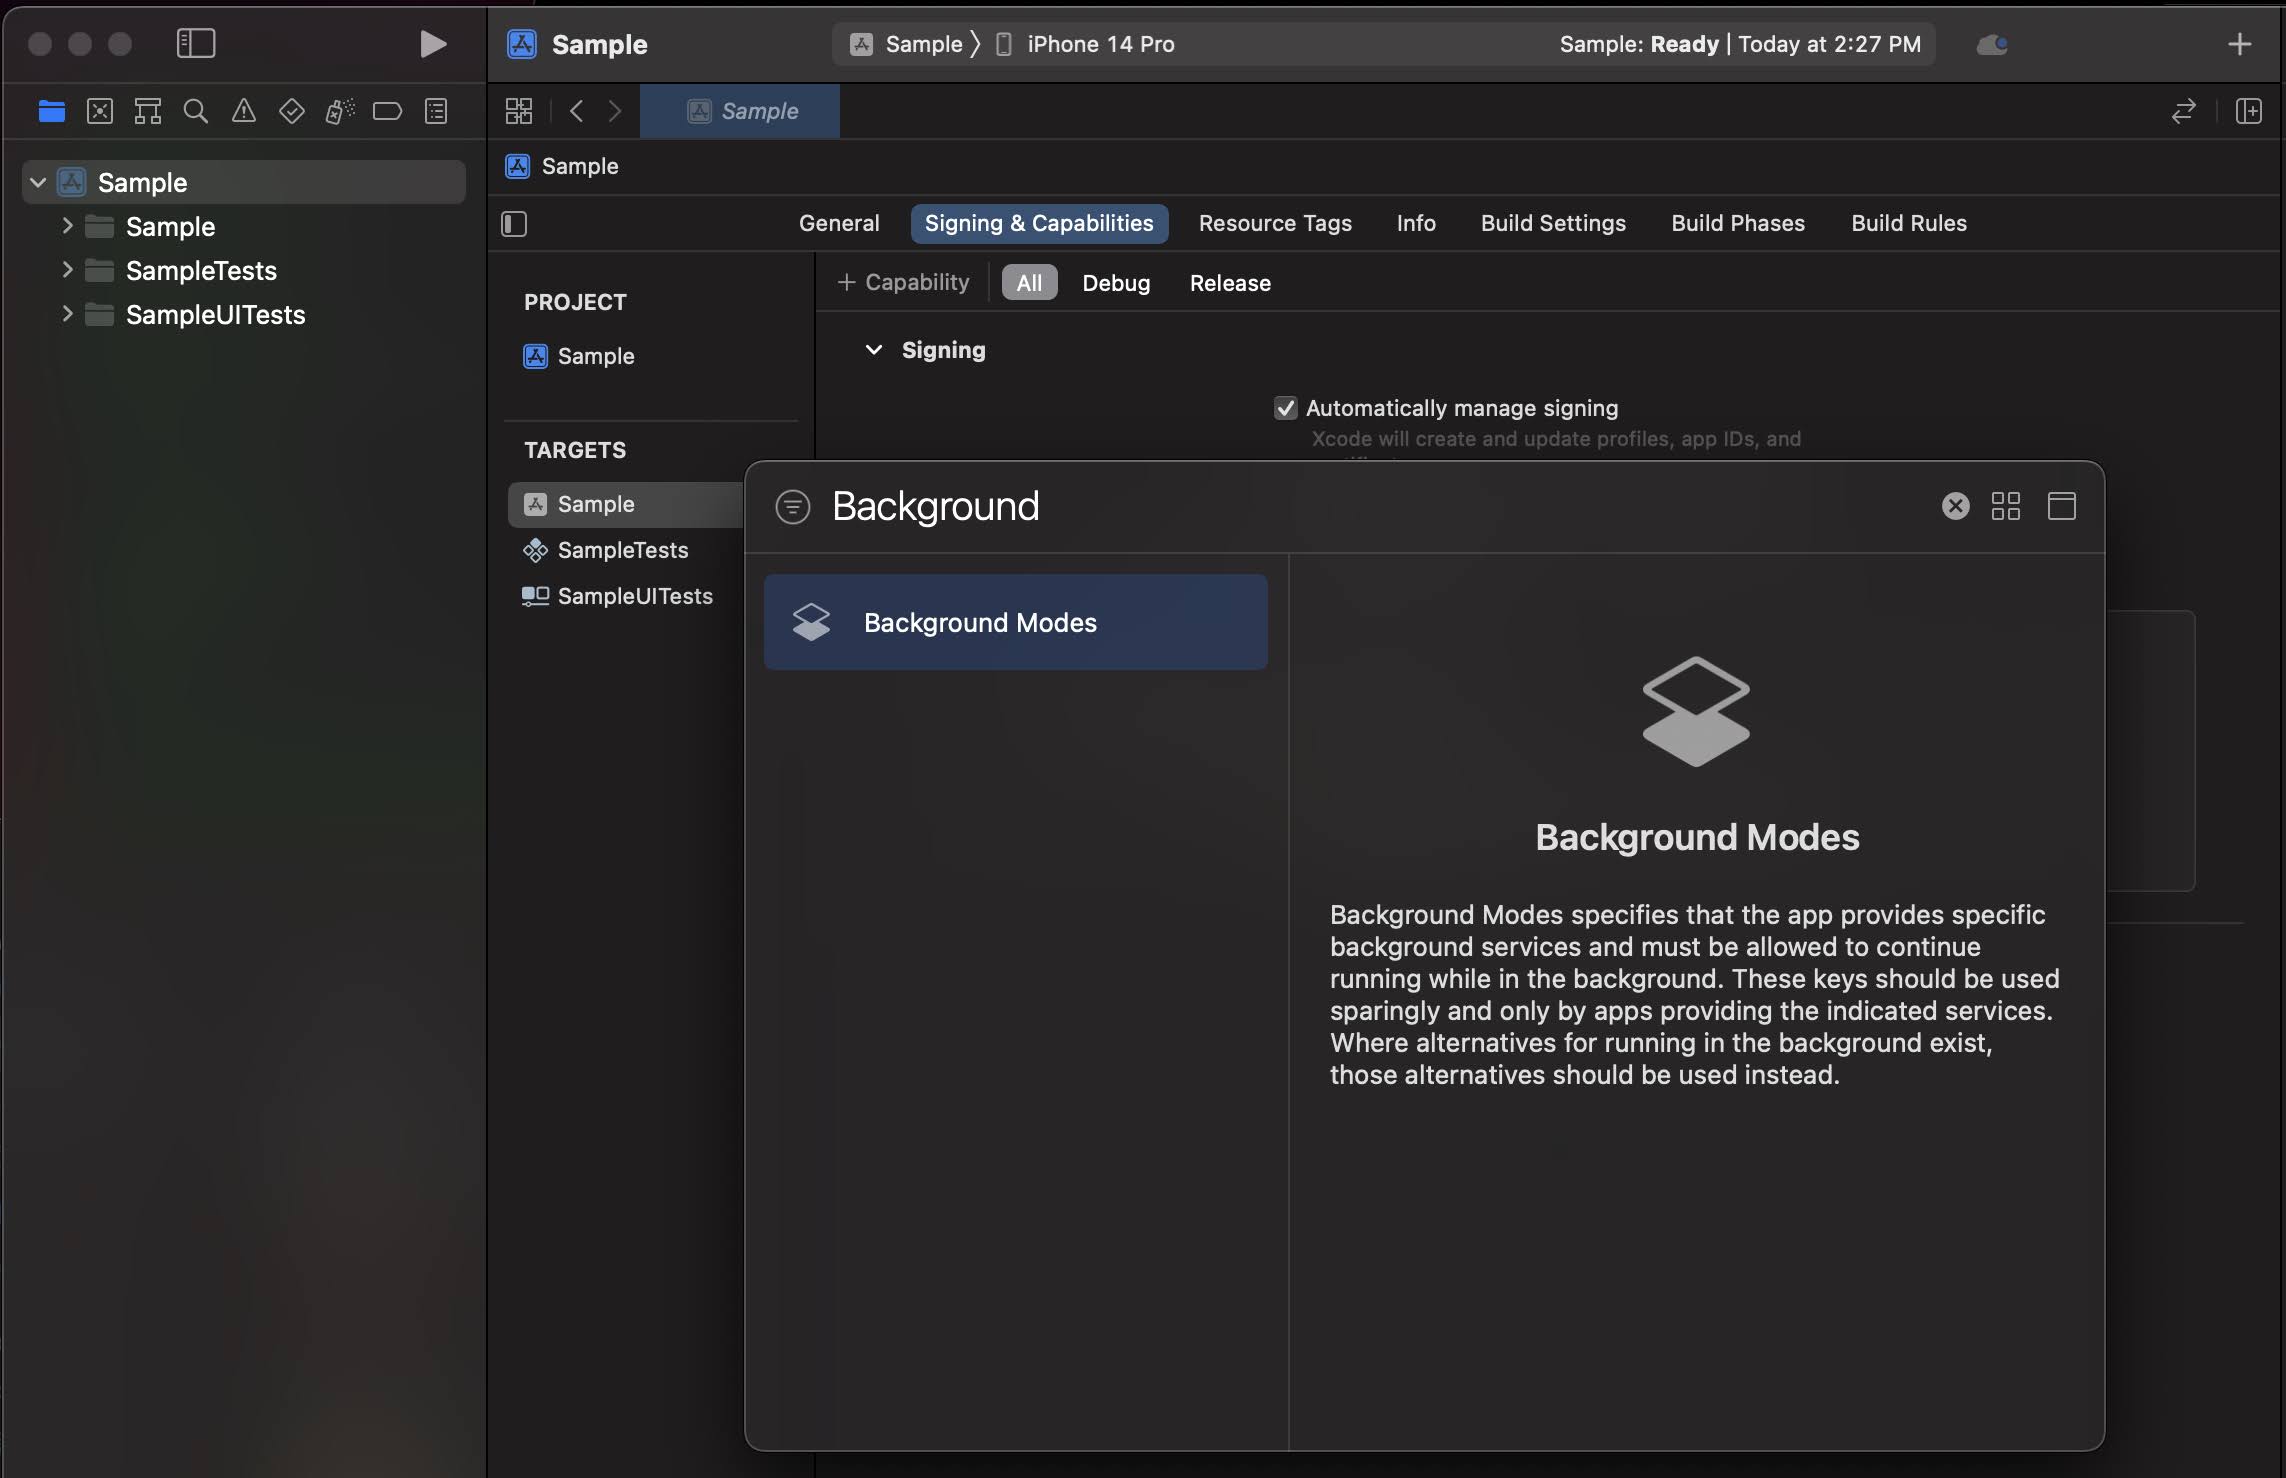
Enable Background Modes
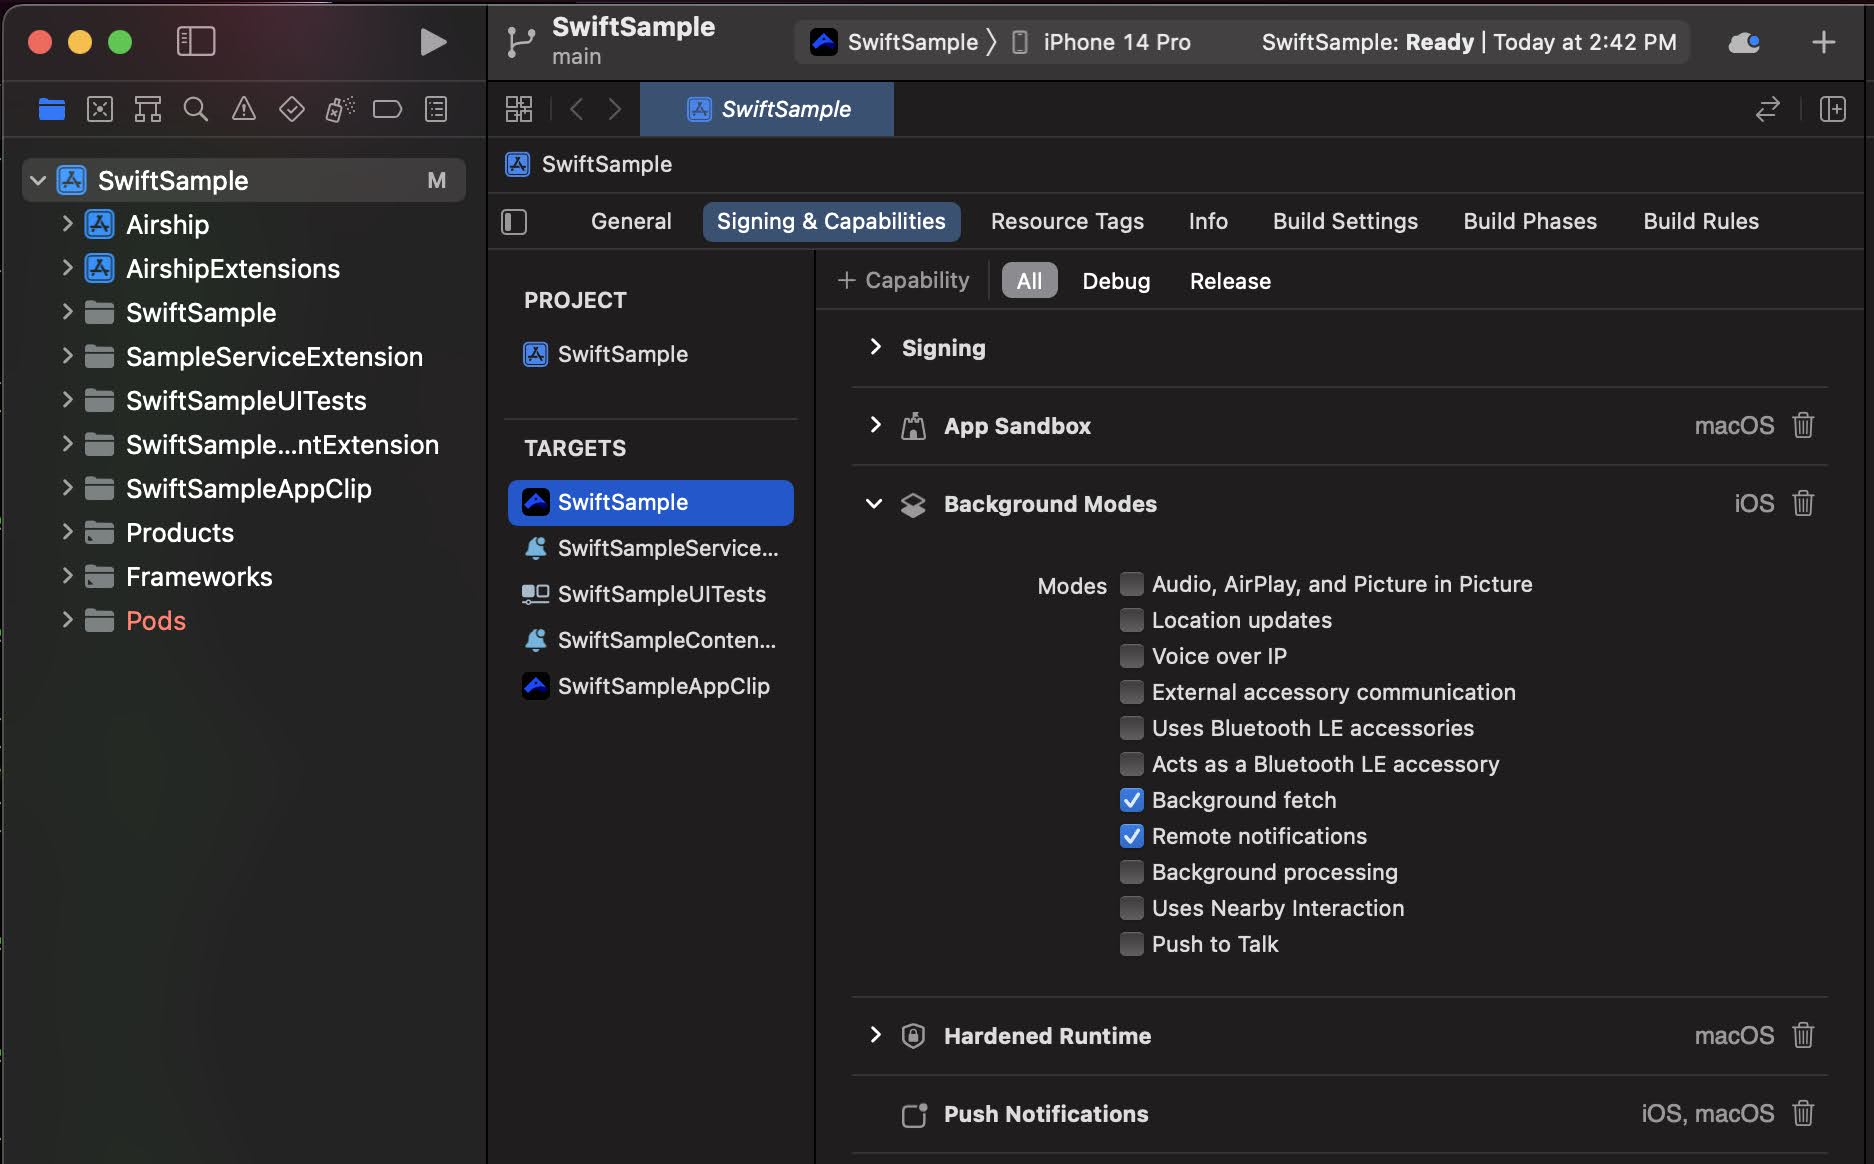
Select your main app target and then click the Signing & Capabilities tab.
Click + Capability and add Background Modes.

In the Background Modes section, select the Remote notifications checkbox.

Add Rich Media Support
To support rich media attachments (images, animated GIFs, video) in push notifications, you need to create a Notification Service Extension. See Notification Service Extension for setup instructions.
Enable User Notifications
The Airship SDK distinguishes between user notifications (visible to users) and silent push notifications (background data delivery). User notifications require explicit permission from the user.
By default, user notifications are disabled. Enable them when you want to show visible notifications to users.
Basic Enablement
The simplest way to enable user notifications is to set the userPushNotificationsEnabled property:
Enable user notifications
Airship.push.userPushNotificationsEnabled = trueUAirship.push.userPushNotificationsEnabled = YES;Checking Authorization State
To check whether the user granted permission, use the async method which returns the system authorization state:
Enable with authorization check
let authorized = await Airship.push.enableUserPushNotifications()
if authorized {
    // User granted permission
} else {
    // User denied permission
}This async method is not available in Objective-C. Use the basic userPushNotificationsEnabled property instead.
The return value represents the system authorization state (whether the user granted permission), not the state of userPushNotificationsEnabled, which will always be set to true after calling this method.
Handling Denied Permissions
If the user has already denied notification permissions, you can provide a fallback action to guide them to system settings or show a custom message:
Enable with fallback
// Navigate to system settings if permission is denied
let authorized = await Airship.push.enableUserPushNotifications(
    fallback: .systemSettings
)

// Or provide a custom callback
let authorized = await Airship.push.enableUserPushNotifications(
    fallback: .callback {
        // Show custom UI explaining why notifications are important
        // and guide user to system settings
    }
)

// Or no fallback
let authorized = await Airship.push.enableUserPushNotifications(
    fallback: .none
)This async method is not available in Objective-C. Use the basic userPushNotificationsEnabled property instead.
The PromptPermissionFallback options are:
.none- No fallback action.systemSettings- Automatically navigate to system settings if permission is denied.callback- Execute a custom callback to handle the denied state
To increase the likelihood that users will accept notification permissions, avoid prompting immediately on app launch. Instead, wait for a more appropriate moment, such as after the user completes an action or views relevant content.
Configure Notification Options
Before enabling user notifications, you can configure which notification types your app will request permission for.
Standard Notification Options
By default, the Airship SDK requests permission for alerts, badges, and sounds. You can customize these options:
Configure notification options
Airship.push.notificationOptions = [.alert, .badge, .sound]UAirship.push.notificationOptions = (UNAuthorizationOptionBadge | UNAuthorizationOptionSound | UNAuthorizationOptionAlert);Provisional Authorization
Provisional authorization allows you to send notifications without initially prompting the user. Notifications are delivered quietly to the Notification Center until the user explicitly chooses to keep them.
Request provisional authorization
Airship.push.notificationOptions = [.alert, .badge, .sound, .provisional]UAirship.push.notificationOptions = (UNAuthorizationOptionBadge | UNAuthorizationOptionSound | UNAuthorizationOptionAlert | UNAuthorizationOptionProvisional);With provisional authorization, you can programmatically enable user notifications without showing a permission prompt. This is still required for any visible notification delivery.
Foreground Presentation Options
When your app is in the foreground, iOS silences notifications by default. Configure how notifications are displayed when the app is active:
Configure foreground presentation
Airship.push.defaultPresentationOptions = [.alert, .badge, .sound]UAirship.push.defaultPresentationOptions = (UNNotificationPresentationOptionAlert |
UNNotificationPresentationOptionBadge |
UNNotificationPresentationOptionSound);Handle Notification Events
The Airship SDK provides callbacks for when notifications are received or interacted with. These callbacks are optional—the SDK will handle notifications automatically if you don’t set them.
Set up notification callbacks
// Handle when user taps a notification
Airship.push.onReceivedNotificationResponse = { response in
    // Handle notification response
}

// Handle notification received while app is in foreground
Airship.push.onReceivedForegroundNotification = { userInfo in
    // Handle foreground notification
}

// Handle background content-available notification
Airship.push.onReceivedBackgroundNotification = { userInfo in
    // Handle background notification
    return .noData
}

// Customize presentation options per notification
Airship.push.onExtendPresentationOptions = { options, notification in
    // Return presentation options for this specific notification
    return [.badge, .list, .banner, .sound]
}
// Handle when user taps a notification
UAirship.push.onReceivedNotificationResponse = ^(UNNotificationResponse *response) {
// Handle notification response
};
// Handle notification received while app is in foreground
UAirship.push.onReceivedForegroundNotification = ^(NSDictionary *userInfo) {
// Handle foreground notification
};
// Handle background content-available notification
UAirship.push.onReceivedBackgroundNotification = ^UIBackgroundFetchResult(NSDictionary *userInfo) {
// Handle background notification
return UIBackgroundFetchResultNoData;
};
// Customize presentation options per notification
UAirship.push.onExtendPresentationOptions = ^UNNotificationPresentationOptions(UNNotificationPresentationOptions options, UNNotification *notification) {
// Return presentation options for this specific notification
return UNNotificationPresentationOptionList | UNNotificationPresentationOptionBadge | UNNotificationPresentationOptionSound;
};Silent Notifications
Silent notifications are push messages that don’t display a notification to the user. They’re typically used to wake your app in the background to perform tasks or fetch content.
To send a silent notification, set the content_available property to true in the iOS override object.
Thoroughly test your implementation to confirm that silent notifications don’t generate any visible device notifications.
Silent notifications (content_available) don’t have guaranteed delivery. Factors affecting delivery include battery life, WiFi connectivity, and the number of silent pushes sent recently. These metrics are determined solely by iOS and APNs.
Use silent notifications to supplement your app’s regular behavior rather than for critical functionality. For example, use them to pre-fetch data ahead of time to reduce load times when the user launches the app.
Next Steps
- Notification Service Extension - Add rich media support to push notifications
- Interactive Notifications - Add action buttons to notifications
- Badge Management - Set, reset, or enable auto-badge functionality
- Quiet Time - Suppress notifications during specific hours
- App Clips - Configure push notifications for App Clips